Migrating from qTest to Testiny
This guide shows how to migrate test cases from Tricentis qTest Manager to Testiny. The Testiny importer connects to the qTest API and migrates your test cases including their module structure, steps, custom field values, text formatting, images, attachments, called test cases and linked requirements. Both qTest SaaS (*.qtestnet.com) and qTest on-premises sites are supported.
Migrate via qTest API
You need the address of your qTest site and a qTest bearer token. The importer migrates one qTest project at a time — repeat the steps below for each project.
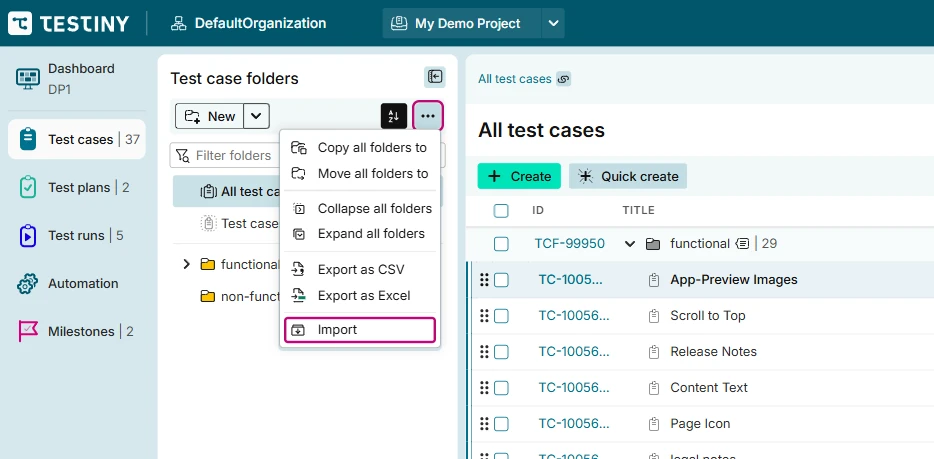
- Go to the test cases in your Testiny project and choose
Importfrom the menu as shown in the screenshot below.
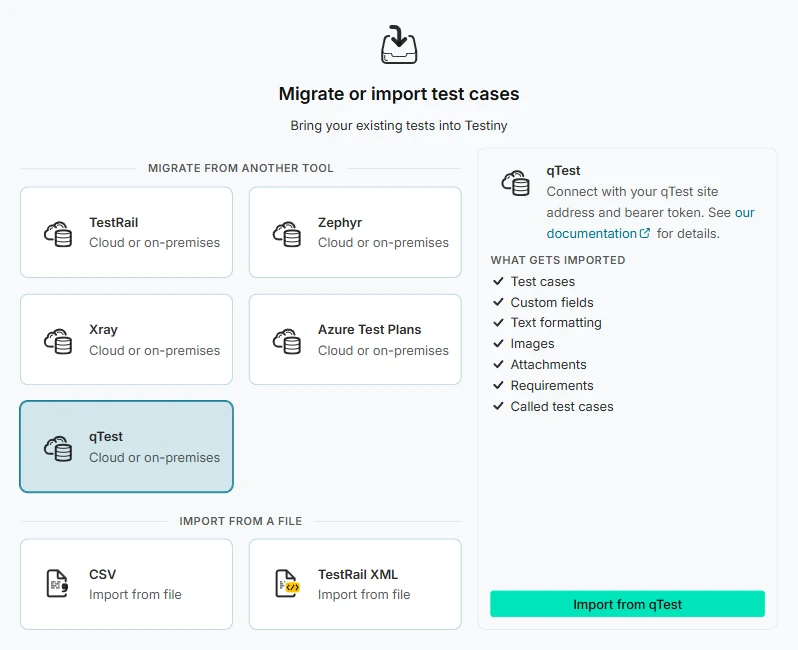
- Select
qTestand clickImport from qTest.
-
Enter your qTest credentials, then click
Connect:- qTest Site Address — the URL of your qTest site, e.g.
https://your-site.qtestnet.com. You can also paste any link copied from qTest — the importer only uses the site address. - qTest Bearer Token — the API token of your qTest user. The importer accepts the token with or without the
Bearerprefix.
- qTest Site Address — the URL of your qTest site, e.g.
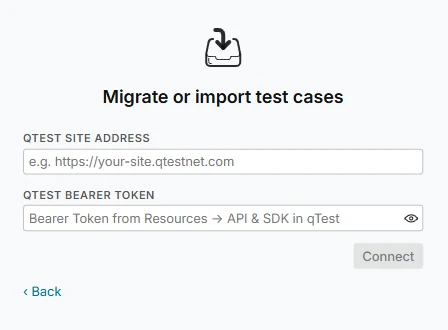
To get the bearer token, log in to qTest Manager, open the Resources page and copy the token from the API & SDK section. See the qTest documentation for details.
The importer only reads the test cases your qTest user has access to.
Please note that a qTest on-premises site must be reachable from the Internet so that Testiny can send API requests and migrate the data.
-
After connecting, you can now import your existing test cases:
- Choose from which qTest project you would like to import the test cases.
- If your qTest requirements come from Jira, you can also configure a Jira integration in Testiny and select it to migrate the linked Jira requirements as well.
- If you just want to try the migration, you can also set a limit to only retrieve a small number of test cases.
Then click
Continue. -
Testiny retrieves the test cases from qTest. Click
Map fields automaticallyto align the fields from your qTest test cases with the fields in Testiny.
You can optionally map custom fields as well — if a custom field from qTest does not already exist in Testiny, you can create it during the mapping. Once the mapping is confirmed, you get a preview of the test cases that will be imported. For further information about general importer settings, refer to the Importer Settings. -
Finally, if there are no errors and you're satisfied with the preview, click
Importto finalize the import and add the test cases to your project.
A summary dialog appears after the import, showing detailed statistics and any error messages. Copy the data to the clipboard (Copy all data to the clipboard) or dismiss the dialog by selecting eitherSave summary and close(this action downloads an HTML report of the import) or justClose.
What gets imported from qTest
The importer reads the latest version of each test case in the selected qTest project and converts it as follows:
- Modules become folders in Testiny, with the same nesting and order as in qTest.
- Name, description, precondition, steps and expected results are imported with their text formatting. Images embedded in the text are uploaded to Testiny.
- Test case fields — the qTest system fields arrive as
qtest_status,qtest_type,qtest_priorityandassigned_to, the qTest test case ID (e.g.TC-12) asqtest_id. Custom fields keep their qTest name. Map them to existing Testiny fields or create new custom fields during the field mapping. - Attachments of test cases and test steps are uploaded to Testiny. Step attachments appear as a link (or an inline image) in the step they belong to. Use the
Import attachmentssetting to importAllattachments,Only ones linked in text, orNone. - Called test cases — a step that calls another test case is replaced by the steps of the called test case, using its approved version (or its latest version if it was never approved). The first of these steps names the called test case, and the expected result of the calling step is added to the last one. If a called test case is deleted or not accessible, the importer shows a warning and keeps a placeholder step.
- Parameters in step texts (
[~name]in qTest) are kept as{{name}}placeholders. - Requirements linked to a test case are listed in the
qtest_requirementsfield (ID and name). If you selected a Jira integration in step 4, requirements that qTest synchronizes from Jira are additionally linked to their Jira issues in Testiny.
Test runs, test cycles and test results from qTest Test Execution are not migrated — the importer migrates the test cases from qTest Test Design.
Avoid hitting the API rate limit
qTest SaaS limits the number of API requests per site. The importer waits and retries automatically when qTest rejects requests, so you usually don't need to change anything. If other tools use the qTest API at the same time, set the API rate limit in the importer's advanced settings to Low or Medium to send fewer requests. The default is Off.
Migrate via the Testiny CLI
You can also migrate qTest test cases with the Testiny CLI, e.g. to script the migration of many projects. Pass the bearer token in the QTEST_API_KEY environment variable and run the testcase command with the qTest options:
export TESTINY_API_KEY=<your Testiny API key>
export QTEST_API_KEY=<your qTest bearer token>
testiny-importer testcase --project <Testiny project key> --qtest-api https://your-site.qtestnet.com --qtest-project "<qTest project name or ID>"
| Option | Description |
|---|---|
--qtest-api <site url> | Imports from this qTest site |
--qtest-project <name or id> | Imports from this qTest project; the CLI asks for the project if you omit it |
--qtest-tc-limit <count> | Limits the number of test cases fetched |
--qtest-rate-limit <rpm> | Limits the number of requests per minute to the qTest API (default: no limit) |
--work-items | Links the Jira requirements; use --integration to choose the Jira integration |
Run testiny-importer testcase --help for all options, e.g. how attachments and duplicates are handled.
Next steps
- Organize your test cases in folders.
- Set up the Jira integration to link Jira requirements to your test cases.
- Create a test run for your migrated test cases.