Jira Cloud
Use Testiny as your Jira test management tool and connect test cases and results to Jira Issues. Testiny fully integrates into Jira Cloud — you can create, link and look up issues, requirements or defects from Testiny. You are also able to view linked testing activities directly from Jira — a full two-way integration.
Testiny further makes complex issue-type configuration (with all its custom fields etc.) unnecessary. Testiny reads your issue-configurations and performs the whole configuration in the background. Just link Testiny with Jira — and you’re done!
See how to set up your Jira integration:
Configuration
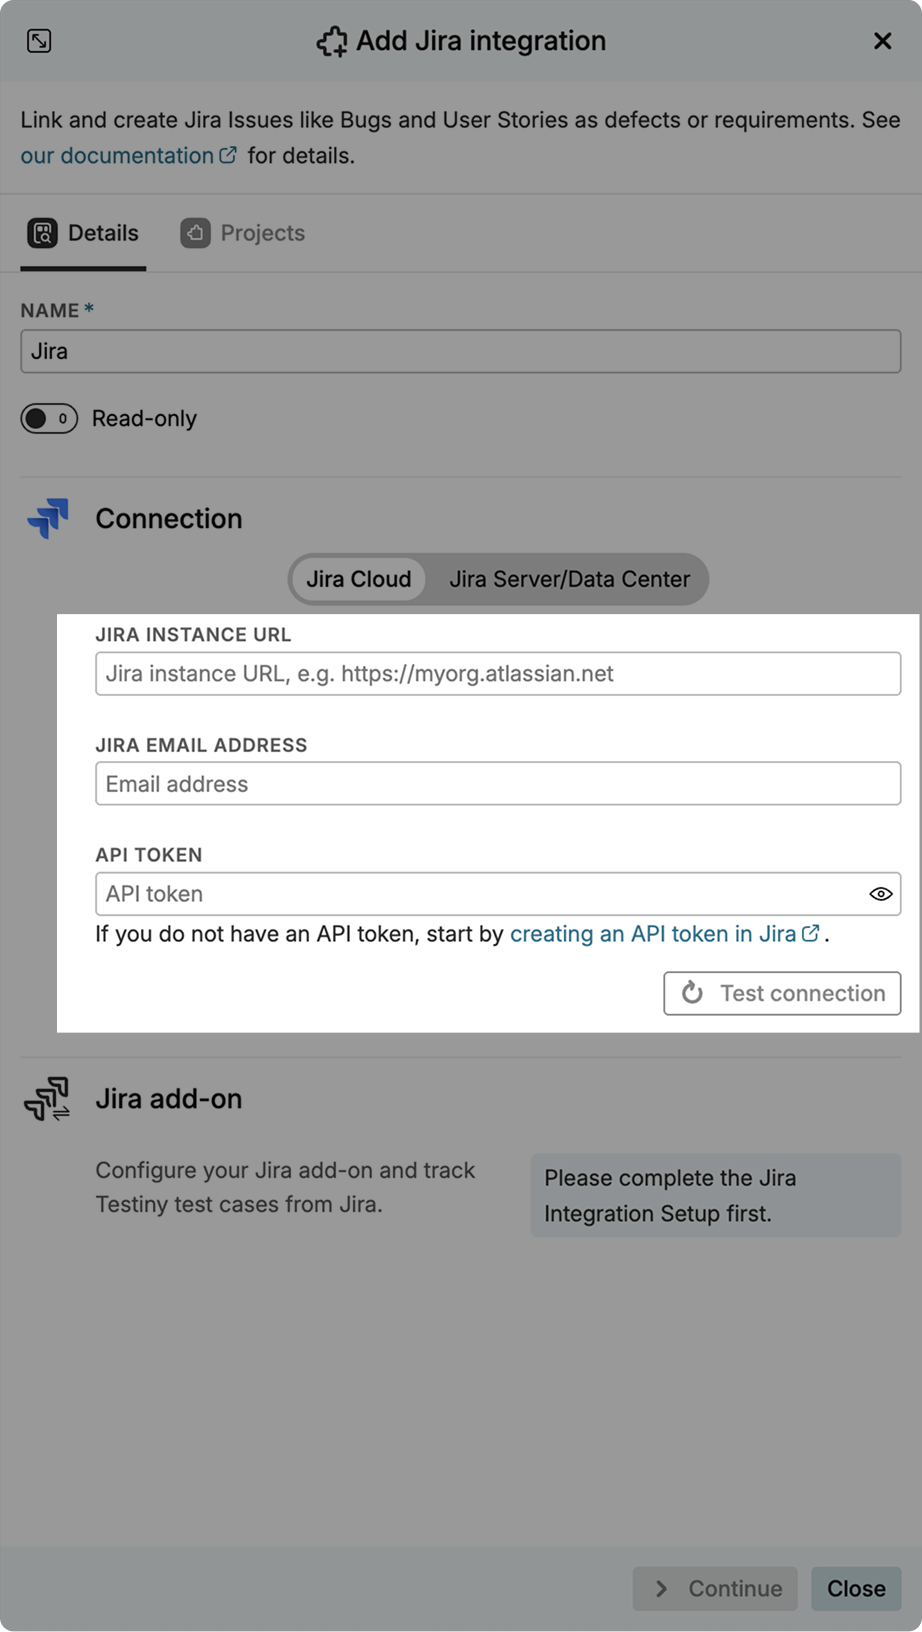
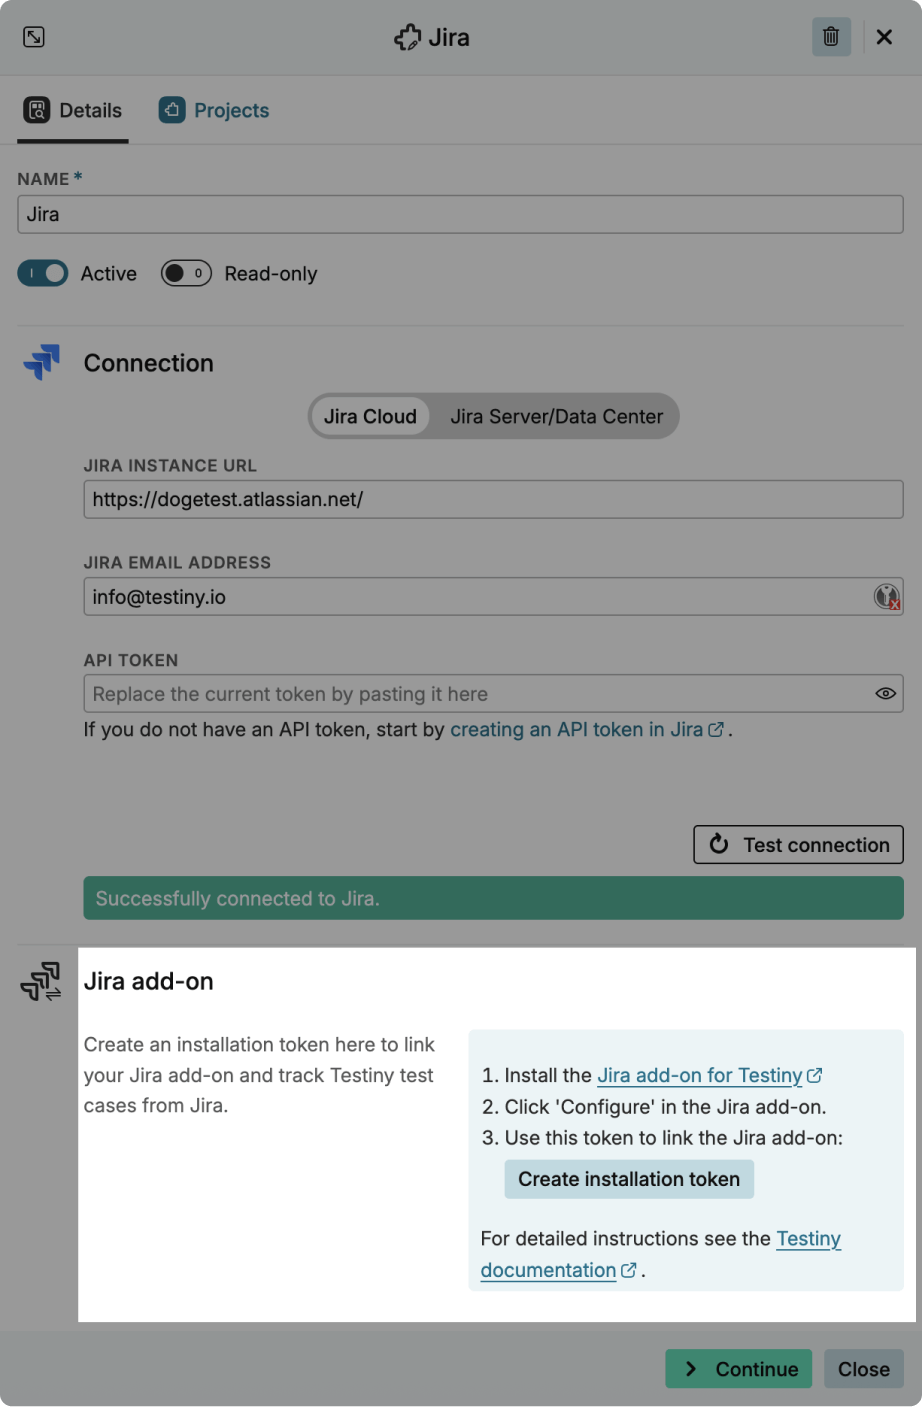
To configure a new integration, you need to have admin rights in Testiny. Go to Settings > Integrations and click on '![]() Add integration' for Jira.
A side panel opens where you need to define the following options for the connection:
Add integration' for Jira.
A side panel opens where you need to define the following options for the connection:
-
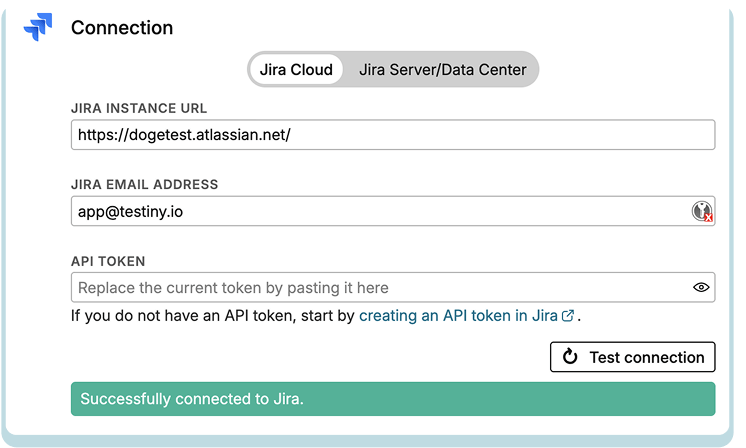
Jira Instance URL
Enter the Jira Instance URL — it usually has the format:https://your_organization.atlassian.net -
Jira Email Address
Testiny connects with Jira using one of the user accounts available in your Jira instance. Please enter the email of the user that you’d like to use for the Testiny connection. -
Jira API token
To increase security, Testiny uses an API token instead of a password to interact with the Jira API.
Please create an API token directly in Jira. Creating an API token is described in detail on this page. Then copy the API token into this input field.You can use granular tokens with specific permissions, but make sure that the token you use has at least the following permissions in Jira:
For linking and looking up issues:
read:project:jira(Scope type Granular)read:jira-work(Scope type Classic)read:jira-user(Scope type Classic)read:board-scope:jira-software(for Agile/SCRUM projects, scope type Granular)read:sprint:jira-software(for Agile/SCRUM projects, scope type Granular)
And for creating issues:
write:jira-work(Scope type Classic)
When the above fields are filled in, click the button "Test connection" to check if the credentials are valid and a connection to Jira can be established.
When you’ve successfully connected Testiny with Jira, you can now also install the Jira add-on for a full two-way integration or skip this step for now and configure which projects you want to connect. To configure the mapping of the projects, click "Continue" or directly go to the "Projects" tab. Here, you can define the scope of the integration for:
-
Testiny Projects
-
All projects
By default, the integration is configured for all existing and future projects of your Testiny organization.
You can also choose whether to use this integration for defects only, requirements only, or both.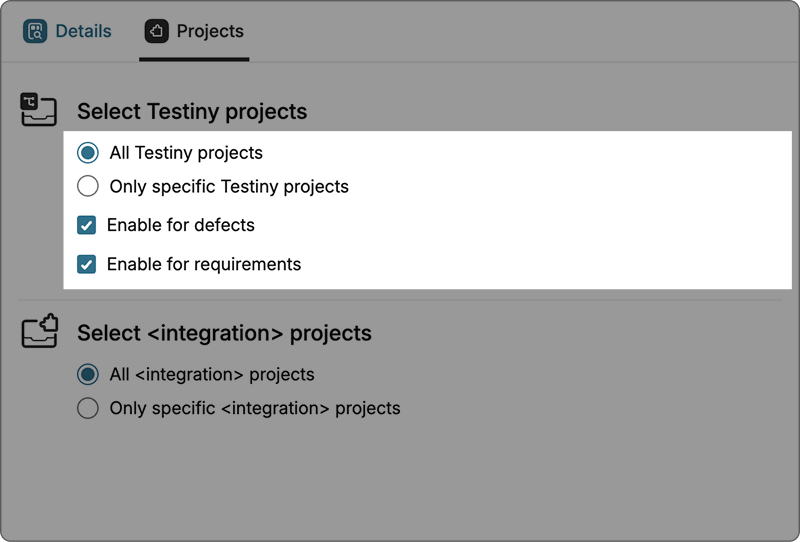
-
Only specific projects If you want to configure an integration for specific Testiny projects only, select this option. Now you can select for which projects you want to enable this integration.
You can also choose whether to use this integration for defects only, requirements only, or both.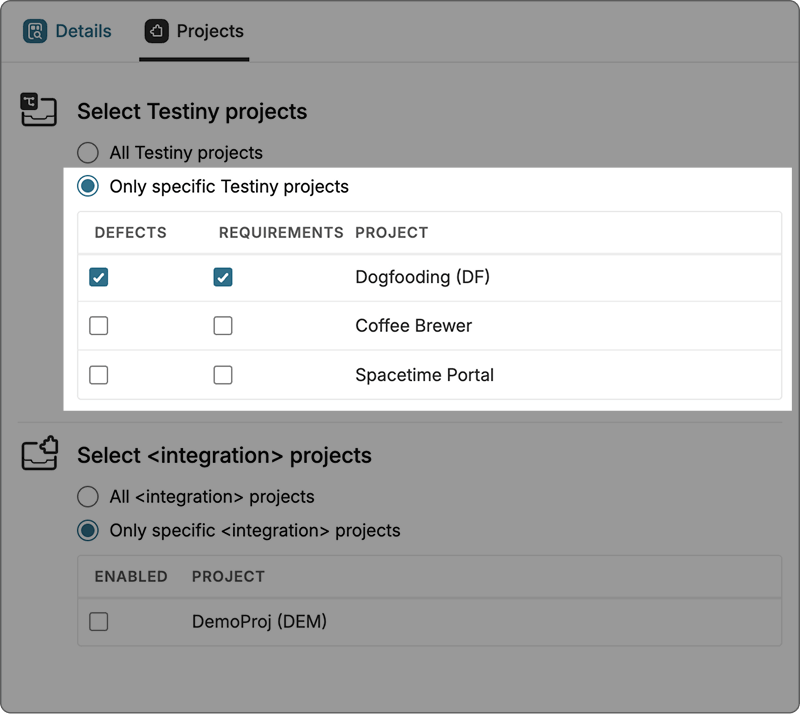
-
-
Jira Projects
-
All projects
By default, the integration is configured for all projects.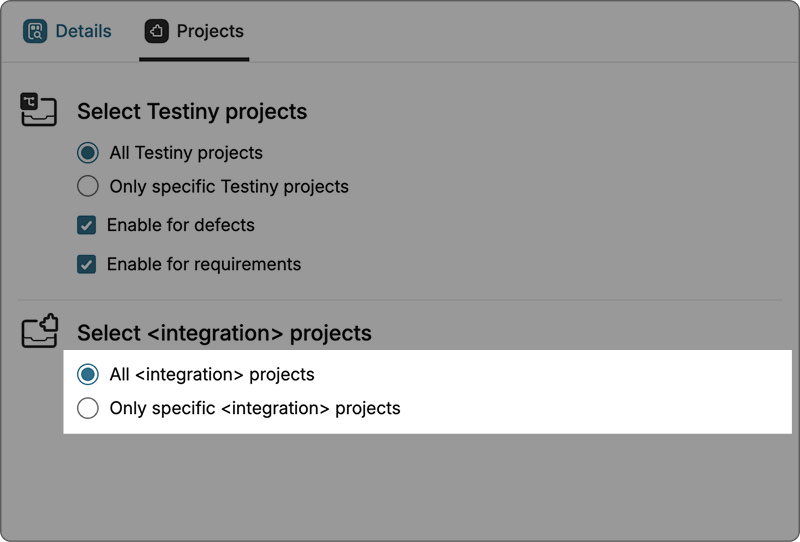
-
Only specific projects
If you want to configure an integration for specific projects only, select this option. Now you can select which projects you want to enable this integration for.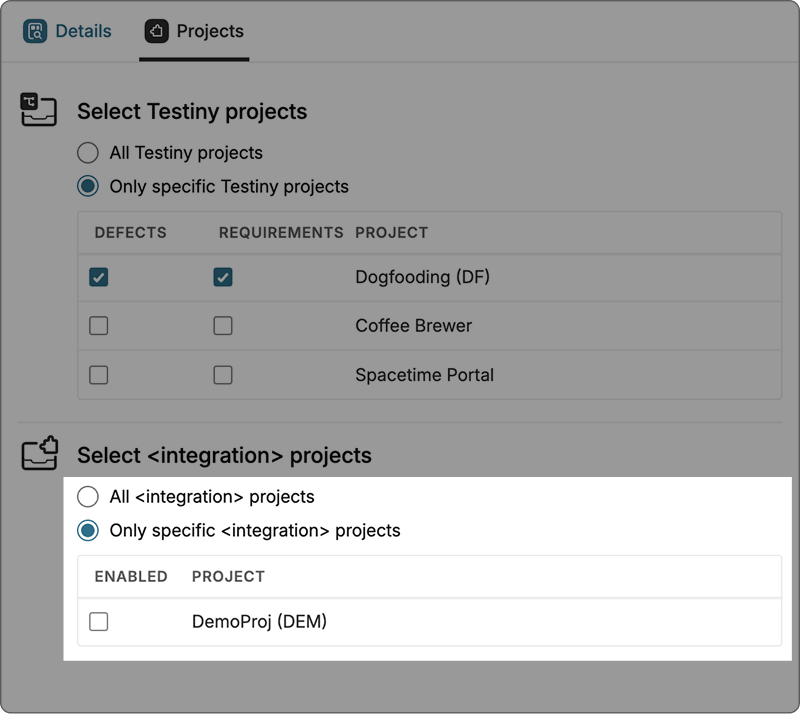
-
Jira add-on
For a full bi-directional integration, install the Jira add-on on the official Atlassian Marketplace enabling backwards linking from Jira to Testiny. You’re able to view testing activities done in Testiny directly within Jira — e.g. see which requirements in Jira are covered by which test cases or which bugs are linked to a certain test-run. By activating this integration, you gain full traceability from Jira as well as from Testiny.
You need admin rights in Jira to install the Jira add-on from the Atlassian marketplace.
-
Install the app from the official Atlassian marketplace. You can also navigate in Jira to Apps > Find new apps and search for "Testiny".
noteTo configure the Jira Cloud add-on with Testiny Server, please refer to the Testiny Server Documentation.
-
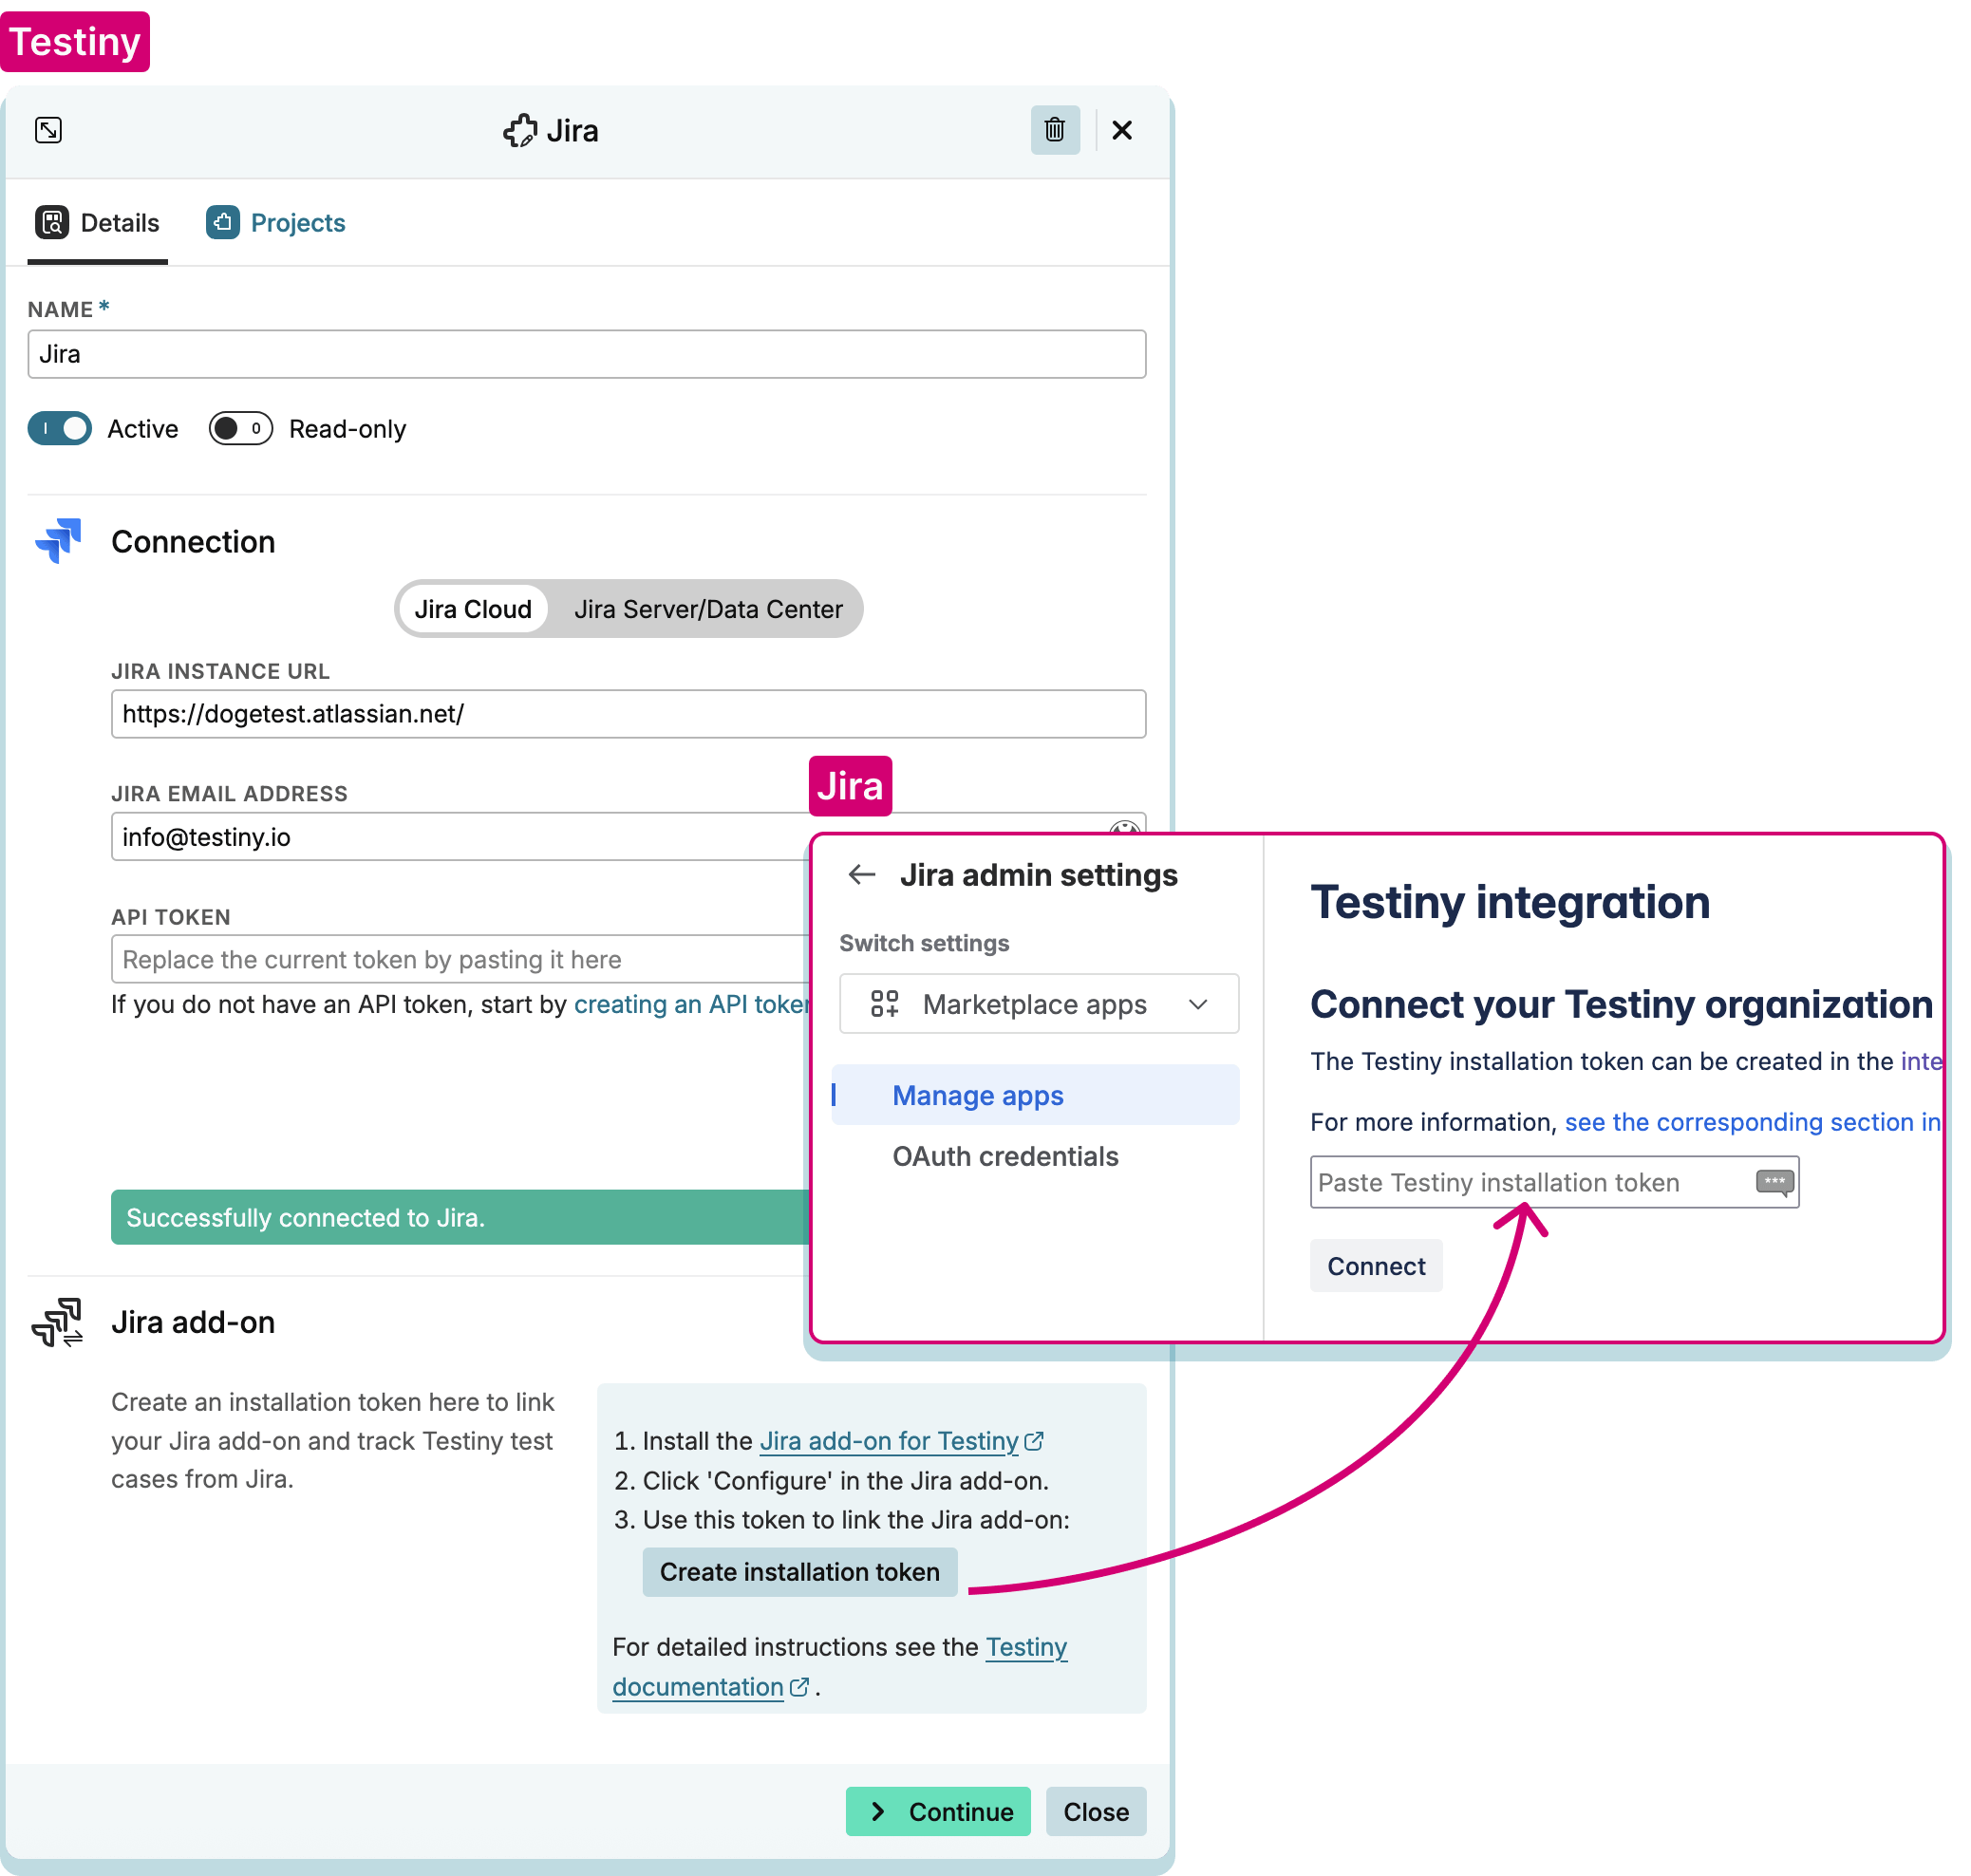
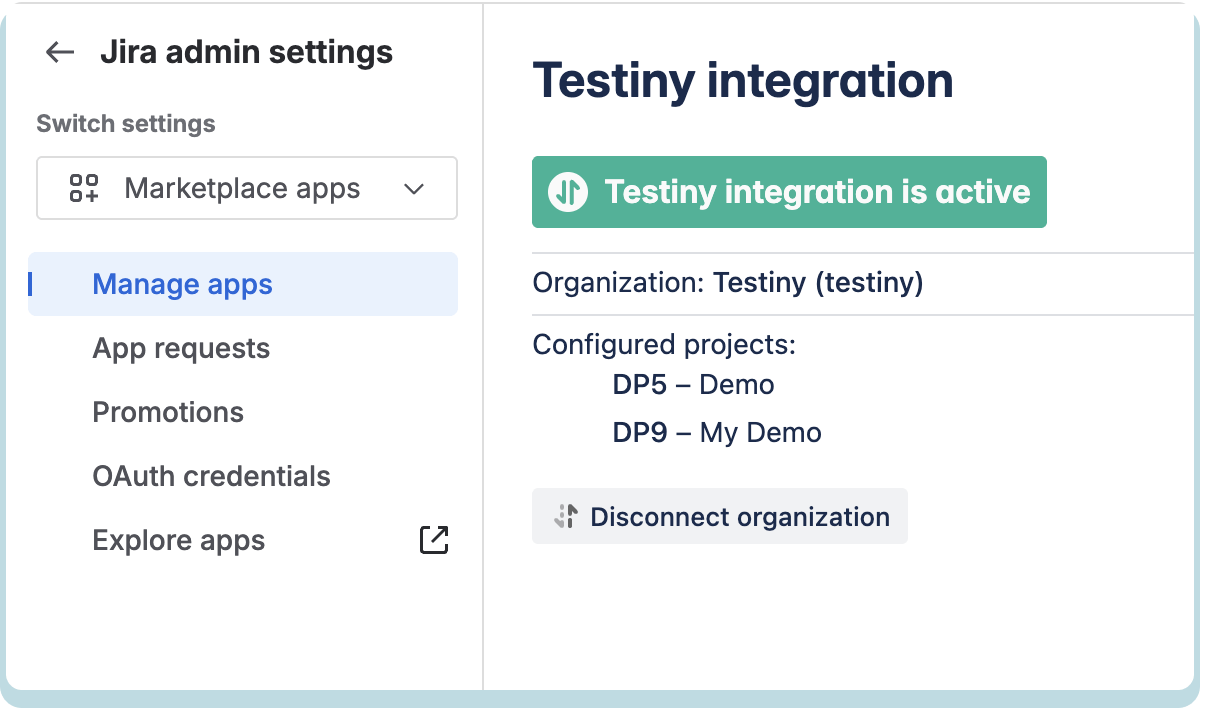
After installing the app, select "Configure" in the Jira add-on.
-
Create an installation token for the Jira-App in Testiny. Go to the "Details" tab of your Jira Cloud integration and click the button
Create installation tokenas shown in the screenshot below:
- Copy the installation token, paste it inside the add-on in Jira configuration window into the field showing "Paste Testiny installation token" and press
Connect.
Ensure that the Jira user connecting Testiny to Jira has global permissions to browse users and groups.
You’ve successfully connected your Jira instance with Testiny. From now on, you’re able to view testing activities also within Jira issues.
Using the Jira Integration
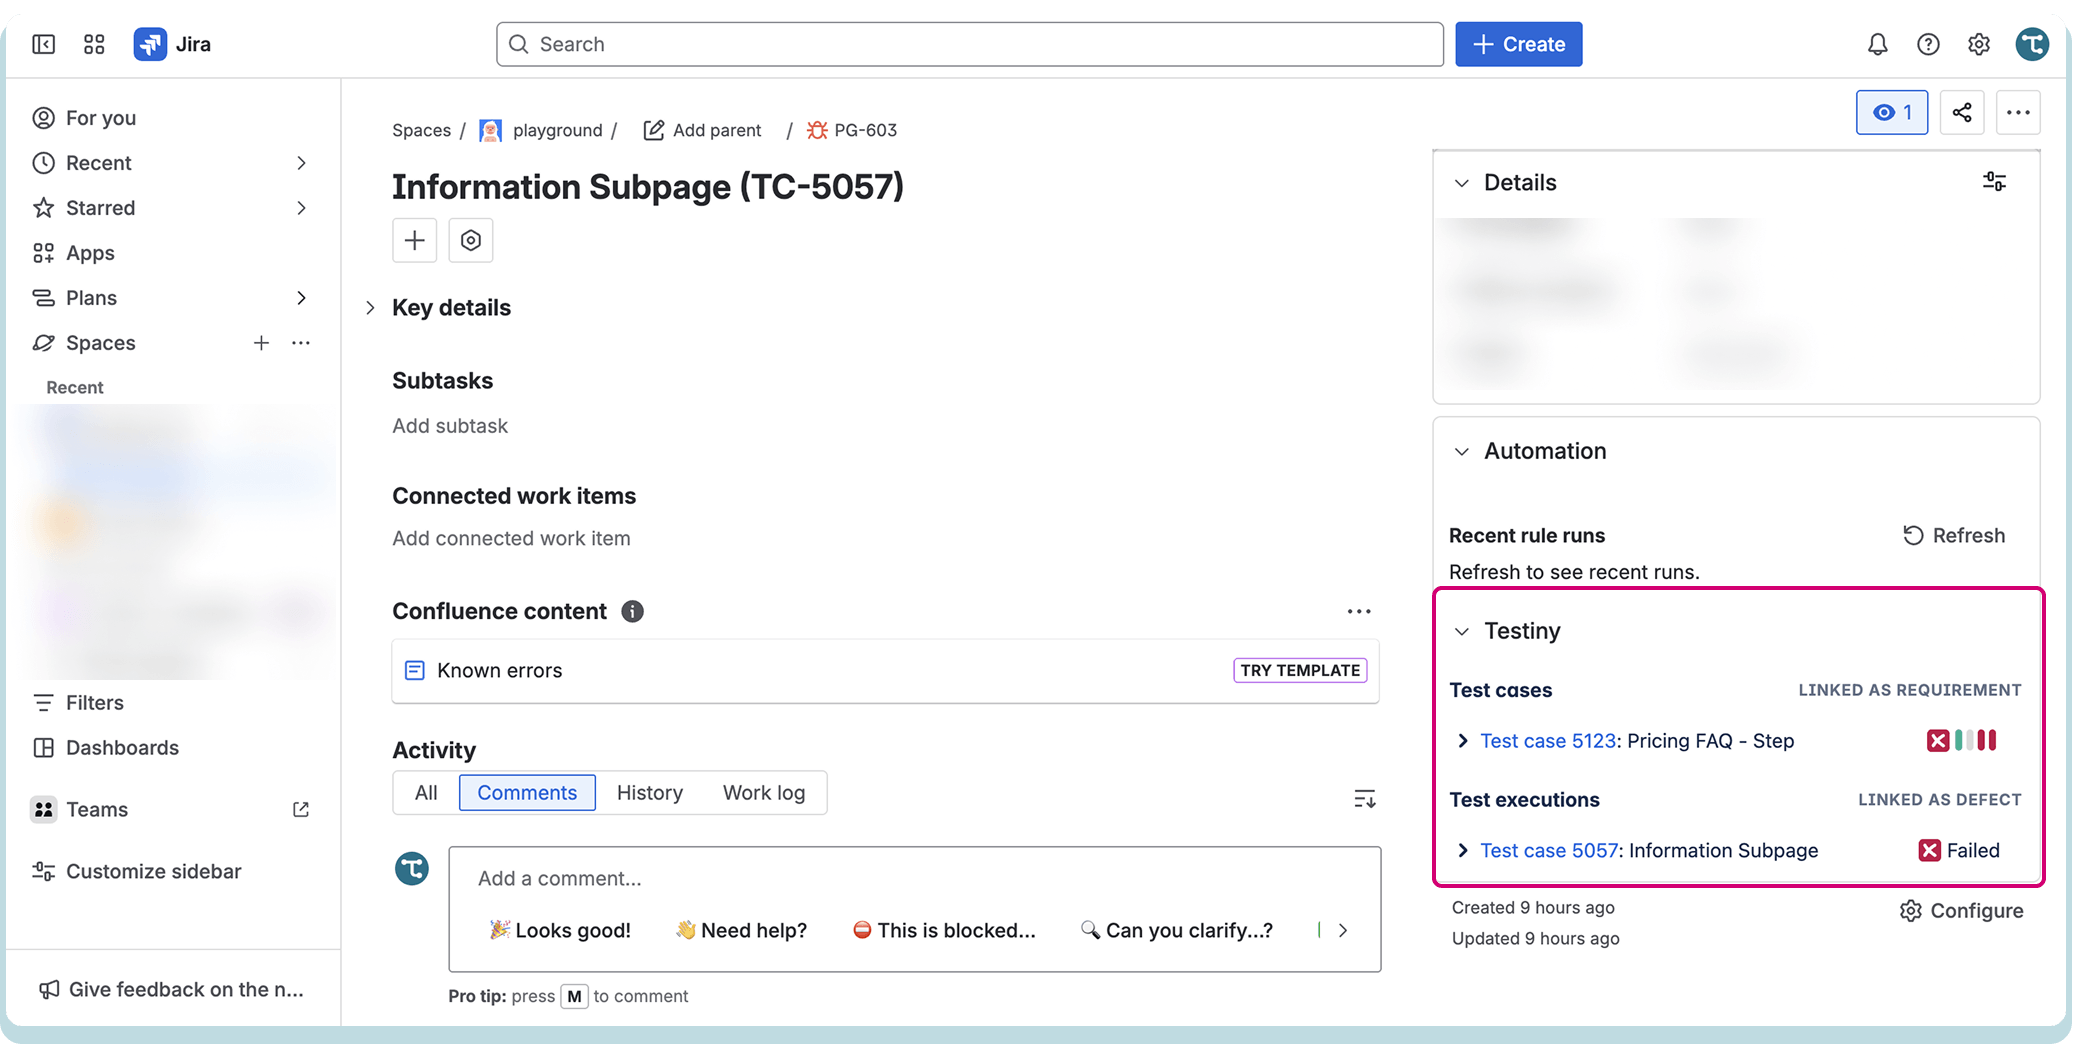
Viewing Testiny Activities inside Jira
From any Jira issue you can see all Testiny entities that link the current issue (including test cases, test run results, etc.).
Using these links you can directly access the relating Testiny entry to lookup further details.
Creating or linking Jira Issues
Within Testiny, you can link test runs and executions to Jira issues. If you find a bug during your tests, you can create an issue in Jira directly from Testiny. It is also possible to link requirements in Jira to test cases or create requirements in Jira directly from Testiny to build up your test coverage matrix.
Jira issues can be created (or linked to) in Testiny from the following entities:
-
Test cases
It is possible to link requirements to test cases (a requirement can be any type of Jira issue) or to create a requirement that is automatically linked to the test case.
 -
Test runs and test executions
Testiny provides the ability to create defects (or link an existing issue) directly from a test run or a test execution.
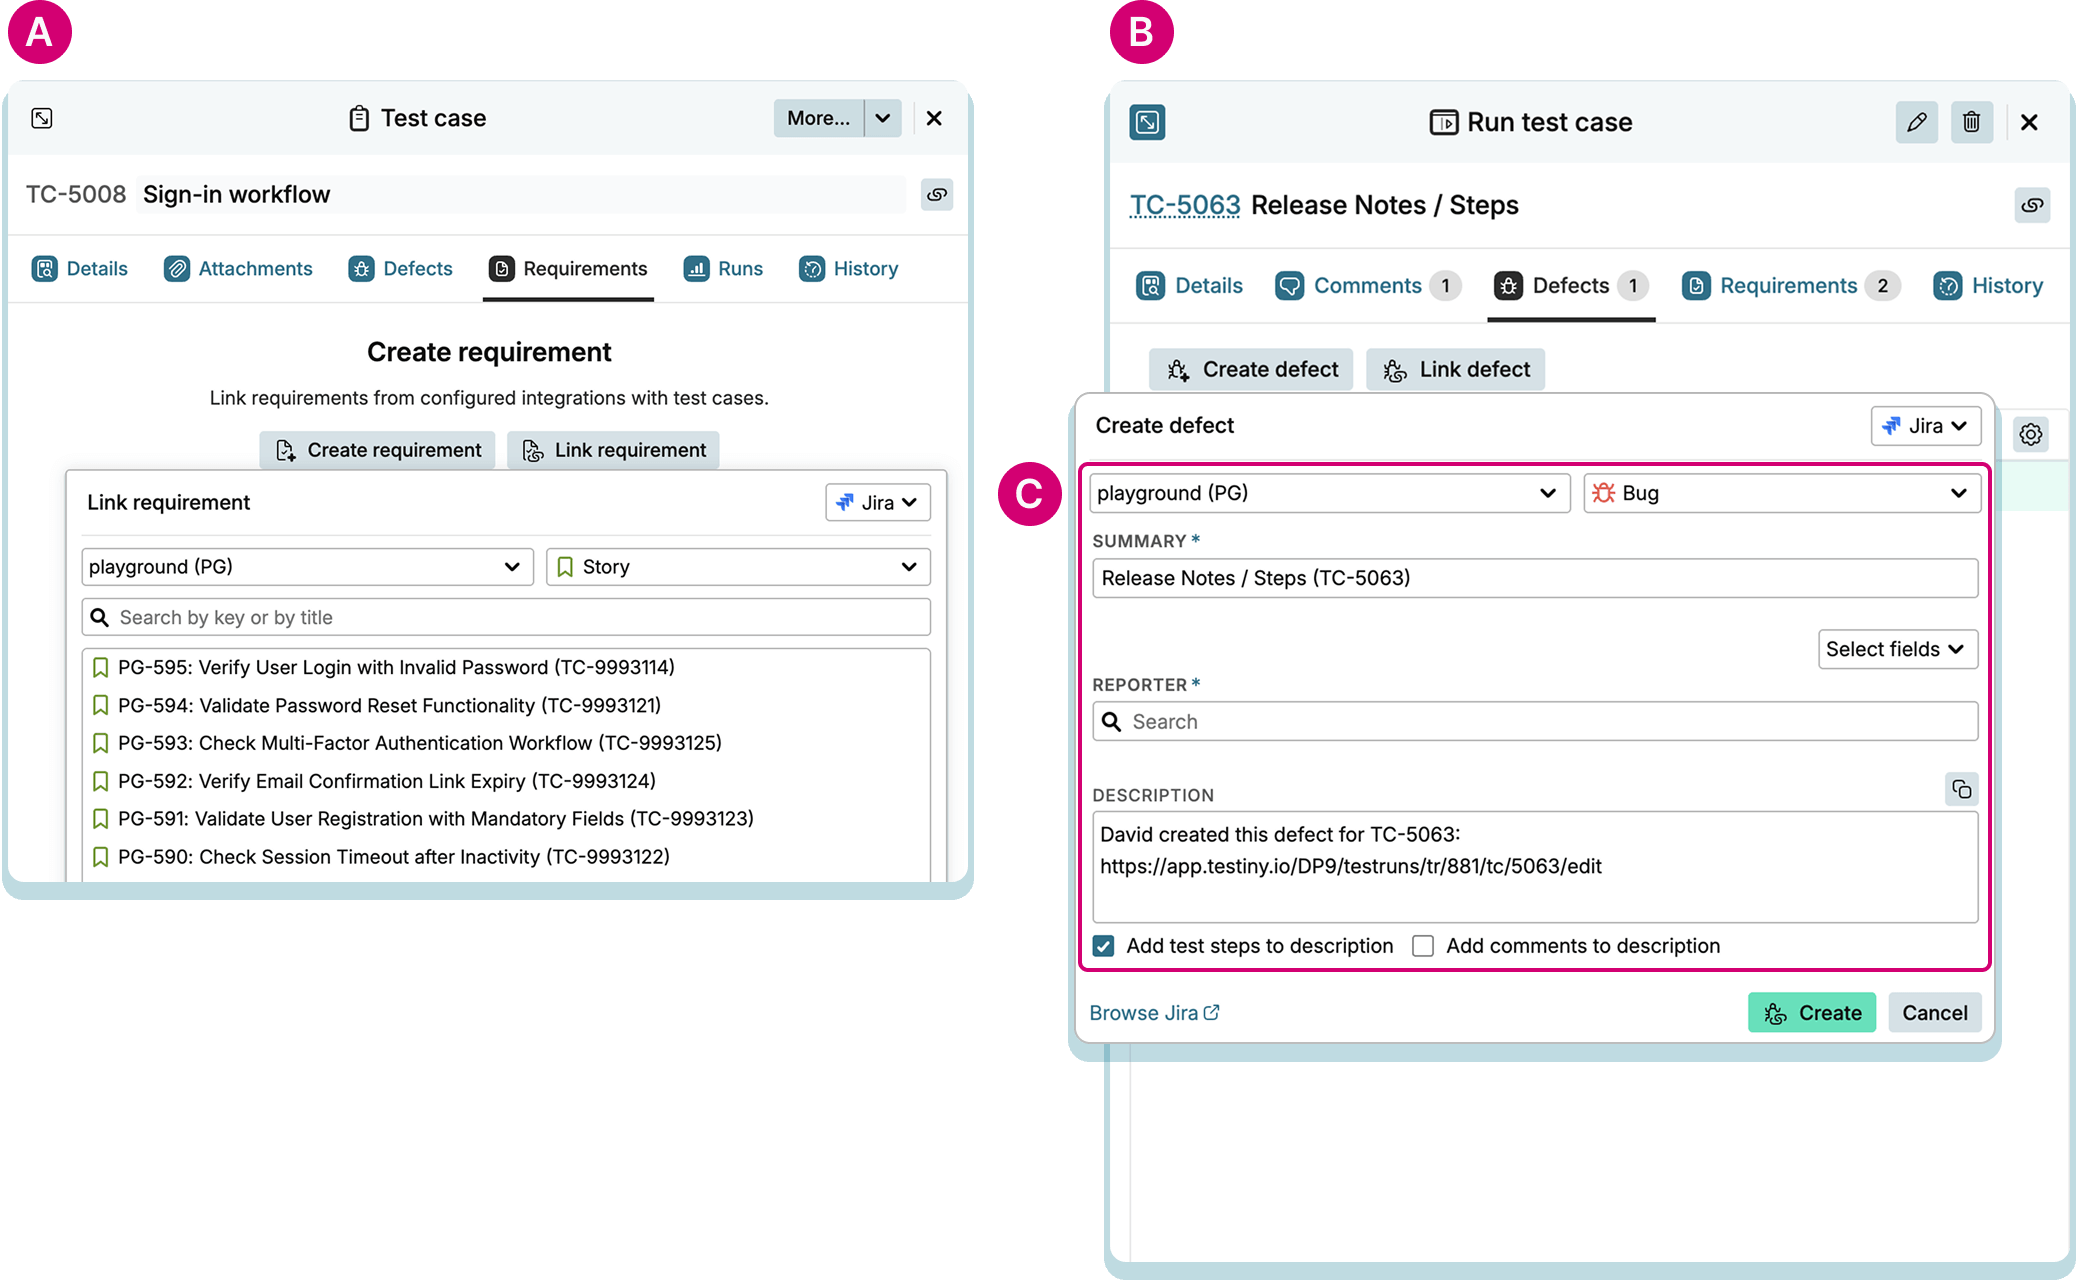
Creating issues
When creating a requirement or a defect from Testiny, a create dialog will open where you can set the fields for the Jira issue. In this dialog you can select the Jira project, the issue type and set any other fields that may be required. Click Create to confirm. If pop-ups are allowed, the newly created issue will open in a new browser tab. Otherwise, a small window with the details and a link to the issue will appear.
Depending on your configuration and the integration’s requirements, you can select
- a project via dropdown

- issue type via dropdown
- any relevant custom fields via multi-select (optional)
You can also choose to Add test steps to description, and if there are comments on the test case, an option to Add comments to description will appear.
Linking existing issues
When linking a requirement or a defect, a search dialog ![]() will open where you can search all existing issues directly in Testiny (no need to switch to Jira) and select the issue you want to link.
will open where you can search all existing issues directly in Testiny (no need to switch to Jira) and select the issue you want to link.
The Jira integration lets you include additional fields (for example a Reporter or Assignee) in the Create dialog. Use the Select fields dropdown to add any fields available through the external integration. Ensure that the necessary permissions are configured in Jira.
Accessing Jira Issues in Testiny
Connecting Jira with Testiny allows you to directly look up and access Jira issues.
Testiny shows essential information such as the issue status or the issue type inline.
Essential information like the issue title or issue status is synchronized into Testiny.
This means that even if the integration is unavailable, Testiny remains unaffected and will still display the synchronized data.
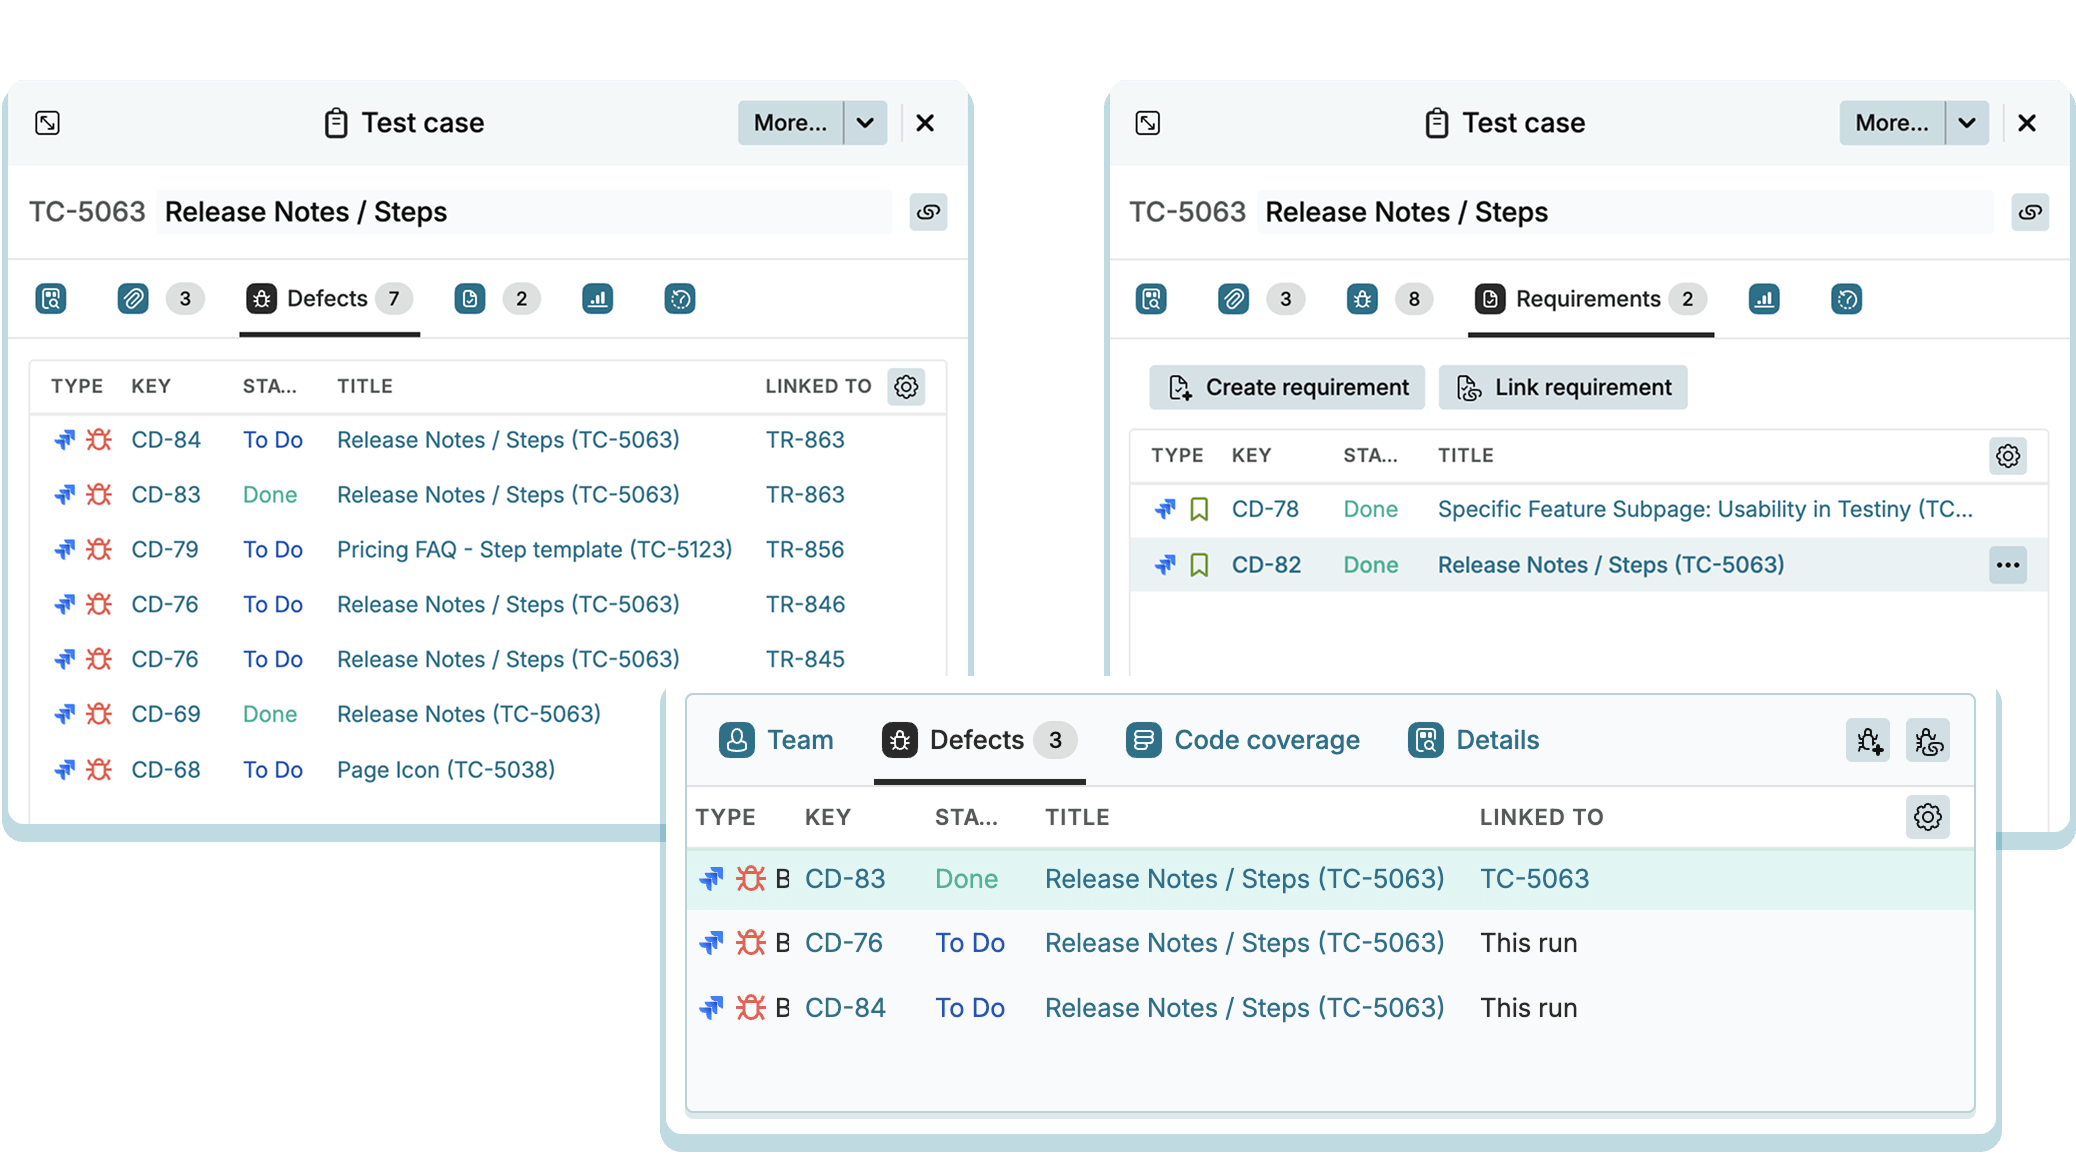
For further details on linked issues, the issue can be opened directly from Testiny by clicking the issue ID. Testiny supports issue links in various places:
- Test cases
- Test runs
- Test results
- Milestones
Technical details: How does the integration work?
If you’re curious how the integration works, the next section might be interesting for you :-)
-
Testiny Jira add-on:
The Jira add-on (an Atlassian app, installed from the Atlassian Marketplace) provides the functionality to authenticate with Jira and link a Testiny organization with a specific Jira instance. Inside Jira, details from Testiny (like status of a test run, a test result linked to a defect) are directly rendered by the Atlassian app (inside an iframe). Only the Jira instance, which was configured with the Jira authentication-token is allowed to access the Jira interface for the respective organization. -
Looking up issues: Looking up issues in Testiny does not require the Jira add-on. Testiny directly interacts with the Jira REST API and retrieves live data. Data is retrieved in the context of the user used to connect Testiny with Jira.
-
Creating issues: Testiny automatically creates a new issue (using the default type from the Jira integration for requirements or defects) directly in Jira using the Jira REST API. If the browser settings allow opening a new window/pop-up, the issue is automatically opened in a new tab and can be adjusted immediately. The issue is created with the user context that is used to link Testiny with Jira.
-
Linking existing issues: Searching for issues works directly using the Jira REST API. Users can directly link with existing issues.
If linked issues appear in Testiny but not in Jira, make sure your Testiny project is connected to the correct Jira instance.
Jira Server/Data Center
Testiny also supports an integration with Jira Server or Jira Data-Center. Please have a look at the Jira Server/Data-Center documentation.