Migrating from TestRail to Testiny
This guide shows how to migrate test cases from TestRail to Testiny. We recommend using our importer that uses the TestRail API where you can migrate:
- existing users
- test cases including attachments, custom field values, text formatting and linked Jira requirements
Alternatively, you can also export a TestRail XML file and import it, but this will not import attachments.
Migrate via TestRail API
Testiny supports the migration via TestRail API so that you can migrate your test cases including images and attachments, as well as custom field values, text formatting and linked Jira requirements. Follow these steps:
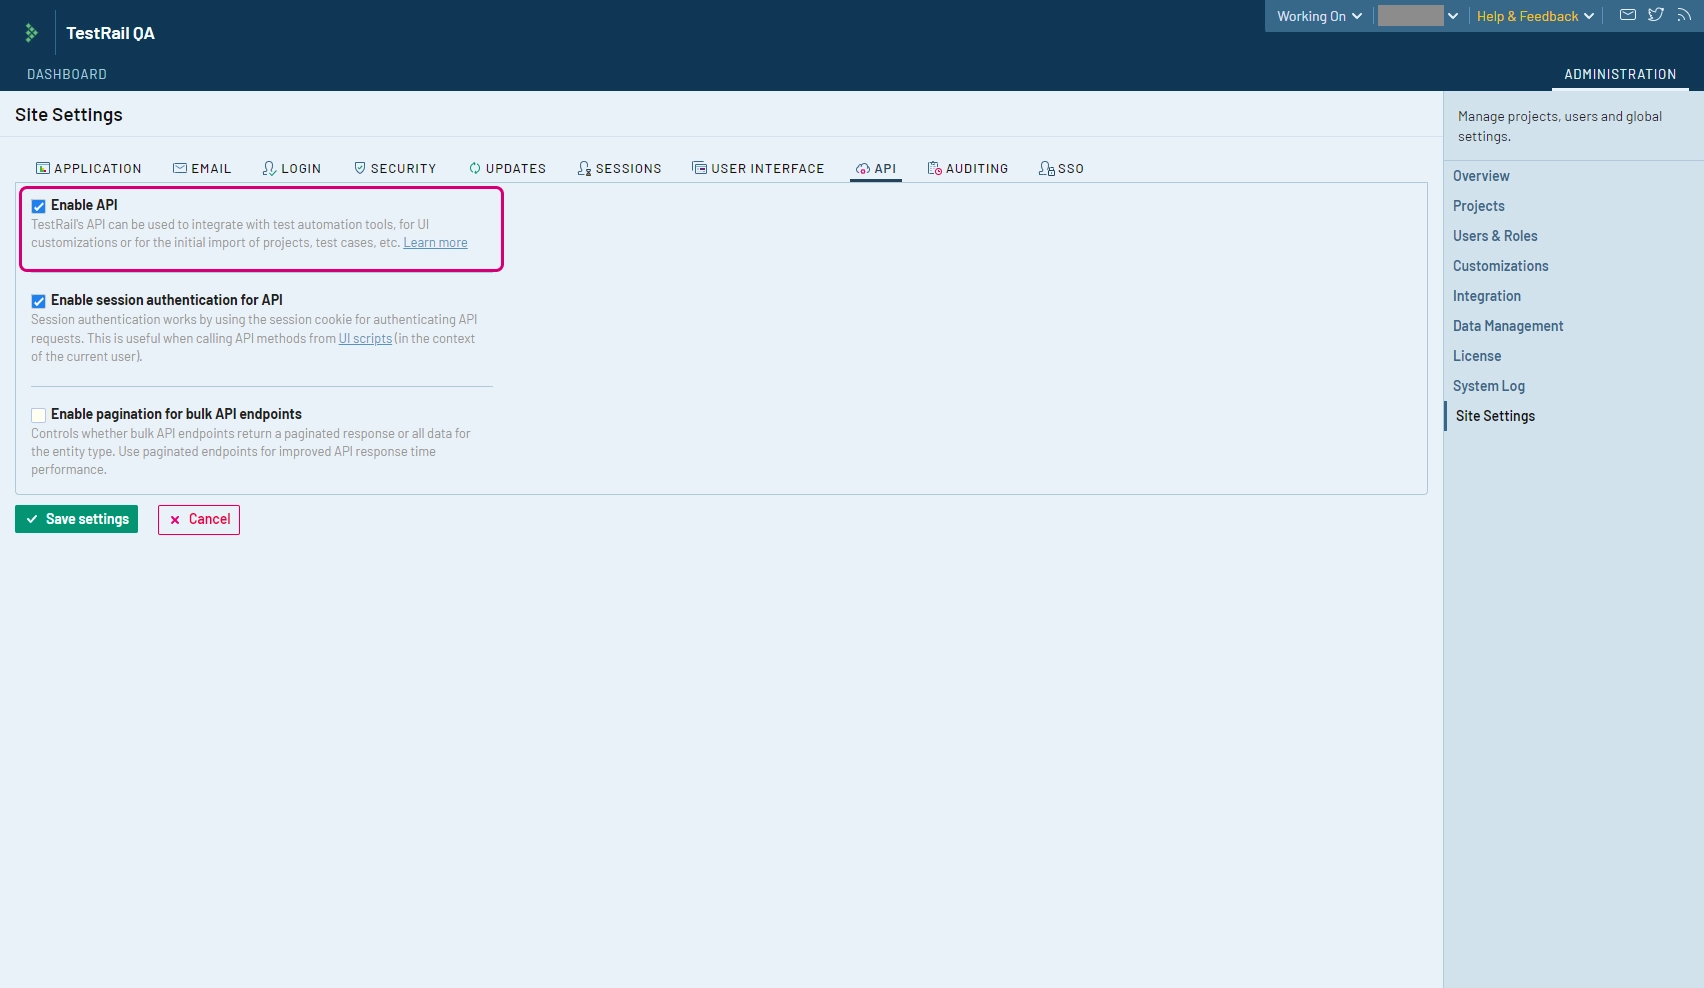
- In TestRail, make sure that the API is enabled (in
Administration > Site Settings > API), as shown in the screenshot below. If the API is not enabled yet, check the optionEnable APIand then clickSave settings.
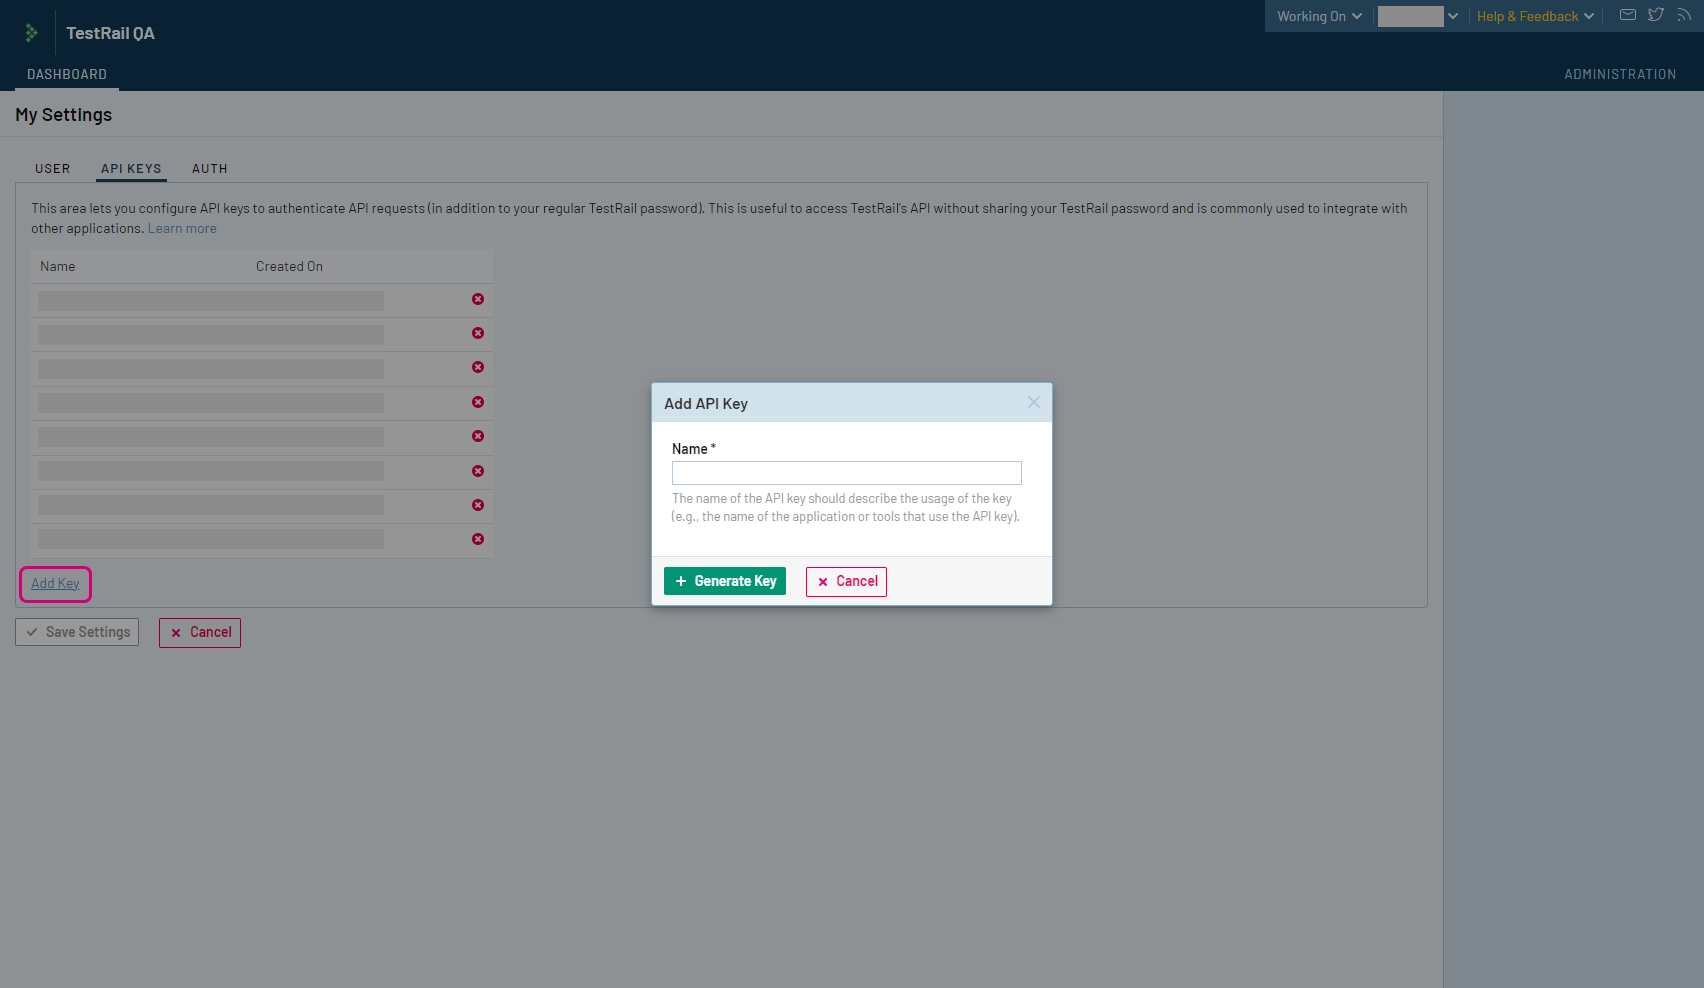
- If you have not generated a TestRail API key yet, do so (in
My Settings > API Keys) by clickingAdd Keyas shown in the screenshot below. - Type in a name for your API Key and click
Generate Keyand save the API key for later. - Finally, don't forget to click
Save Settingto save the generated API key.
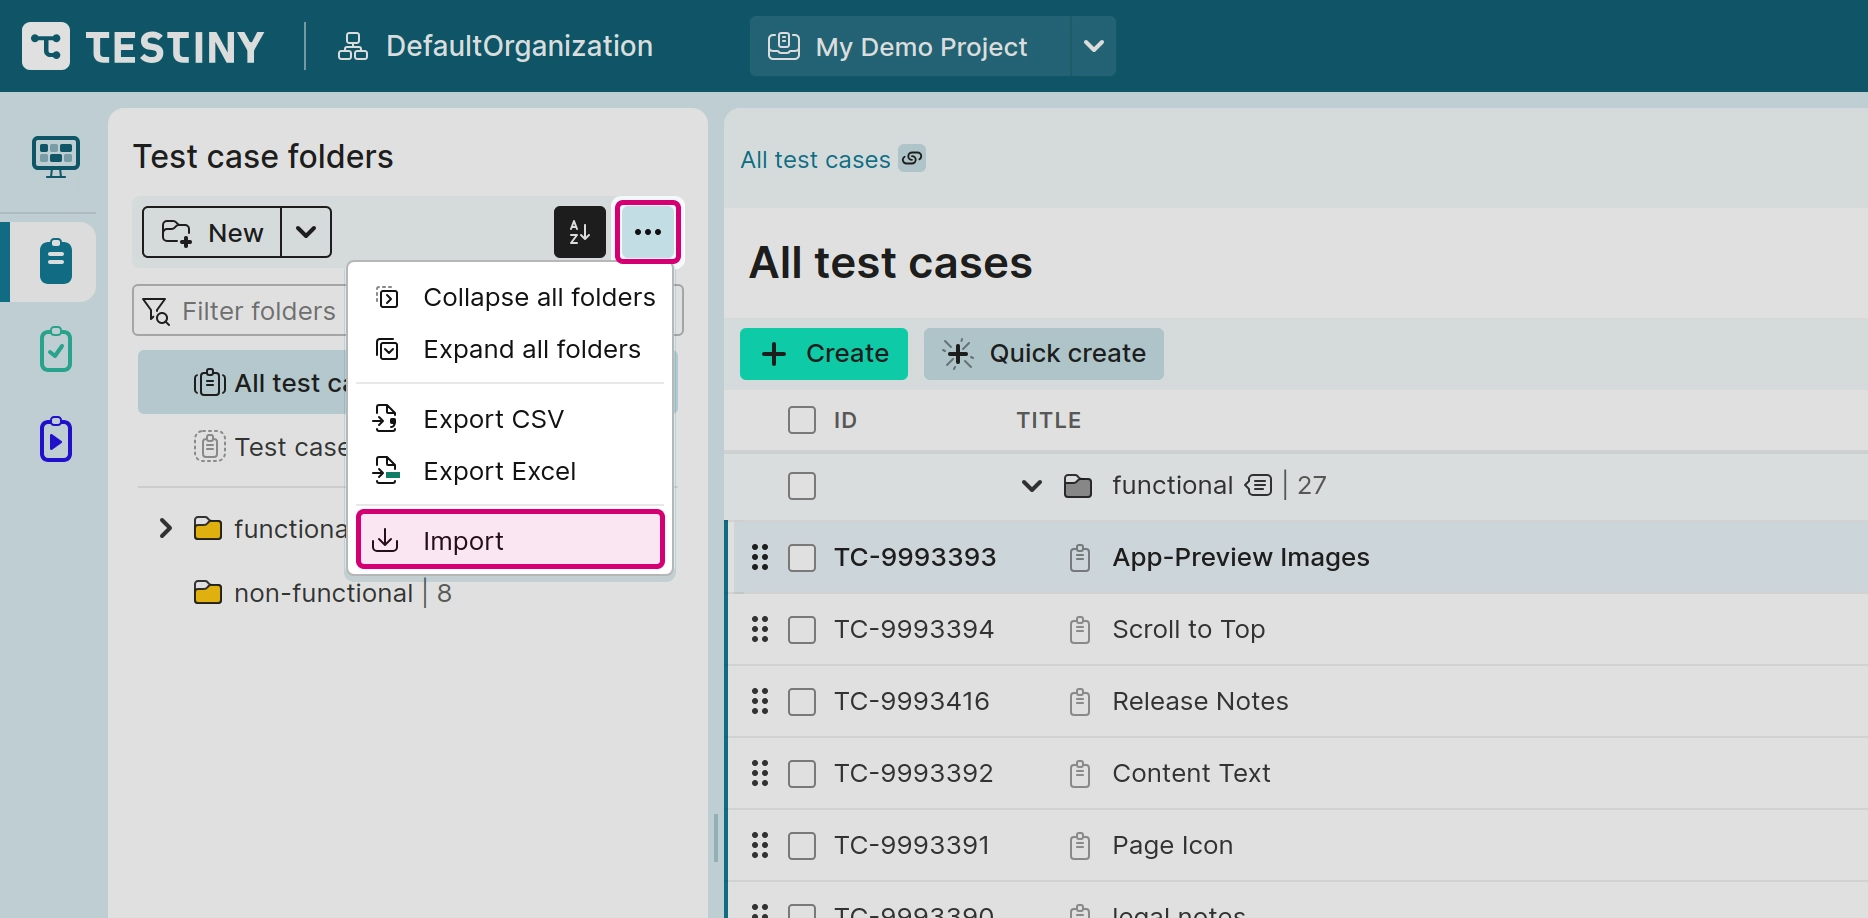
- Go to your Testiny project and choose 'Import' from the menu as shown in the screenshot below.
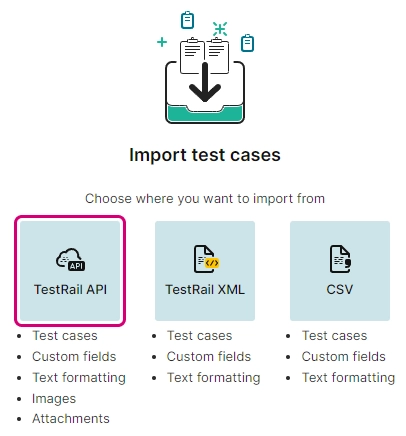
- Choose the option
TestRail API.
 |
|---|
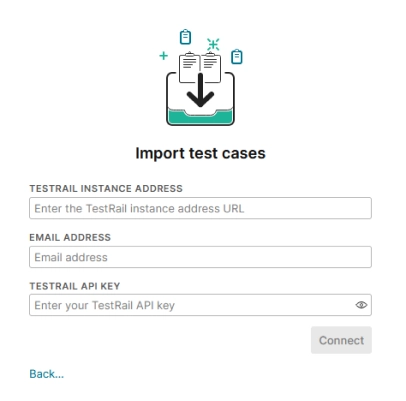
- Enter your TestRail API credentials: provide the URL to your TestRail instance, the email address of your TestRail user and the API Key.
Then clickConnect.
 |
|---|
Please note, that the TestRail instance must be publicly reachable so that Testiny can send API requests and migrate the data.
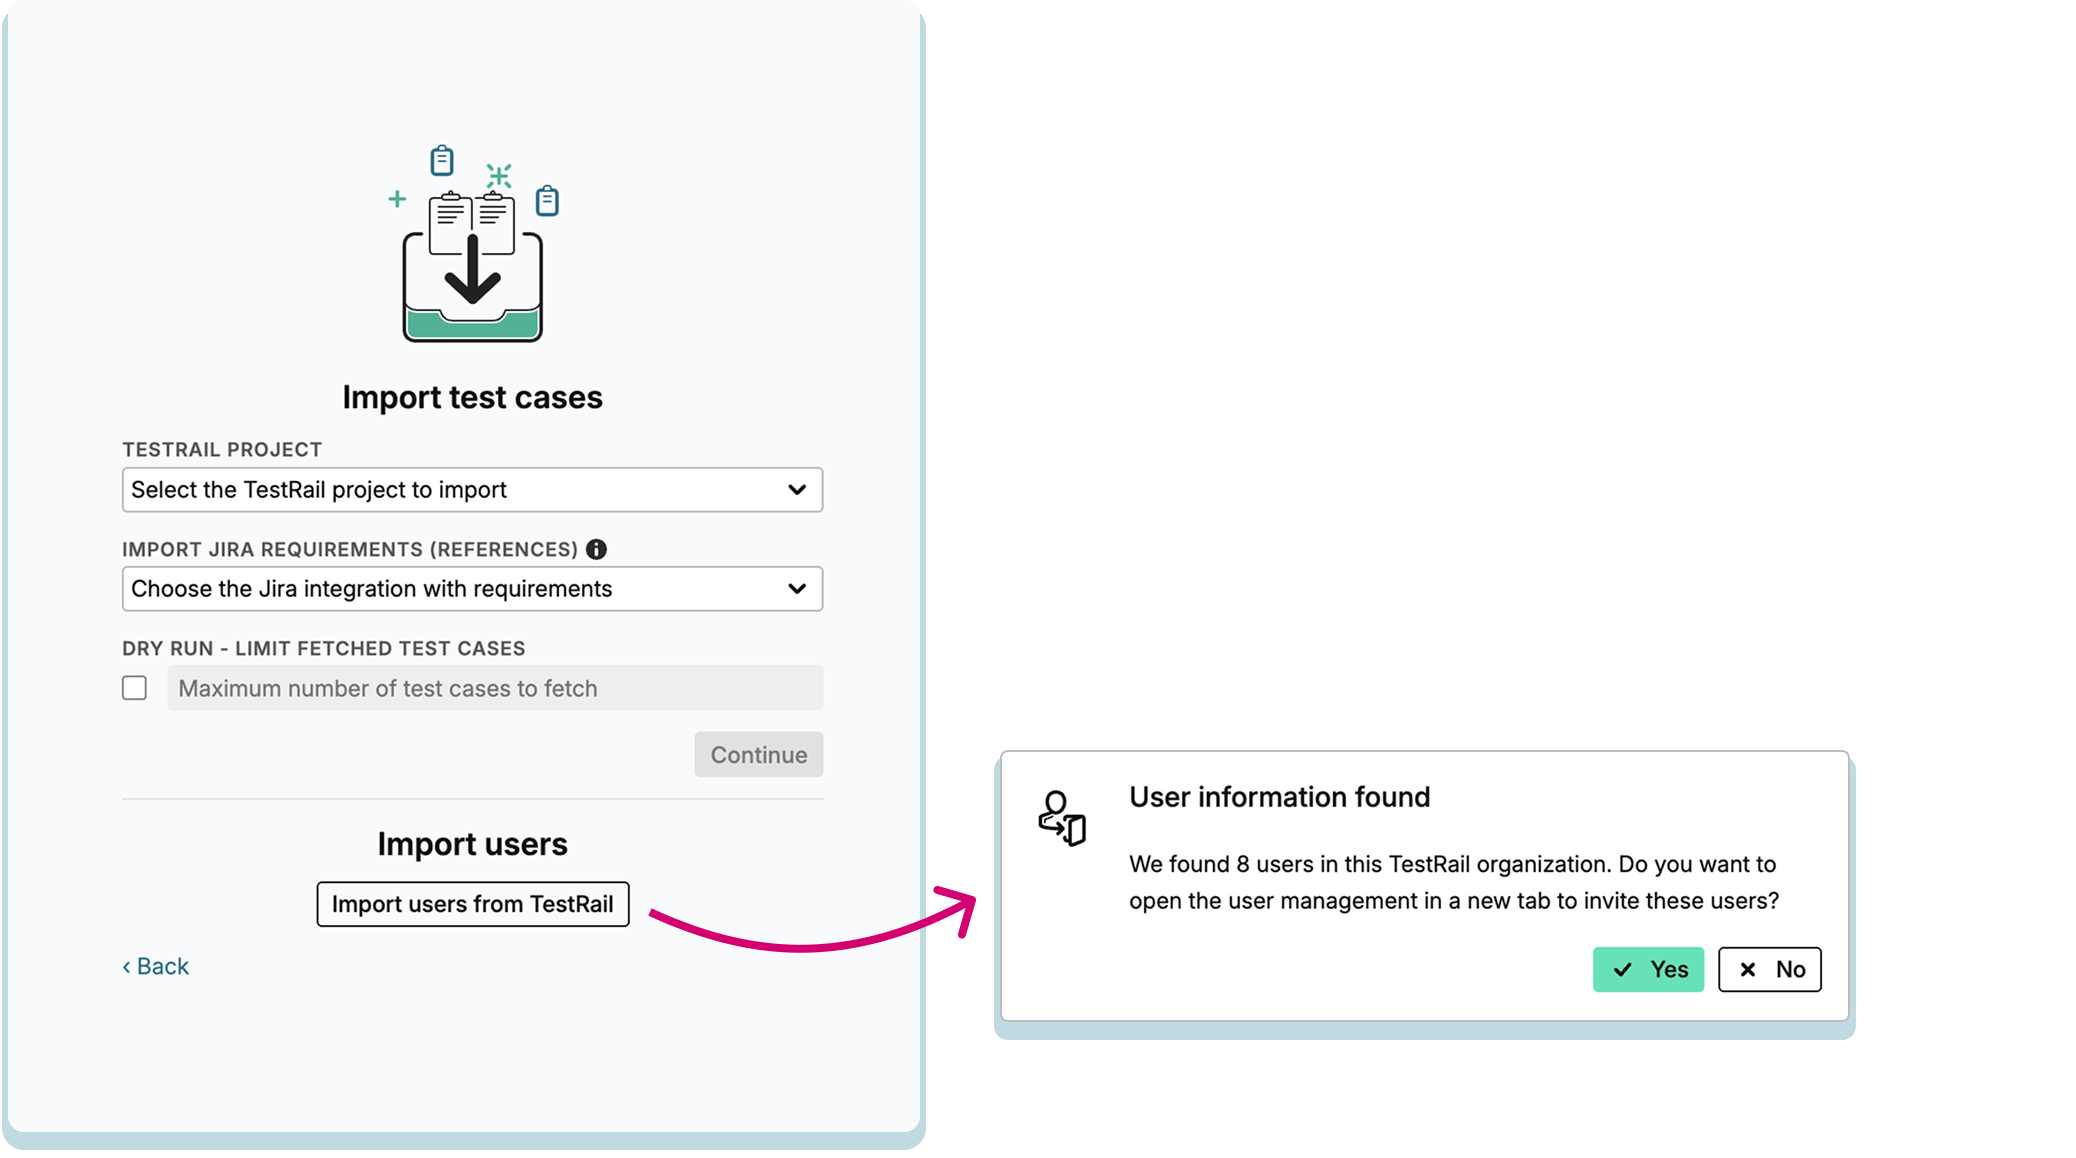
- You can now:
- Import test cases:
- Choose from which TestRail project you would like to import the test cases.
- If you have been using Jira to track requirements, you can also configure a Jira integration in Testiny and migrate linked requirements as well (the Jira integration needs to connect to the same Jira integration you used in TestRail for references).
- If you just want to try the migration, you can also set a limit to only retrieve a small number of test cases.
- Import users: Click
Import users from TestRailto migrate users.
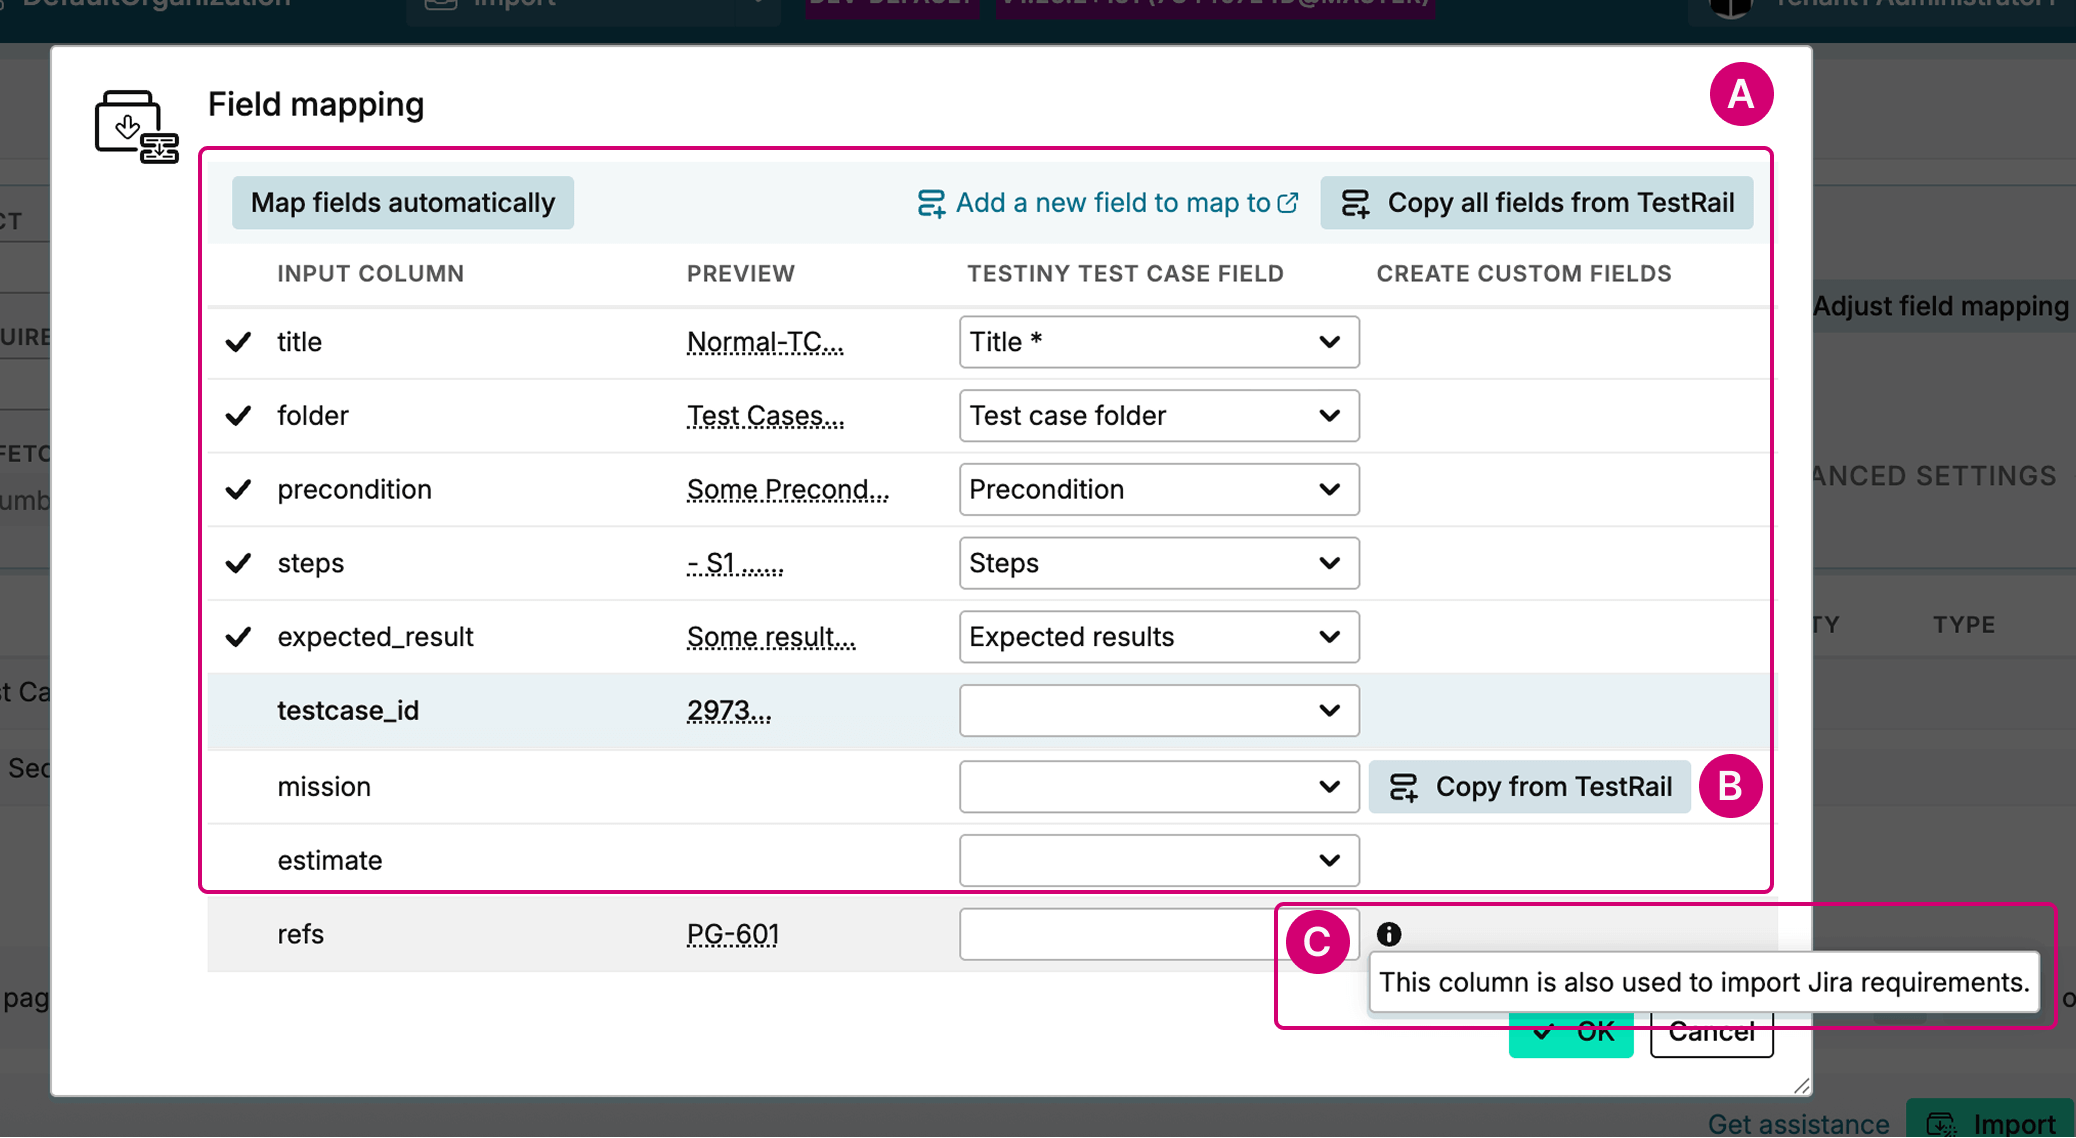
- After selecting a project, Testiny retrieves the test cases from TestRail, automatically detects the available settings, and displays the corresponding field mapping
 . Field mappings define how fields from your TestRail test cases are aligned with fields in Testiny.
- If a custom field from TestRail does not already exist in Testiny, you can create it automatically by selecting
Copy from TestRail. Testiny will then generate the field and associate it with the appropriate attribute .
. - Look for the info icon
 , which highlights that references from TestRail are also used to link requirements in Testiny.
Once you confirm the automatic mapping (and apply any manual adjustments if needed), a preview of the test cases to be imported will be shown in the main view below ![]() .
.
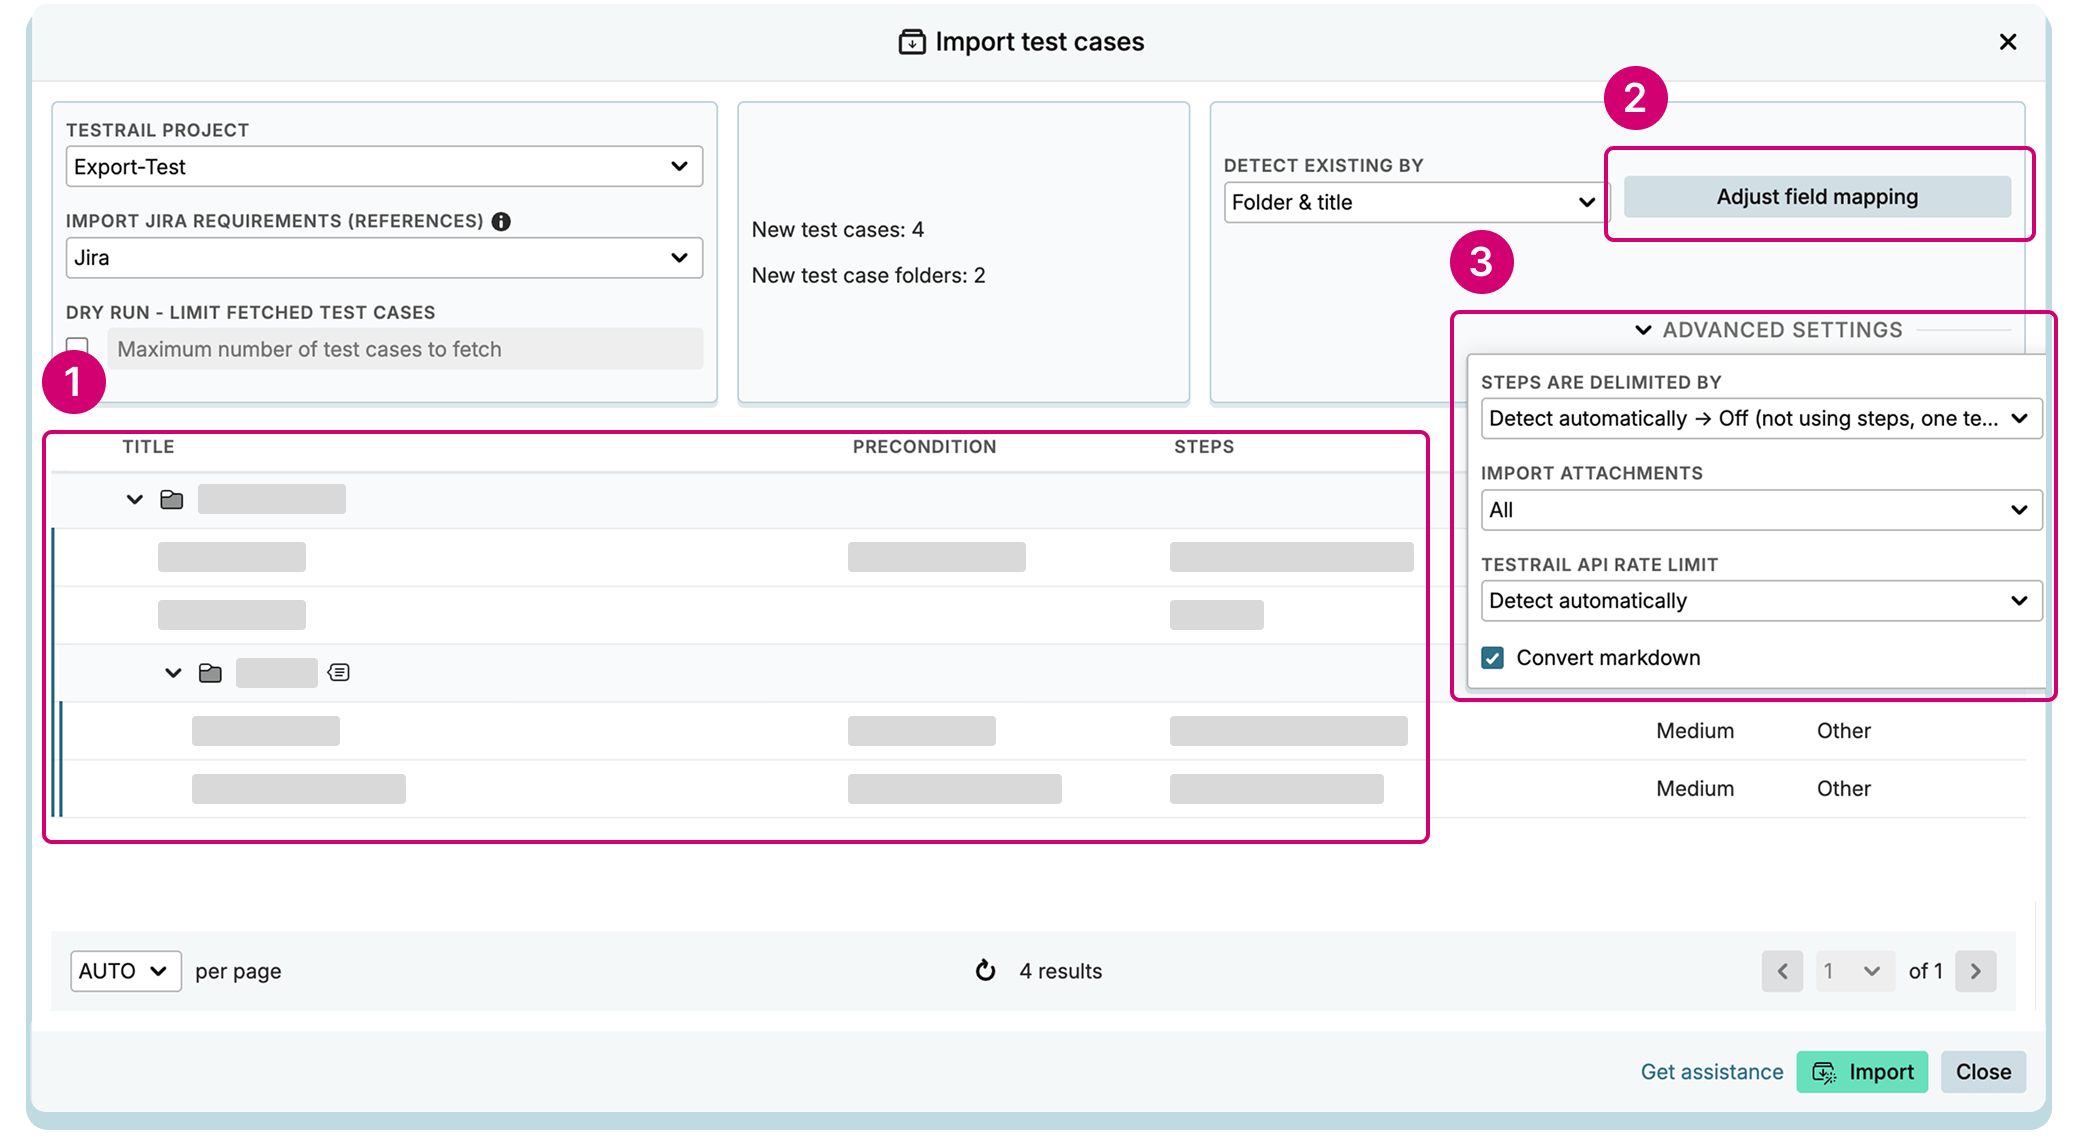
In ![]() , you can re-adjust the field mapping.
In
, you can re-adjust the field mapping.
In ![]() , you will find advanced settings. For the TestRail import, you can define whether attachments should be imported, set the TestRail API rate limit, or decide whether markdown should be converted to Testiny's rich text formatting.
For further information about general importer settings, please refer to the Importer Settings.
, you will find advanced settings. For the TestRail import, you can define whether attachments should be imported, set the TestRail API rate limit, or decide whether markdown should be converted to Testiny's rich text formatting.
For further information about general importer settings, please refer to the Importer Settings.
- Finally, if there are no errors and you're satisfied with the preview, click
Importto finalize the import and add the test cases to your project.
A summary dialog appears after the import, showing detailed statistics and any error messages. Copy the data to the clipboard (Copy all data to the clipboard) or dismiss the dialog by selecting eitherSave summary and close(this action downloads an HTML report of the import) or justClose.

Migrate via TestRail XML File
Testiny also supports the import of test cases from TestRail XML files, including custom field values, separate steps and text formatting. You just need to export the test cases from TestRail as XML and drag & drop the file into Testiny’s importer.
Since TestRail does not include any images or files in its XML exports, images and attachments cannot be migrated this way. You would need to migrate via TestRail API or you need to add the images after the import manually.
Follow these steps:
-
Export test cases from TestRail. See TestRail’s documentation on how to export test cases to XML.
-
Go to your Testiny project and choose 'Import' from the menu as shown in the screenshot below.
- Choose the option
TestRail XML.
 |
|---|
-
Then drag & drop the XML file or click "Select a file to import" to open the file dialog.
-
After selecting a file, Testiny tries to automatically detect all the settings, such as the field mappings, and shows you a preview of the test cases that will be imported. The field mappings show which fields from your XML file map to which fields in Testiny.
In case a custom field (value) does not yet exist in Testiny, you can click "fix automatically" so that Testiny creates the custom field (values) for you. For a detailed explanation of all available settings, please refer to the Importer Settings. -
Finally, if there are no errors and you're satisfied with the preview you can click "import" to finalize the import and add the test cases to your project.