Working with Test Cases
Test cases are the most fundamental entity type in Testiny and are designed to only require the absolute minimum amount of information — a title and an owner. The owner is intended to be used as the person who is "responsible" for the test case and who is the goto-guy in case of any questions.
In this section we’ll give an overview of the user interface, explain how to create or edit test cases, how to organize them in folders and how to execute test cases.
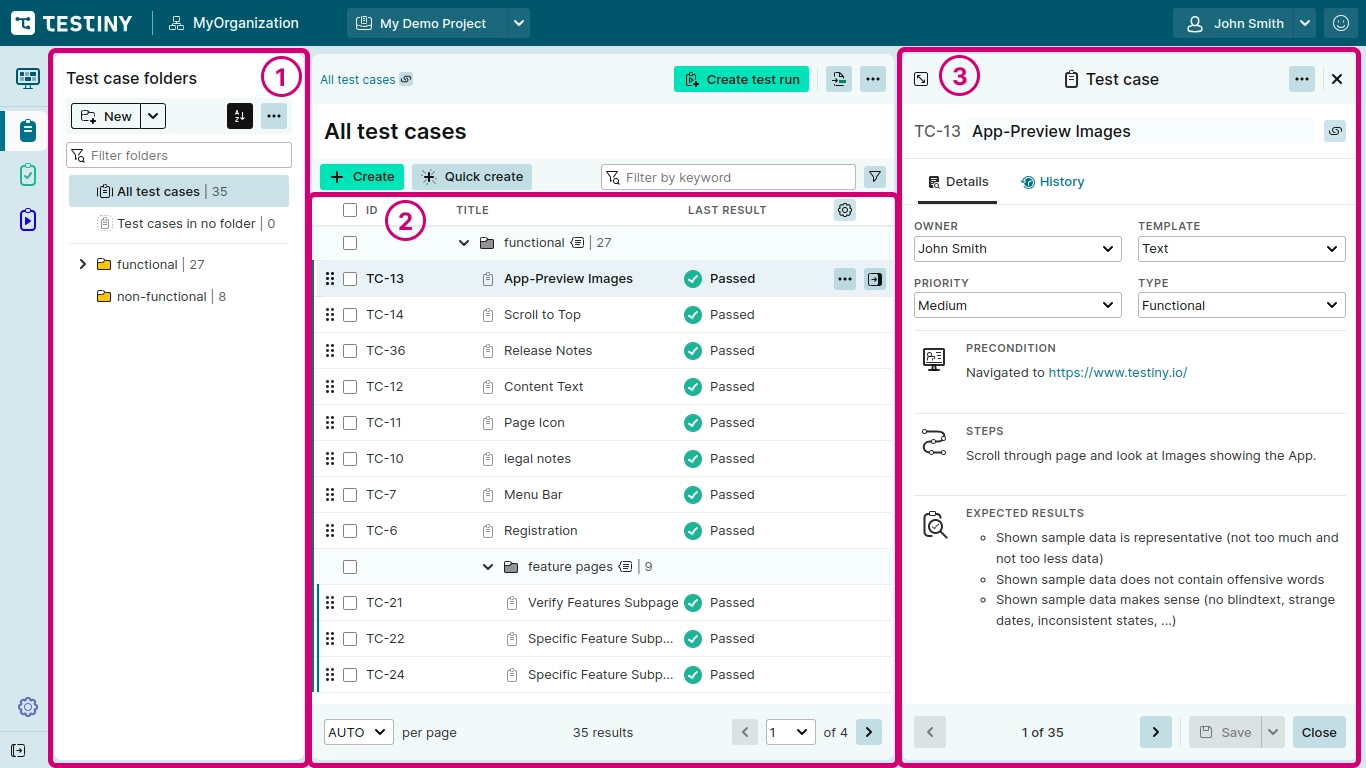
The main elements in the screenshot above are:
- Test case folders are used to group test cases logically together.
- The Test case table lists all test cases of the currently selected folder.
- The Details view opens, when selecting a test case in the table.
Creating Test Cases
To create a test case, either use "Create" or "Quick Create". "Create" opens the test case details view to immediately populate the test case with further information, set preconditions, steps, expected results, etc.
Via "Create" or "Create & Next" you can either create a single test case or create multiple cases successively.
Quick Create
"Quick create" creates test cases by just entering the title and, if configured, required custom fields without opening the test case details view. This allows you to quickly create test cases consecutively and you can fill in the details later.
Duplicating and Copying Test Cases
Test cases and folders can be duplicated via the menu action "Duplicate". The entities are then duplicated in the same folder. You can duplicate multiple test cases at once by simply selecting multiple test cases in the table. If you want to copy test cases or folders directly to another folder (or another project), you can do that via the menu action "Copy to" and selecting a target folder.
Organizing Test Cases
Learn how to organize and manage your test cases efficiently in Testiny.
Test Case Folders
Test case folders can be used to logically group test cases together. For example, all test cases related to the login screen, are grouped in the "Login-Page" folder. Test case folders can be nested and can be empty or contain any number of test cases. There are two special folders/groups:
- All test cases
The "All test cases" group shows all test cases as well as the folder structure in the test cases table. - Test cases in no folder
Test cases that do not belong to any folder are shown in the "Test cases in no folder" group.
Test Case Table
The test cases table shows the test cases of the currently selected folder.
Additional columns show when test cases have been last executed, their last results etc.
and — as with every table in Testiny — you can configure the columns of the table as you like
by clicking the ![]() icon.
icon.
Multi-line fields aren’t displayed directly in the list. To view them, open the details panel on the right, select a test, and use the arrow keys to quickly navigate through all test cases.
Moving Test Cases and Folders
Test cases and folders can be moved to other folders via drag & drop (![]() ) or via the menu action "Move to".
You can move multiple test cases at once by simply selecting multiple test cases in the table.
) or via the menu action "Move to".
You can move multiple test cases at once by simply selecting multiple test cases in the table.
Moving/Copying to another Project
If you want to move or copy a test case or folder to another project, select the entity and choose the menu actions "Move to" or "Copy to" and select the target project and target folder.
When moving or copying test cases to another project, the history will be lost.
If the target project does not contain the same custom fields or does not have the same requirements integration enabled, you'll see a warning that these fields and any linked requirements will not be visible in the target project. When you enable the custom fields and requirement integrations in the target project, the custom field values and linked requirements will become visible again.
Custom sorting
Test cases can be custom ordered. To sort test cases, move the test cases via the drag & drop handle (![]() ).
It is possible to move multiple test cases around simultaneously by simply selecting multiple test cases, as shown in this recording:
).
It is possible to move multiple test cases around simultaneously by simply selecting multiple test cases, as shown in this recording:
Custom sorting of test case folders: By enabling "Sort by Name", the test case folders are sorted alphabetically. If you disable the alphabetical sorting, you can sort the folders in a custom manner according to your needs. Simply drag and drop a single folder between other folders to change their position.
Editing Test Cases & Bulk Edit
To edit a test case, select the test in the table — the details view opens on the right side. All changes are local until you press the "Save" button. In case someone else modified the test case in the meantime, an error will appear when saving.
To edit multi-line fields, either use the ![]() button or double-click the desired field. See the rich text editor section for more information.
button or double-click the desired field. See the rich text editor section for more information.
Bulk editing test cases
To apply changes to multiple test cases at once, simply select the respective tests and a dedicated bulk editing bar appears. You can duplicate, delete, or edit multiple test cases at once.
When using "Edit", a dedicated view opens, showing all possible fields to perform a bulk edit on.
If the field is different among the selected tests, '[Multiple values]' is shown. If the field shows a value (e.g. the owner name), the value is the same for all selected cases.
When clicking 'Save', Testiny will show you which changes will be applied to which test cases and you can either confirm the bulk edit or cancel it.
Test Case Templates
Testiny currently supports two types of templates: the text template and the steps template.
The field precondition (a multiline text area) is available in both templates.
-
Steps template
Within the steps template, each step is assigned an expected result.
This template is perfect if your test can be split into clearly separated steps with a defined result. -
Text template
The text template allows you to write your tests in free text; no limitations apply when writing your tests.
This template is ideal e.g. for exploratory tests or a more general test with less defined results.
Please visit the Test Case Templates page for more information.
Executing Tests
To execute test cases and create a test run directly from the test cases screen, just click the "Create test run" button at the top of the screen. This opens the side panel, where you can set a custom title and also pre-assign test cases to individual users in your organization. Using 'Owner' assigns the tests to their respective owners. Otherwise, you can also assign all tests to a single person or leave the test cases unassigned for now (the assignment can be changed later on).
Clicking "Create" creates a new test run, where you can walk through the tests and assign results. More about this in the section about how to execute tests.
Please note: The test run will include the test cases in the currently selected folder. If you are in the "All test cases" view, a test run with all test cases will be created. If you select specific cases or folders, a run with only the selected tests or folders will be created.
This feature enables you to quickly create a test run. However, we recommend creating test runs by using a test plan.
Defects & Requirements
If you’ve configured an issue tracker integration (like Jira cloud, GitHub, etc) you can link defects and requirements to your test cases.
History
Testiny tracks all changes to test cases. The history of each test case can be found in the details view in the "History" tab.