Testiny Tutorial
This tutorial will give you a very quick overview of Testiny and its main features and workflows. If you’re interested in specific information, please have a look at the individual section(s).
This is a very short guide to using Testiny test management. If you’re new to software testing and test management or are interested in additional information about Testiny, start with Core Concepts instead.
Your first Project
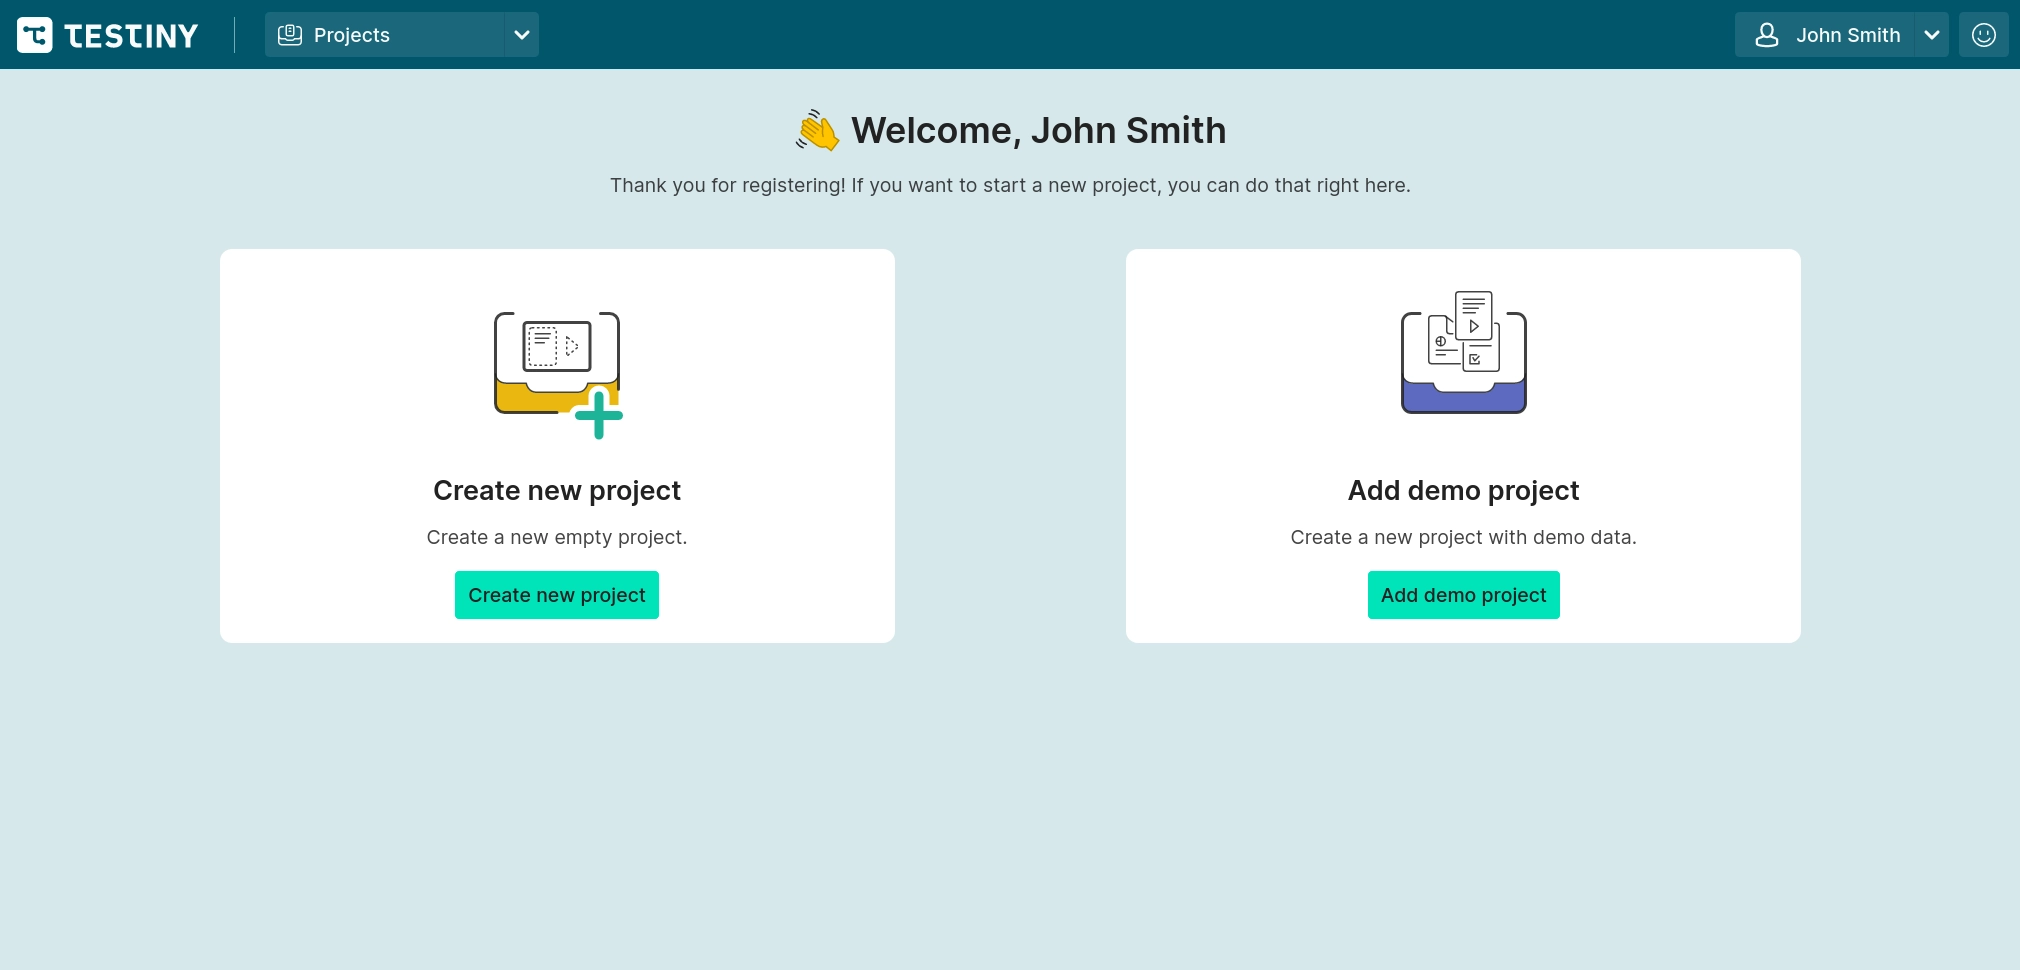
After successfully signing up to Testiny, you’ll have the option to create a new empty project or use a demo project, as shown in the screenshot above.
-
Demo Project
The demo project is already filled with some test cases, test plans, test runs etc. We recommend using this project if you’d like to get a quick overview of Testiny. You can play around in this project, create test cases, execute tests, etc.
Please note: You can delete the demo project at any time; you don’t have to live with it forever. ;-)
So it’s safe to try Testiny this way. We are continuously updating the demo project, especially when new features are released. Therefore, this is the fastest way to get a feeling and a good overview of Testiny. -
New project If you choose "Create new project", Testiny will create an empty project. If you are already familiar with test management and other tools, give this option a try. You’ll see how easy it is to do test management with Testiny.
Similar to the demo project, you can delete projects at any time.
Once a Project is created
After selecting either a demo project or an empty project, your screen should look similar to the one below. The main difference will just be the number of test cases and the charts. The following screenshot is taken from a demo project.

On the left, there is the sidebar navigation panel to switch between the dashboard, test cases, etc. This dashboard shows charts about the project’s status and also suggests "first steps" to take and provides the most important actions in a newly created project:
- Creating test cases
- Creating test runs
- Creating test plans
- Inviting your colleagues
- Enabling integrations for linking defects and/or requirements
- Creating custom fields to adapt Testiny to your needs
For the next sections, let’s assume you’ve chosen a demo project.
Creating Test Cases
When you select "Create test cases" or click the "Test cases" item in the sidebar, it brings you to the following screen:
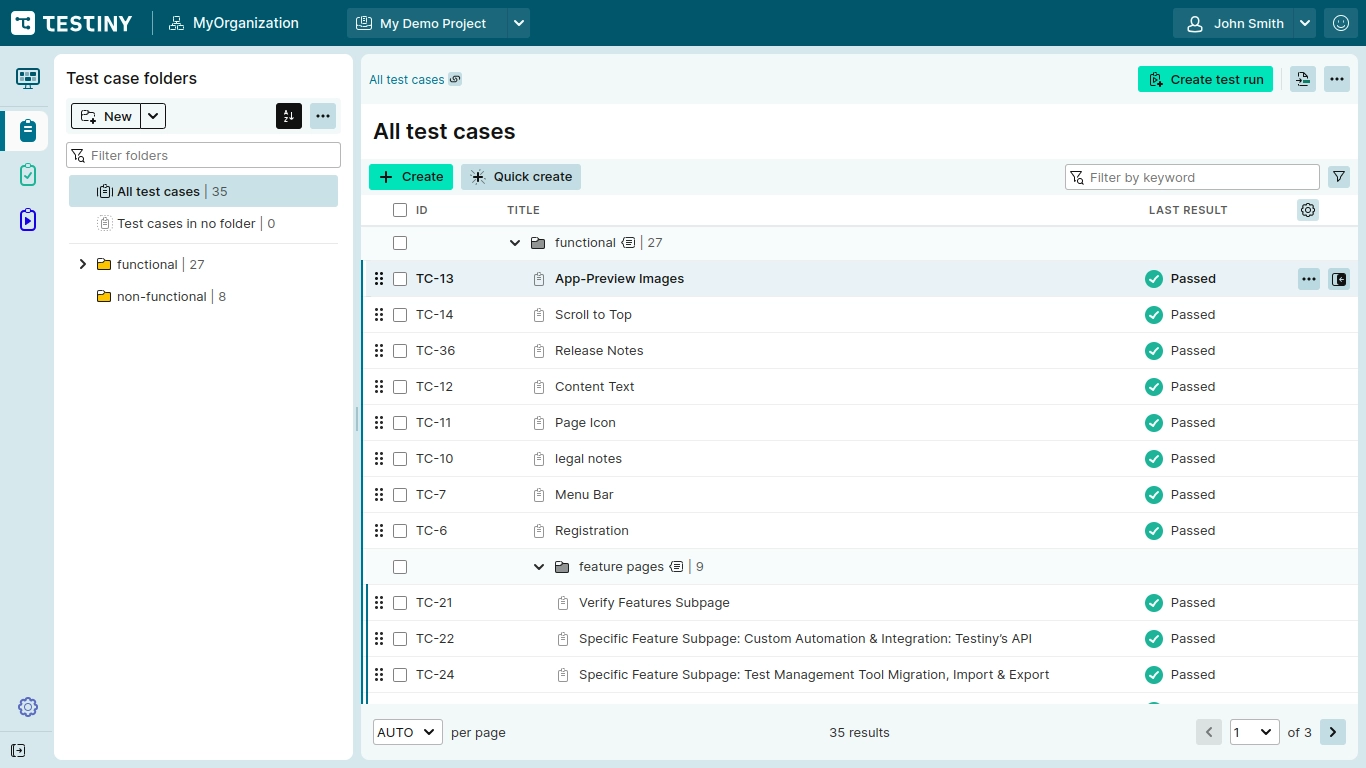
The main elements on this screen are:
- Test case folders — the list of test case folders
- Test cases — the table of test cases including the folder structure. It shows the test cases in the selected folder or, in this case, all test cases.
Test Case Folders
Testiny relies on a folder-based concept. This means that you’re able to place test cases that logically belong together in a specific folder, e.g. all cases that belong to login/registration/... are placed in a Login/Register folder.
In the current example, the distinction is made between functional and non-functional test cases.
Testiny further provides the ability to use subfolders and to drag & drop folders around. Simply drag a folder by the ![]() icon and drop it on top of another folder — it works just like a file explorer on your operating system.
icon and drop it on top of another folder — it works just like a file explorer on your operating system.
Test Case Details
Selecting a test case in the table opens the details view on the right side, as shown in the next screenshot:
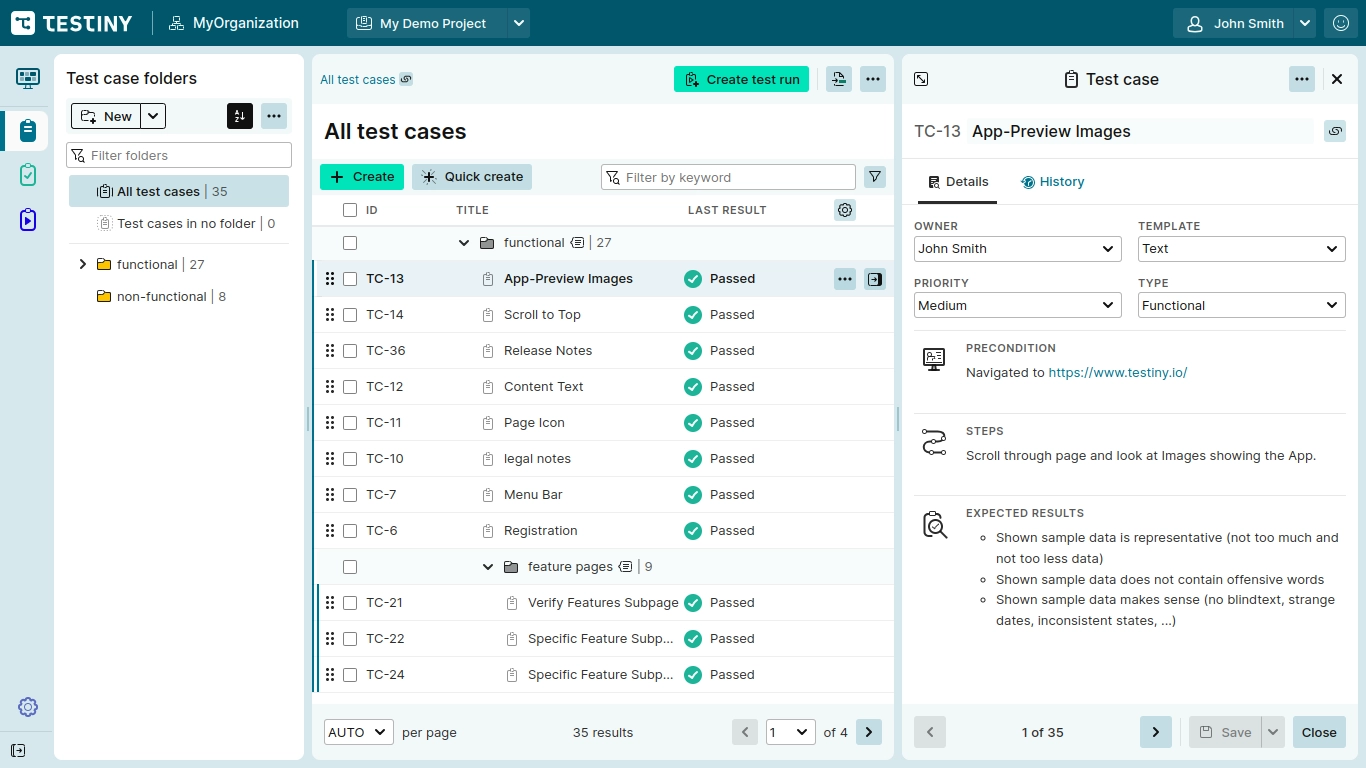
This details view opens when you select a test case, but also when you create a new one. Every test case needs a title, an owner and uses a template. When creating a test case, fill in all the necessary information needed for your test and click "Create". If you need additional fields — no problem: Testiny also supports custom fields (more about this later on).
All text fields come with a comprehensive rich text editor which supports everything you could ever need for writing tests such as lists, bullet points, links, tables, images, etc. And we’re also very proud of our "copyable snippets" as they are very helpful when you need to paste some test data (like an email address) somewhere. Just make it "copyable" and when you click on it, the text is added to your clipboard.
Furthermore, you can choose between two types of templates for your test case: "Steps" and "Text". The "Steps" template allows you to write a step-by-step test with individual step results. The "Text" template is best suited for exploratory tests or any other type of test that does not rely on one action followed by another.
If you have set up an integration with an issue tracking tool, you can also create requirements directly out of Testiny or link existing requirements with test cases.
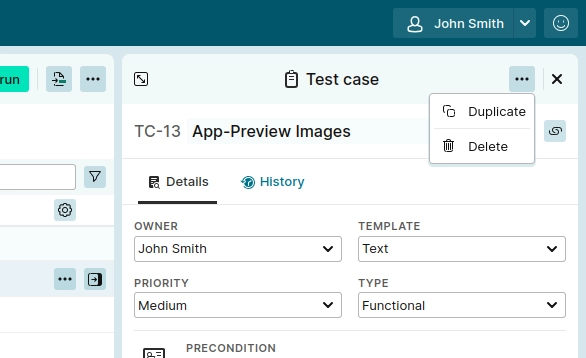
Don’t miss the ![]() button in the upper right corner. This menu provides you access to additional actions, like duplicating or deleting the test case.
button in the upper right corner. This menu provides you access to additional actions, like duplicating or deleting the test case.
Watch this video to learn how to create test cases in Testiny.
Moving and Ordering Test Cases
Bringing test cases in the correct order can save lots of headaches and can avoid testing the same things multiple times.
In Testiny, each test case has its own index within a folder and you can move test cases up and down to custom sort them using the drag & drop handle (![]() ). Testiny illustrates all the places where you can move a test case.
When creating a test run, Testiny uses the order specified in the test case folders.
). Testiny illustrates all the places where you can move a test case.
When creating a test run, Testiny uses the order specified in the test case folders.
It’s also possible to move test cases between folders or even move complete folders (test cases in the folders and subfolders are automatically moved as well). This allows you to group all test cases that belong logically together in one folder and to specify the order in which the test cases shall be executed during a run.
Don’t worry about moving folders while others are working with Testiny at the same time because our message bus keeps everything in sync. Your colleagues won’t even notice that the folder they're in has suddenly changed its location.
Moving Test Cases to another Project
If you want to move or copy test cases or folders to another project, you can do that via the menu actions "Move to" or "Copy to". In the wizard, you can select the target project and target folder.
Read more about organizing and moving test cases and folders.
Creating Test Plans
This feature provides the ability to statically and/or dynamically assemble test cases into a test plan. You can create test plans for bugfix releases, regression tests or for specific features of your software.
Click the item Test plans in the sidebar to navigate to the list of test plans. This screen shows the existing test plans if you have selected the demo project as shown in the screenshot below.
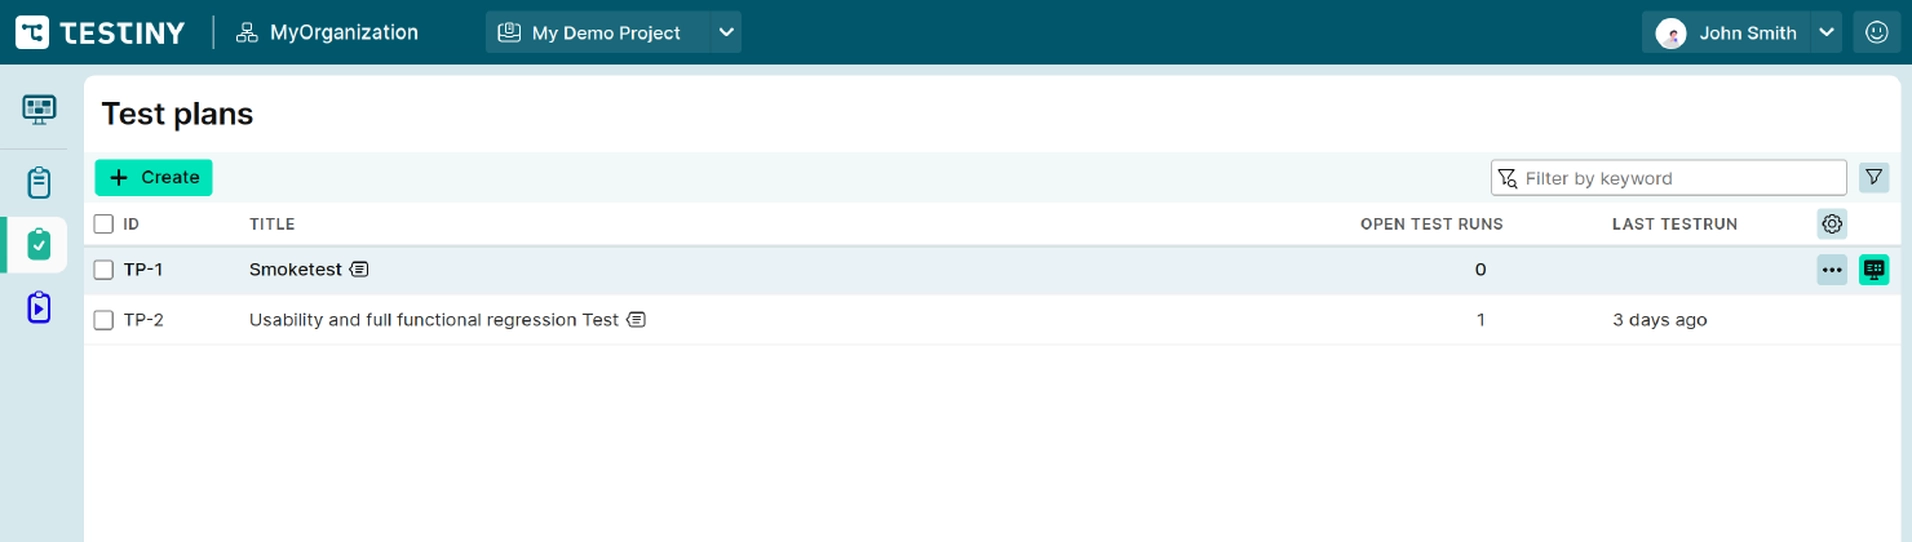
To create a test plan, click on "![]() Create" in the upper left corner and enter a title for the test plan (e.g. "Bug-fix release"). The description is optional (leave it empty for now) and click "Create".
Testiny will create an empty test plan and the next step is to add test cases to your plan.
Create" in the upper left corner and enter a title for the test plan (e.g. "Bug-fix release"). The description is optional (leave it empty for now) and click "Create".
Testiny will create an empty test plan and the next step is to add test cases to your plan.
Adding test cases to your plan
The next step is to add test cases to the test plan. You can add test cases dynamically using conditions or folders, or you can add a list of test cases statically.
In this tutorial, we’ll explore the test plan "Usability and full functional regression Test" from the demo project. Select the test plan in the table and the overview of the test plan opens. We’ll explore this overview later when we analyze test results. For now, we’ll navigate to the test cases in this plan by clicking on the Test cases tab as highlighted in the screenshot below.

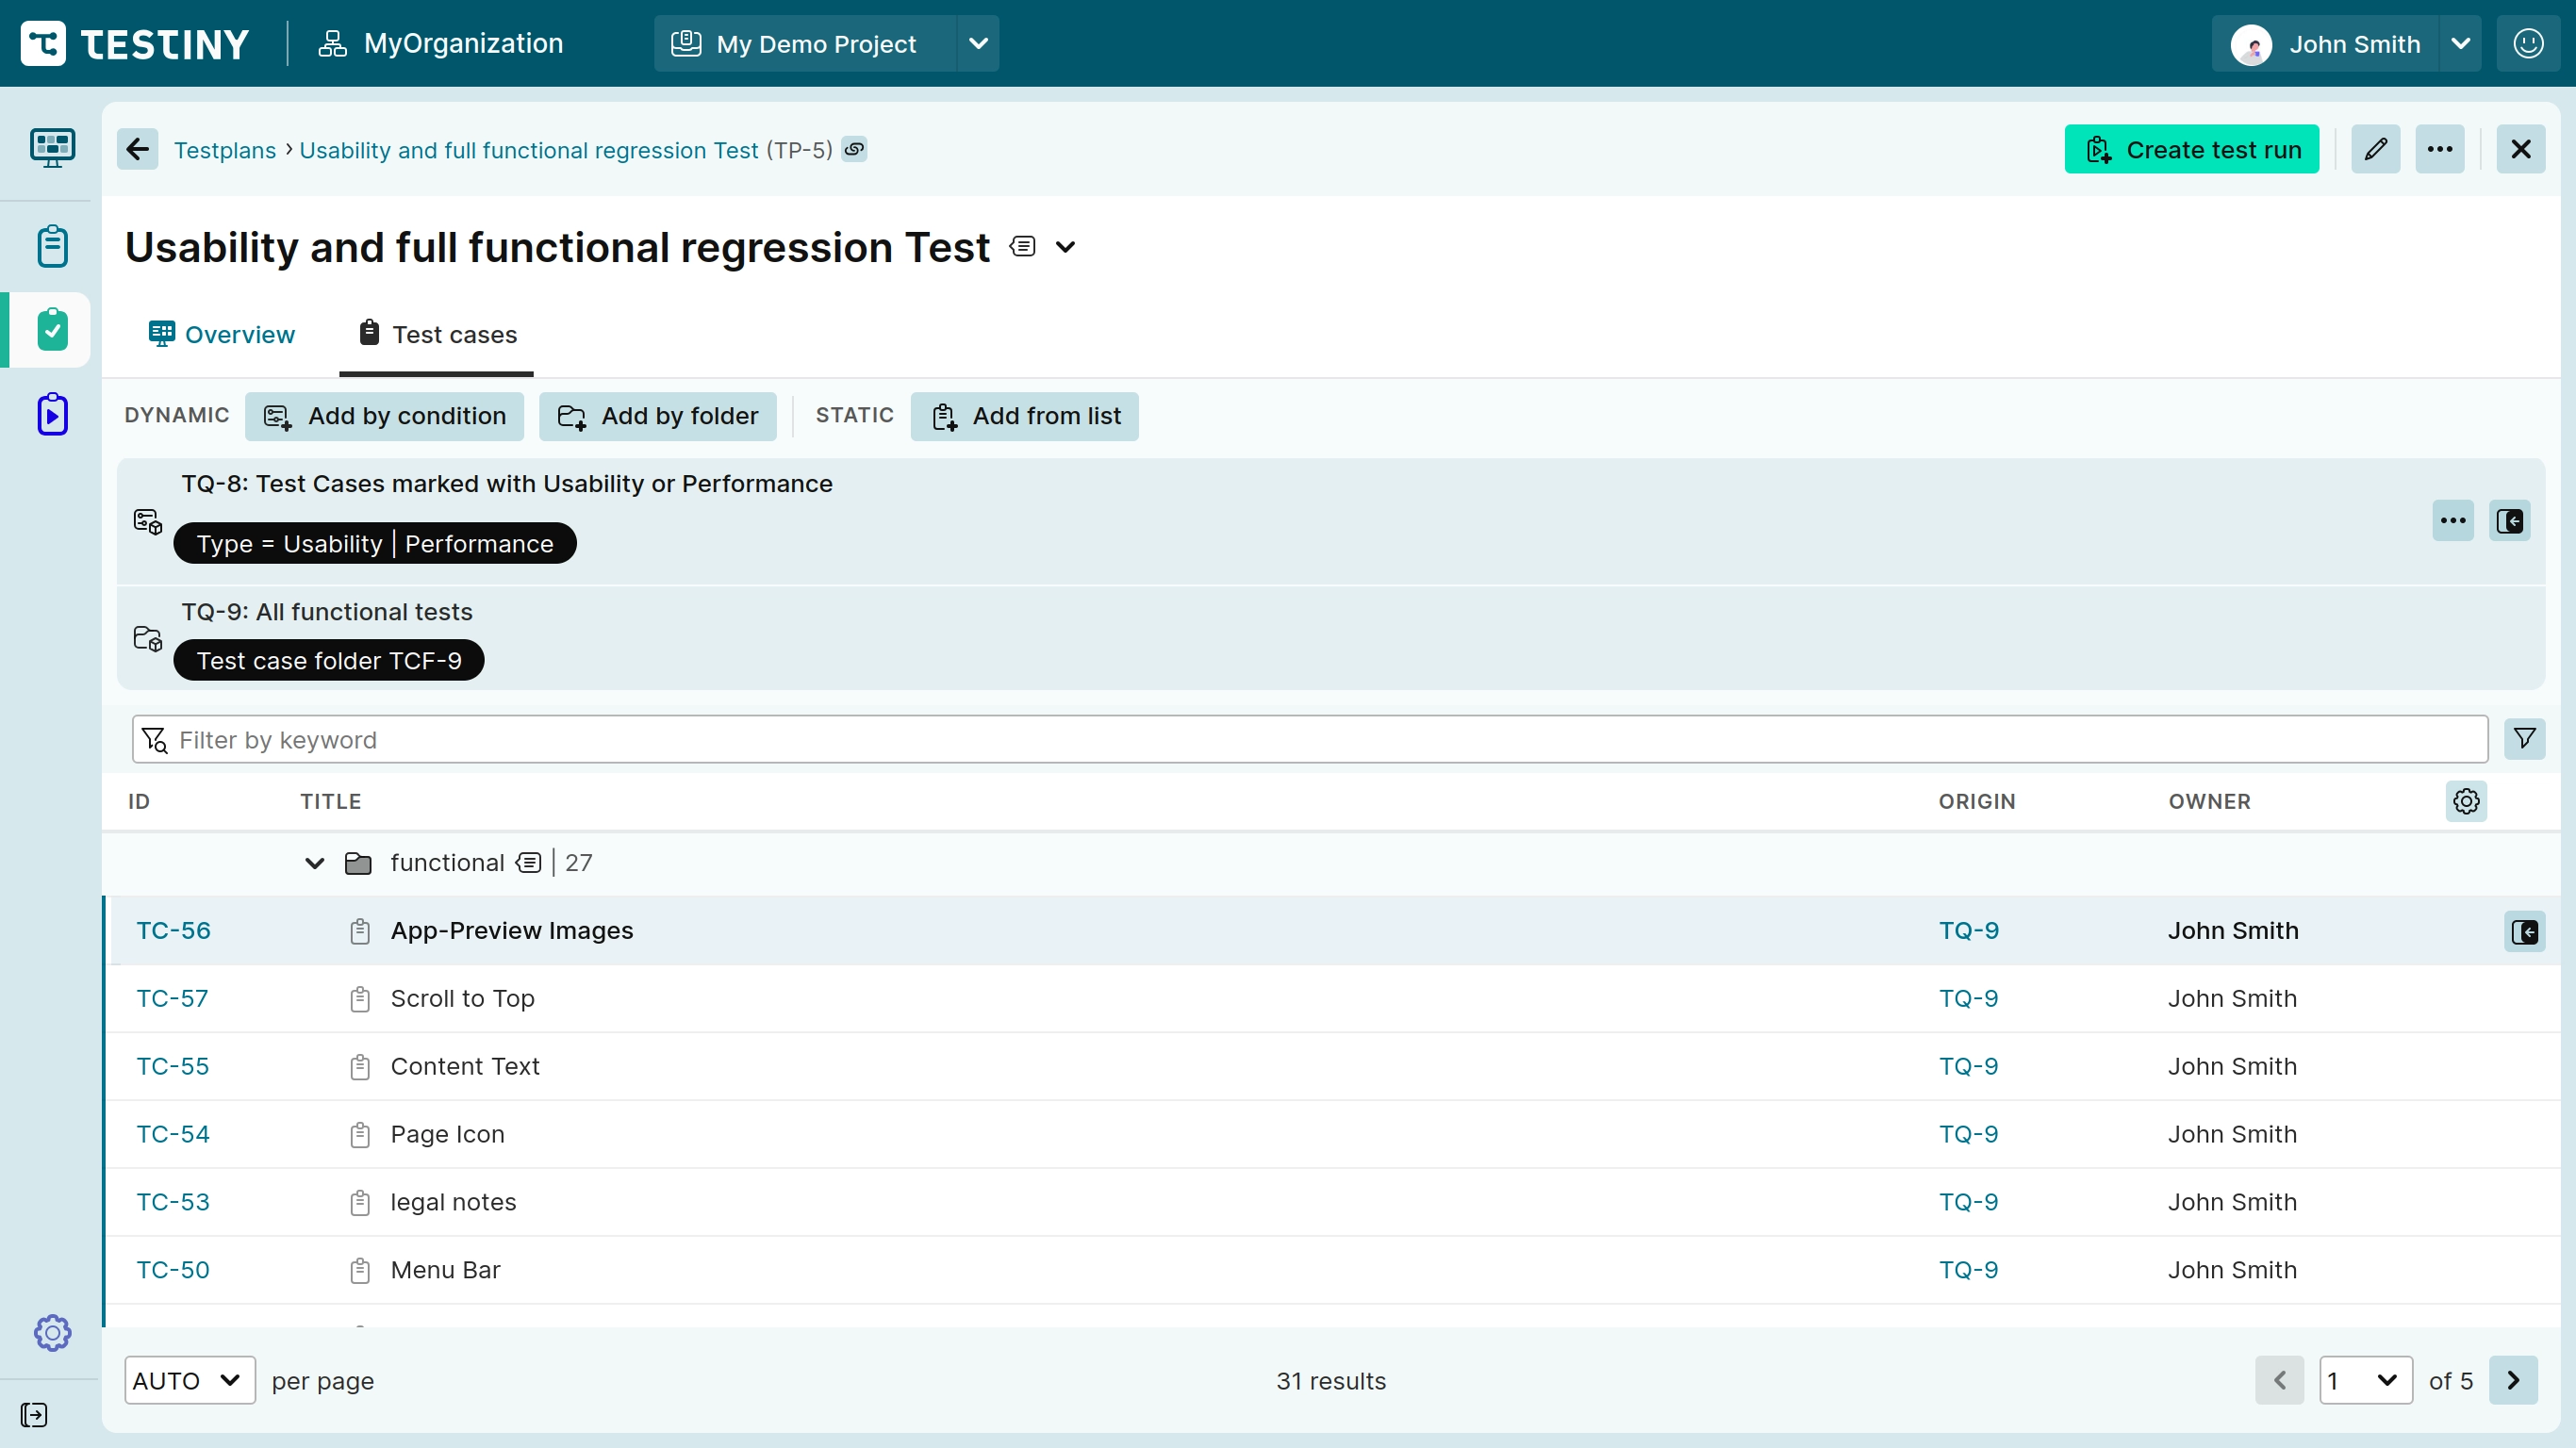
After navigating to the Test cases tab, you can see a list of the queries and the list of test cases that are currently part of the test plan as shown in the screenshot below.
Test cases are added to a plan through queries.
In the example below, there are two queries in this test plan. The first one is a dynamic query adding test cases by a condition. In this case, the query adds test cases where the field "Type" has either the value "Usability" or "Performance". The second query is also dynamic but adds all tests that are in the selected folder. To add more test cases to this plan, add a new query by clicking on the buttons 'Add by condition', 'Add by folder' or 'Add from list'.
To learn more about dynamic and static queries, please read about the concept of test plans and a detailed description of how to work with test plans.
Creating Test Runs
We’ll come back to the test plan overview later. First, we’ll have a look at how to create test runs. There are multiple ways to create a test run:
- using test plans (recommended)
- in test cases view
- in test runs view
All of these options are described in detail in the section about test runs. For this tutorial, we’ll continue with the recommended way and create a test run from our previously created test plan.
In the test plans view, click the "Create test run" button to create a run with all the test cases currently included in the plan. It opens a panel where you can define the title and description of your test run, a preview of how many test cases it contains is shown and you can set to whom the test cases are assigned. You can change all of these settings later as well, so you can just click "Create" for now. This will create a test run and you’re automatically navigated to the newly created test run.
Executing Tests
The created test run should look similar to the screenshot below:

In this screen, you see the list of currently open test runs on the left, and in the center an overview of the run and the test cases in that run. The overview section on the top summarizes the results, shows the team (who is assigned to how many test cases) and details about who created the test run from which plan. Below there is the list of test cases in this run and all test cases are "Not Run" yet. You can find a detailed description of this view in the section about test runs.
Executing tests in Testiny is quite simple. To start, either click the button "Execute test run" or select any of the test cases in the table to open the runner on the right side.
To only see test cases that are assigned to yourself and not run yet, you can filter the test cases in the run.
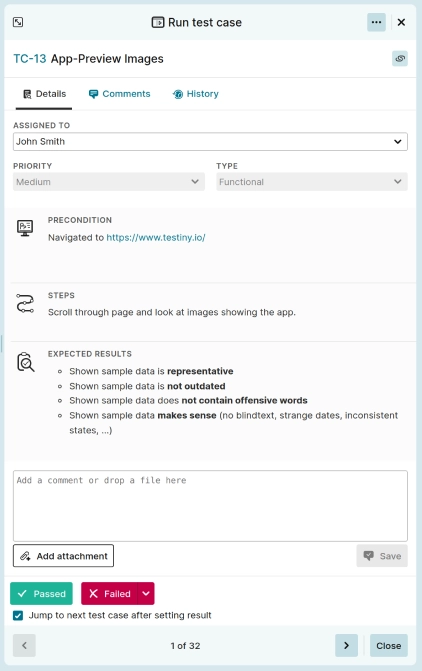
In this runner view shown in the above screenshot, you can see to whom the test case is assigned and the details of the test case. You can also maximize this view with the ![]() icon. To start the test, follow the instruction written in the precondition to set it up and follow the steps to execute the test.
Once executed, you can set the result to Passed, Failed, Skipped or Blocked by clicking on the respective button.
When using the Steps template, you can also set results for each step.
You can also leave comments, copy & paste a screenshot or add an attachment to the execution. All comments can be viewed in the "Comments" tab and all changes are recorded and listed in the "History" tab.
icon. To start the test, follow the instruction written in the precondition to set it up and follow the steps to execute the test.
Once executed, you can set the result to Passed, Failed, Skipped or Blocked by clicking on the respective button.
When using the Steps template, you can also set results for each step.
You can also leave comments, copy & paste a screenshot or add an attachment to the execution. All comments can be viewed in the "Comments" tab and all changes are recorded and listed in the "History" tab.
If you would like to create defects while testing, please set up an integration with your issue-tracking tool. Once an integration is configured, you can create or link defects directly out of Testiny.
When all tests have been executed, you can click "Close test run" to save the current state of your test run and make it immutable.
Please refer to the section about the runner view to learn more about executing tests.
If you would like to import results from automated tests into Testiny, see the Automation Quickstart to report automation results from your CI/CD pipelines.
Creating re-runs
Re-runs enable testers to quickly create a new test run based on the results of an existing one. Instead of manually selecting test cases again, you can generate a follow-up run that automatically includes only the relevant test cases, such as those that failed or were blocked. Learn how to create a re-run.
Analyzing Test Results
The next sections explain how to create reports, analyze results over multiple runs or per test plan.
PDF Reports & Exporting Results
Finally, we’ll look at how to analyze and share test results. Of course, you have the test run overview summarizing all the results and you can filter the test run for failed tests to analyze them one by one.
To share or archive the results, you can generate a report. Just click on the ![]() icon in the top right corner and a dialog will appear where you can specify what to include in the report. More details can be found in the reporting documentation. In addition to that, you can also export the test run to an Excel or a CSV file.
icon in the top right corner and a dialog will appear where you can specify what to include in the report. More details can be found in the reporting documentation. In addition to that, you can also export the test run to an Excel or a CSV file.
Grouping related runs with Milestones
Use Milestones to group related runs under a common goal, track progress across test runs and manage high-level deliverables, such as release versions or sprint cycles.
If you have an issue tracker set up for your project, you can also view created defects across all runs and the requirements covered by the milestone and the related runs.
Test Plan Analysis
If you’ve created your test run from a plan, you can also analyze the results over time. In the "Details" tab of the test run, there is a link to the plan if the run was created from a plan.
In this tutorial, we have created the run from a plan, so you can navigate to this test plan by clicking the link. This brings you back to the test plan, with the Overview tab opened.
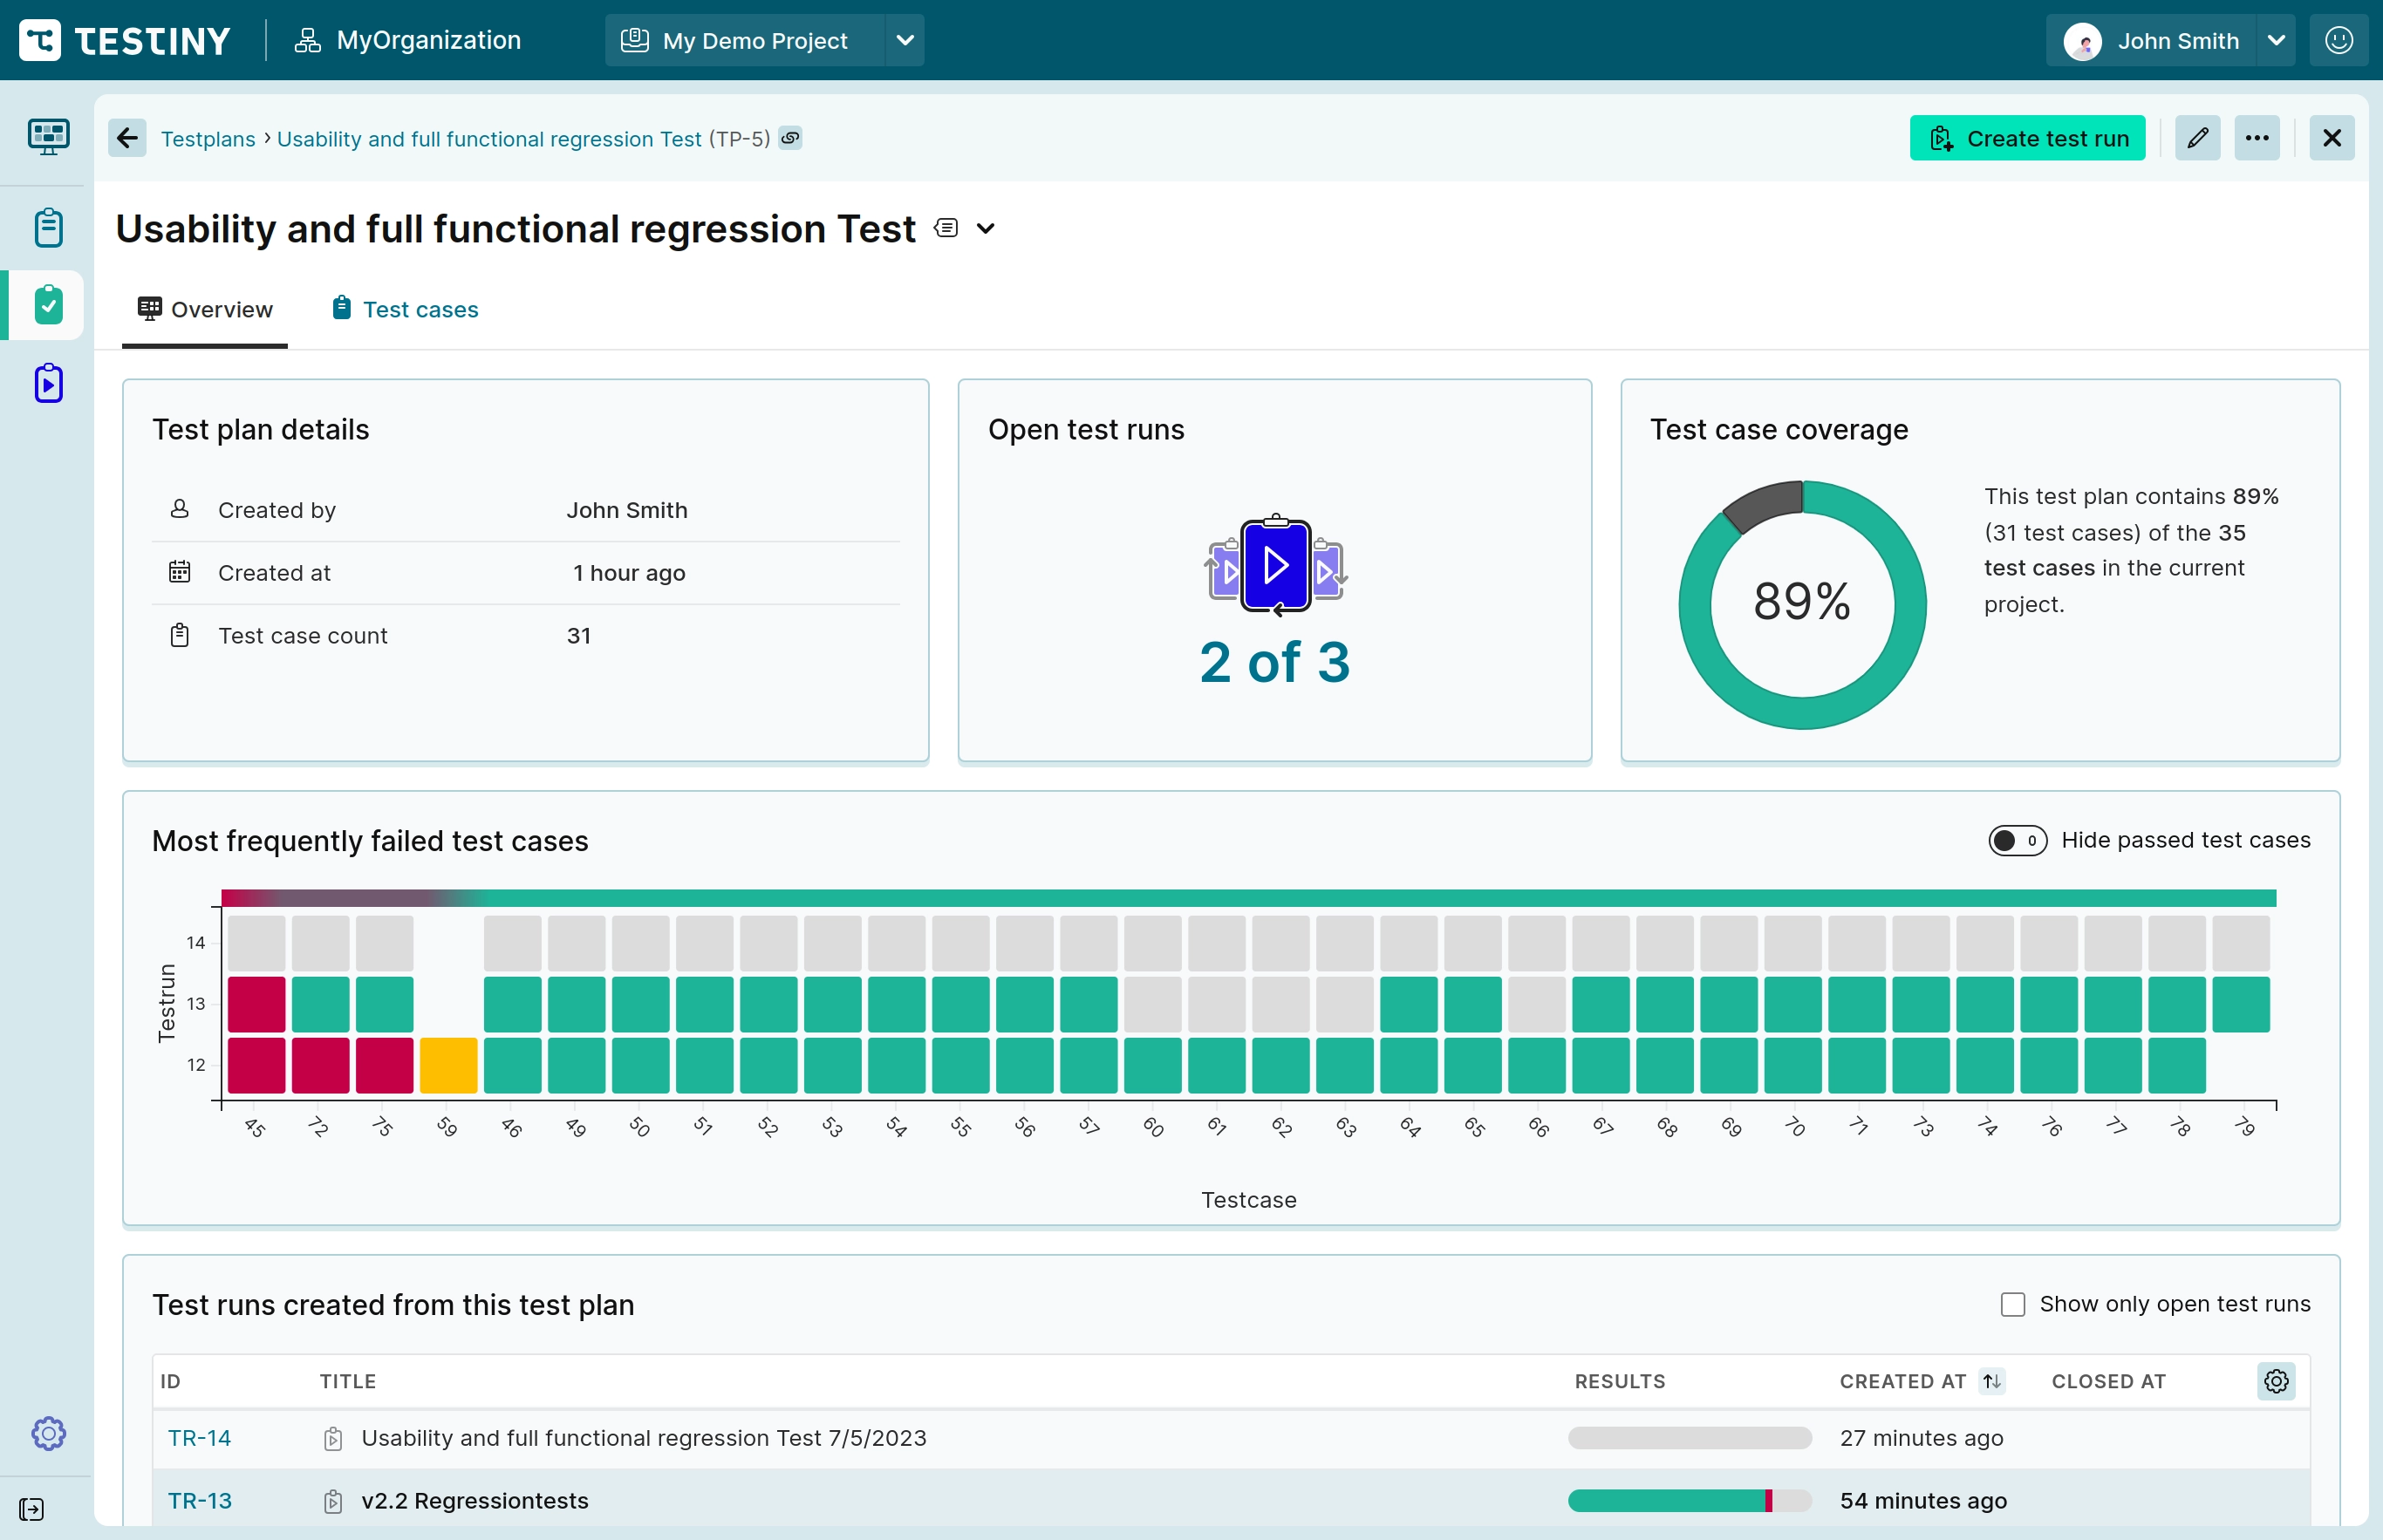
In this screen, you can see details about the test plan, any open test runs created from this plan and how many test cases this plan contains. Since at least one run was already created and executed from this plan, we can see the "Most frequently failed test cases" and a list of test runs created from this plan. The most frequently failed test cases are sorted by failed tests and you can easily see which test cases have failed and how often they have failed in the last few runs.
Settings
So far, you have learned how to create test cases and plans, execute test runs and how to analyze the results. Now let us explore some further topics. To customize Testiny and create custom fields, set up integrations, create API keys, etc. you need to navigate to the settings as highlighted in the screenshot below.
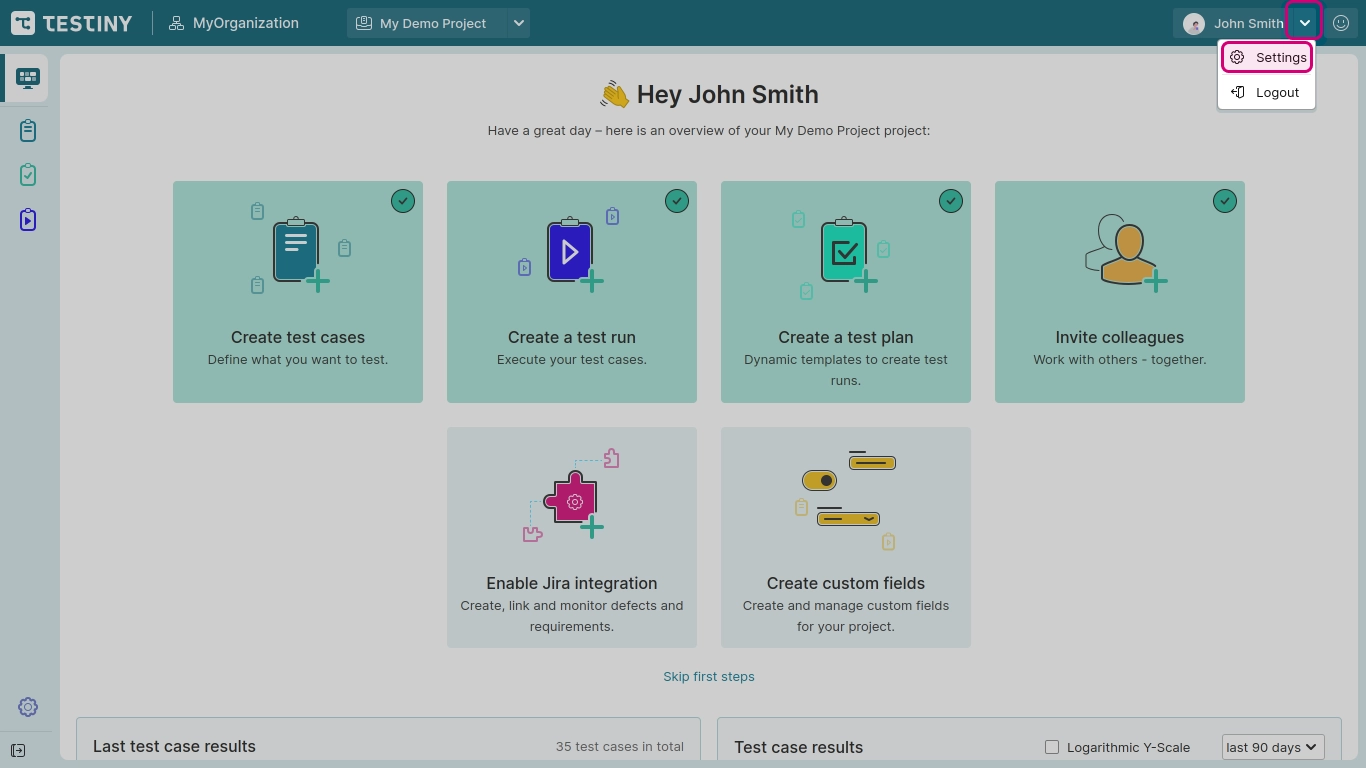
In the following subsections, we’ll go through a few major settings to show you what can be done with Testiny.
Linking Requirements and Defects
As mentioned before, if you have set up an integration with an issue-tracking tool, you can also create requirements and defects directly out of Testiny or link existing ones with test cases and test executions.
To set up an integration, select the item Integrations from the settings sidebar.
In these settings, you can configure integrations with other tools, such as Jira Cloud, Jira Server, GitHub, GitLab, AzureDevops, etc. Learn about how to configure each integration in the integration documentation. You can integrate with as many tools as you like, configure integrations only for specific projects or configure an integration for only requirements or defects.
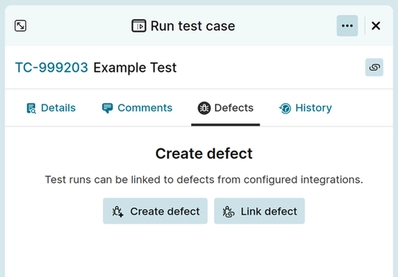
Once you have configured an integration, you can use it for requirements and/or defects management. With an active integration, Testiny allows you to create or link requirements from test cases, and to create or link defects from test results or test runs, as shown below. See the respective sections about requirements in test cases or about defects in test runs for more details.
Adding additional Users
Select the item User management from the settings sidebar.
In this section, you can invite new users to your organization, you just need to enter their email addresses and specify their role. The role can be changed by administrators at any time. The first and last name are optional and can be changed later as well. Upon invitation, the invited user will receive an email to confirm their registration.
The free plan is limited to three users. If you would like to have more than three users in your organization, please upgrade your plan. If you have a paid plan, a preview of the billing amount will be shown when inviting a user and no free seat is available.
Please see the individual sections on inviting and removing users for more information (including billing details) and a detailed description of user roles.
Working Together in Real Time
Once your colleagues have joined, you can all work in Testiny at the same time. A message bus keeps every browser session of your organization in real-time sync, so results, test cases and folder changes made by one team member show up for everybody instantly — there is no need to reload the page.
Read more about immediate updates, or watch a short overview of real-time sync in Testiny:
Multiple Projects
In general, a project should be used to group and manage tests for a single project or application that you are working on. To view all existing projects and to create or delete projects, select the item Projects from the settings sidebar.
In the project settings, all existing projects are listed. Click "Create a new project" to create an empty project. If you want to edit or delete an existing project, select the project in the table and an edit view will open on the right side.
If you have more than one project and navigate back to the main app, you will see in the toolbar that you can easily switch between all of your projects. In this menu you can also create a new project, add a demo project or navigate to the project settings.
Find out more in the settings documentation.
Customizing Testiny
Finally, we will go through a few options to customize Testiny to fit your testing process and your personal preferences.
Custom Fields
We will now take a look at what custom fields are and how to create and configure them.
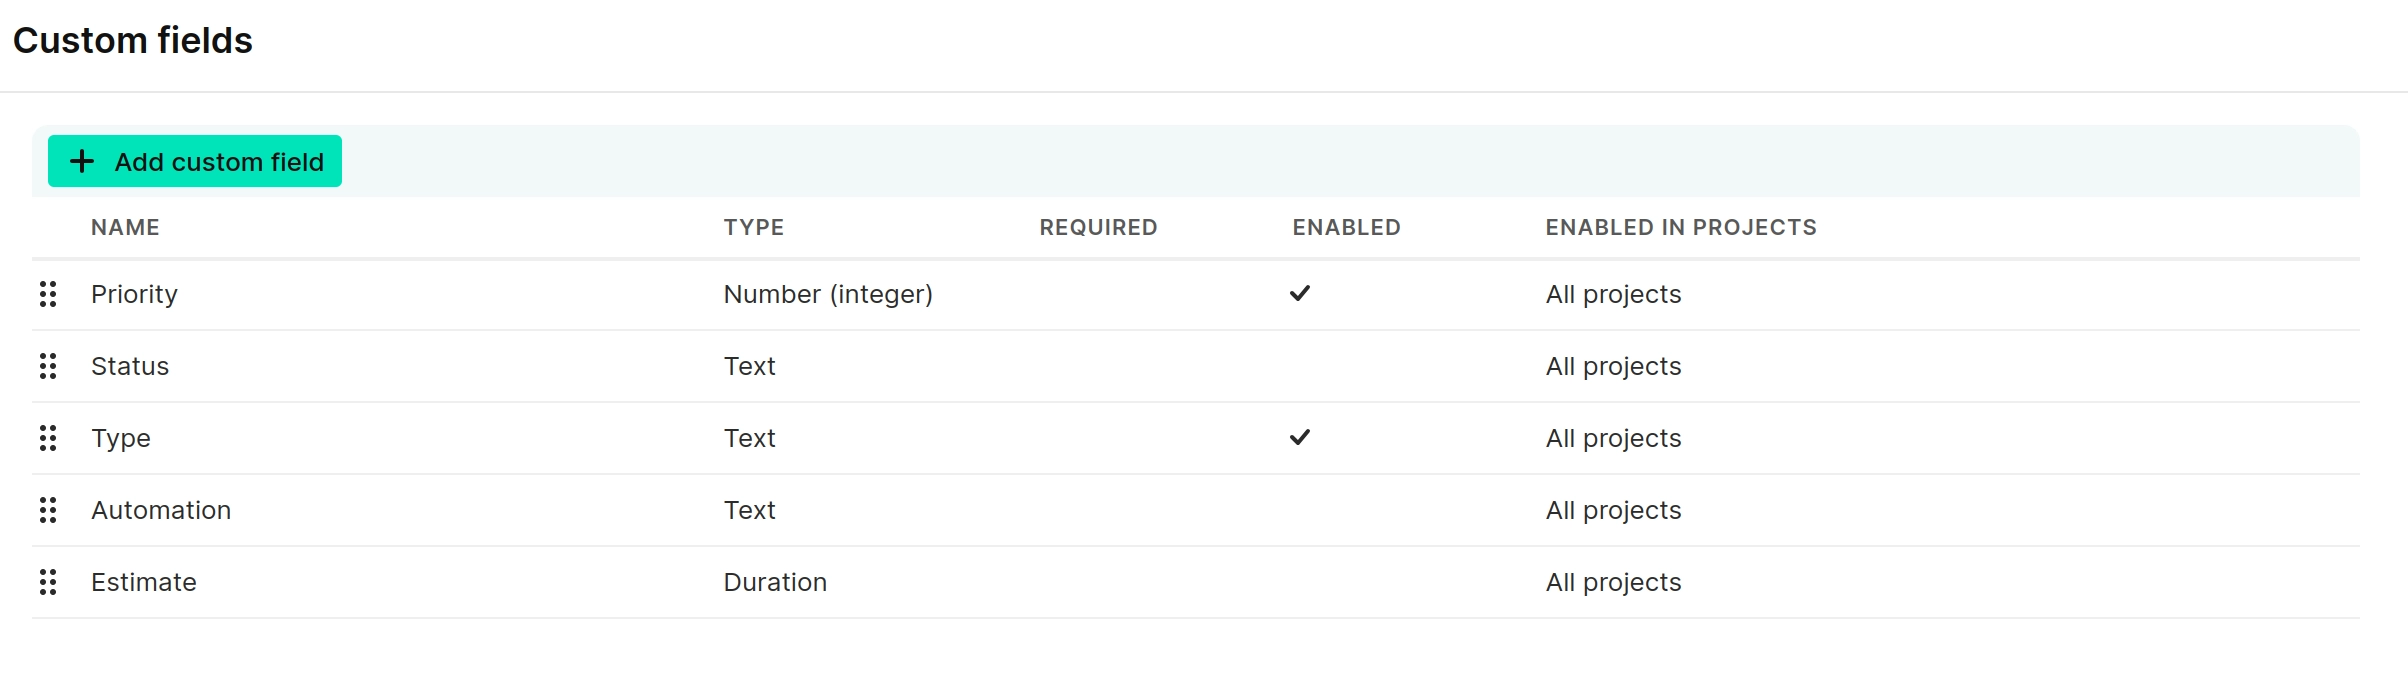
In the settings, select the item Custom fields from the sidebar and you’ll find a button to add a custom field and a list of predefined custom fields, as shown in the screenshot below.
 |
|---|
Custom fields allow you to extend test cases. You can define the data type (number, string, text, URL, duration, dropdown, multi-select...), provide default values or make it a required field.
Clicking on "Add custom field" opens a side panel to create a new field. You can define the name, type, make it a dropdown, make it required or provide a default value. If you switch to the "Projects" tab, you can define the scope of your field, i.e. in which projects the field should be active.
Find out more about custom fields.
Themes & Language
Testiny is designed to easily add multiple themes and languages. For now, we offer a light theme (default) and a dark theme
and support English and German as well as more than 10 AI-translated additional languages.
In the settings, select the item My Profile from the sidebar, and here you can set the theme and the language. These are personal settings, i.e. they only apply to you and are not organization-wide.
Find out more about profile settings.
Table Columns
Most tables in Testiny allow you to choose which columns to show or to hide. To configure the visible and hidden columns of a table, click on the ![]() in the upper right corner of the table. In this dialog, you can now check which columns you want to be shown. Unchecked columns are hidden, but can still be used to filter tables.
These settings are local, i.e. they apply only to you and not to the entire organization. This allows each user to display only the columns they want to see.
in the upper right corner of the table. In this dialog, you can now check which columns you want to be shown. Unchecked columns are hidden, but can still be used to filter tables.
These settings are local, i.e. they apply only to you and not to the entire organization. This allows each user to display only the columns they want to see.
See the following example of configuring the table of the test cases view:
Further topics
- Import test cases or migrate from TestRail
Easily import existing test cases from spreadsheets or migrate from other tools. - Integrations
See all the issue-tracking, automation and CI/CD tools Testiny integrates with. - Test Automation
Testiny integrates with any automation tool and your CI/CD pipeline. - Creating API keys
Learn how to create API keys to use the Testiny CLI or directly our REST API.
Share your thoughts
The Testiny team values feedback and we encourage you to share your thoughts and suggestions at any time. We strongly believe that continuous feedback is essential to improve Testiny and meet the evolving needs of our users. Whenever you have any questions, ideas, comments, but also complaints, just contact us by using Testiny’s built-in feedback system or create a topic in our forum.