Import & Export Test Cases
Importing Test Cases
Import test cases with our convenient in-app importer. Alternatively, you can import test cases via REST API but we recommend to use our in-app importer. If the importer is missing a feature that you'd need, please don't hesitate to contact us at [email protected].
In this section we will describe how to use the in-app importer.
With Testiny’s in-app importer it is very easy to import existing test cases from a CSV file or also migrate from other tools. If you want to migrate from TestRail you should see the TestRail migration guide.
Follow these steps to import test cases from a CSV file:
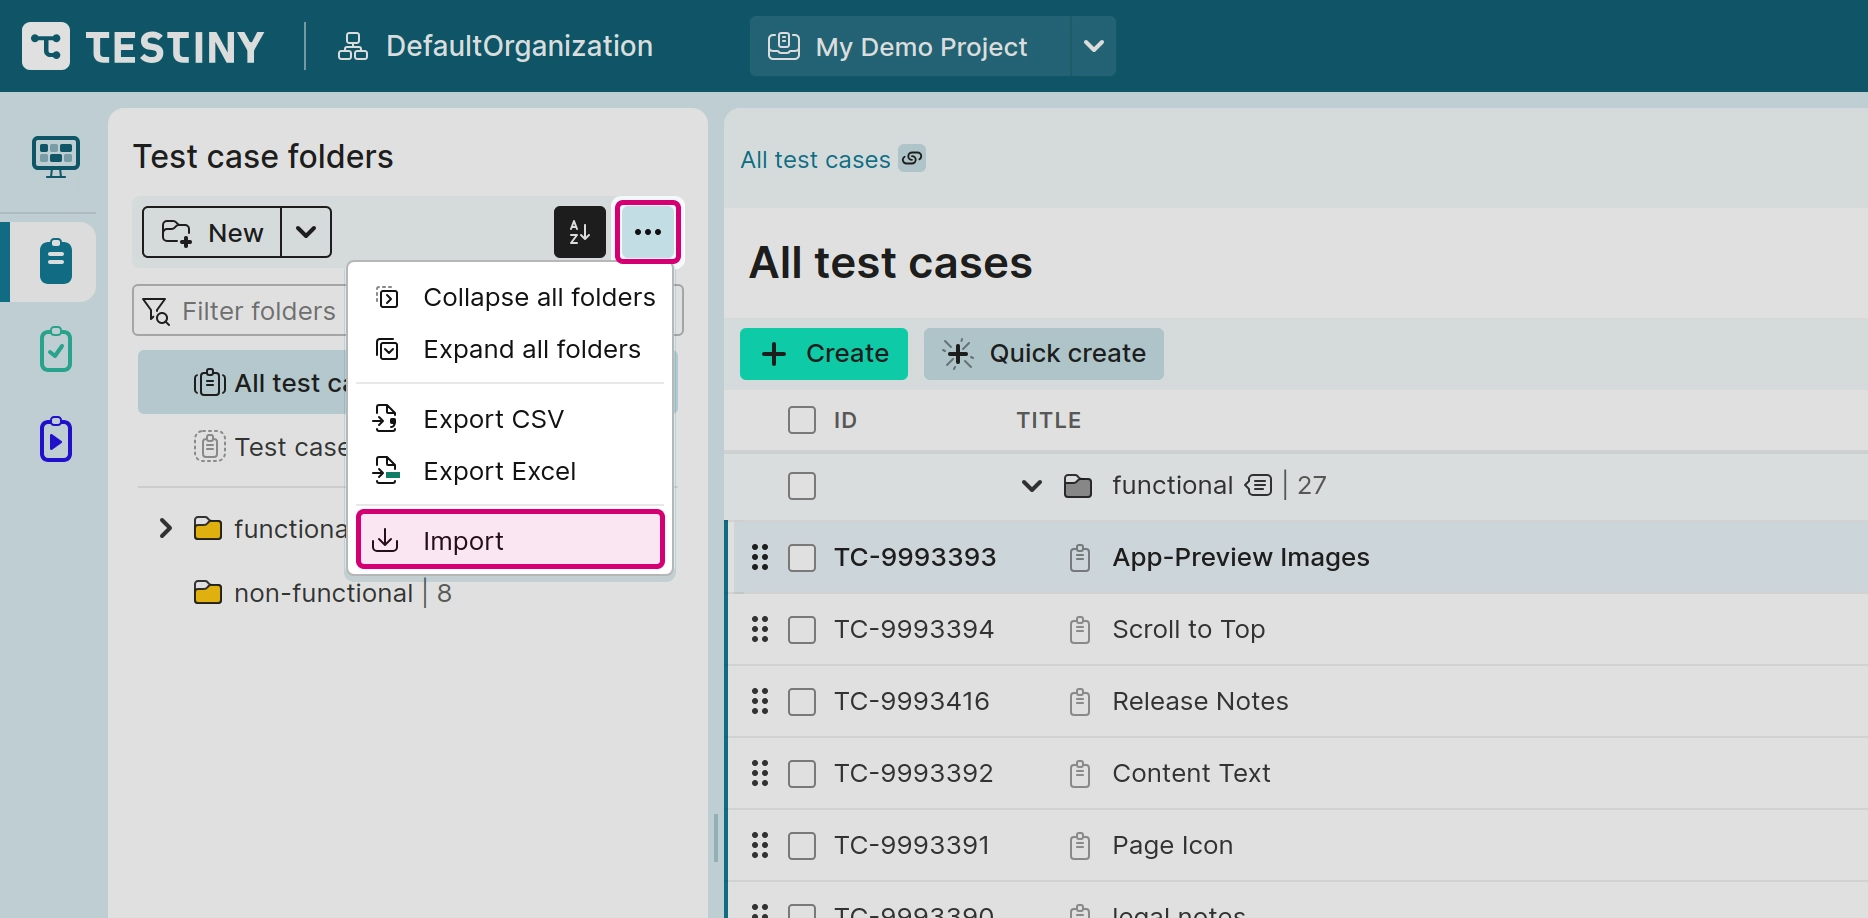
- Open the importer in the test cases view above the list of test case folders in the
 menu, as highlighted in the screenshot below.
-
Choose the option
CSV.
If you want to migrate from TestRail, see the detailed TestRail migration guide. If you want to import an Excel file, you first need to convert it to a CSV file (to do this, open the file in Excel and select File > Save as to save it as CSV file). -
To upload a CSV file, you can simply drag and drop the file or click "select a file" to open the file dialog.
-
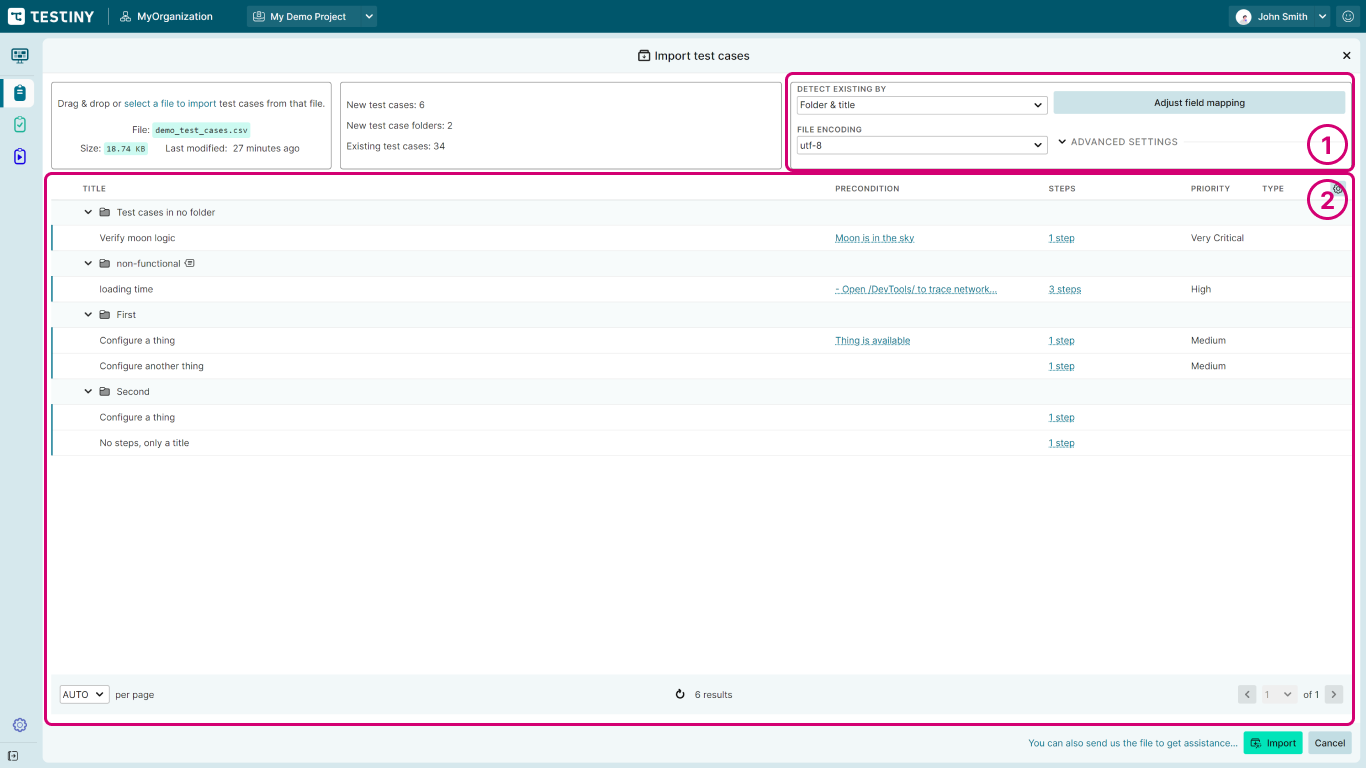
After selecting a file, Testiny tries to automatically detect all the settings as shown in (1) in the screenshot below, such as the file encoding or the field mappings. The field mappings show which fields from your file map to which fields in Testiny. All settings are explained in the following subsection. If the file was valid, you will see a preview of all the test cases that Testiny found in the file as shown in (2) in the screenshot below.
- If there are no validation errors and you are satisfied with the previewed test cases, click "Import" to upload all the test cases to your project. After successfully importing, Testiny shows a success message with the number of folders and test cases imported.
Or watch how to import test cases from CSV files:
Settings
As mentioned, Testiny tries to automatically detect all the settings but it may be necessary to adapt the settings for your specific import file format. The available settings for importing test cases are explained here:
Detect Existing By
By default, Testiny detects already existing/imported test cases by folder & title. This means that if a test case with the same title already exists in the same folder, it will not be imported. You can change this setting to only title to recognize already existing test cases, or to off to import all test cases.
File Encoding
If the autodetected encoding is incorrect (e.g. if there is no file encoding in the CSV file), please select the correct encoding from the dropdown.
Field mappings
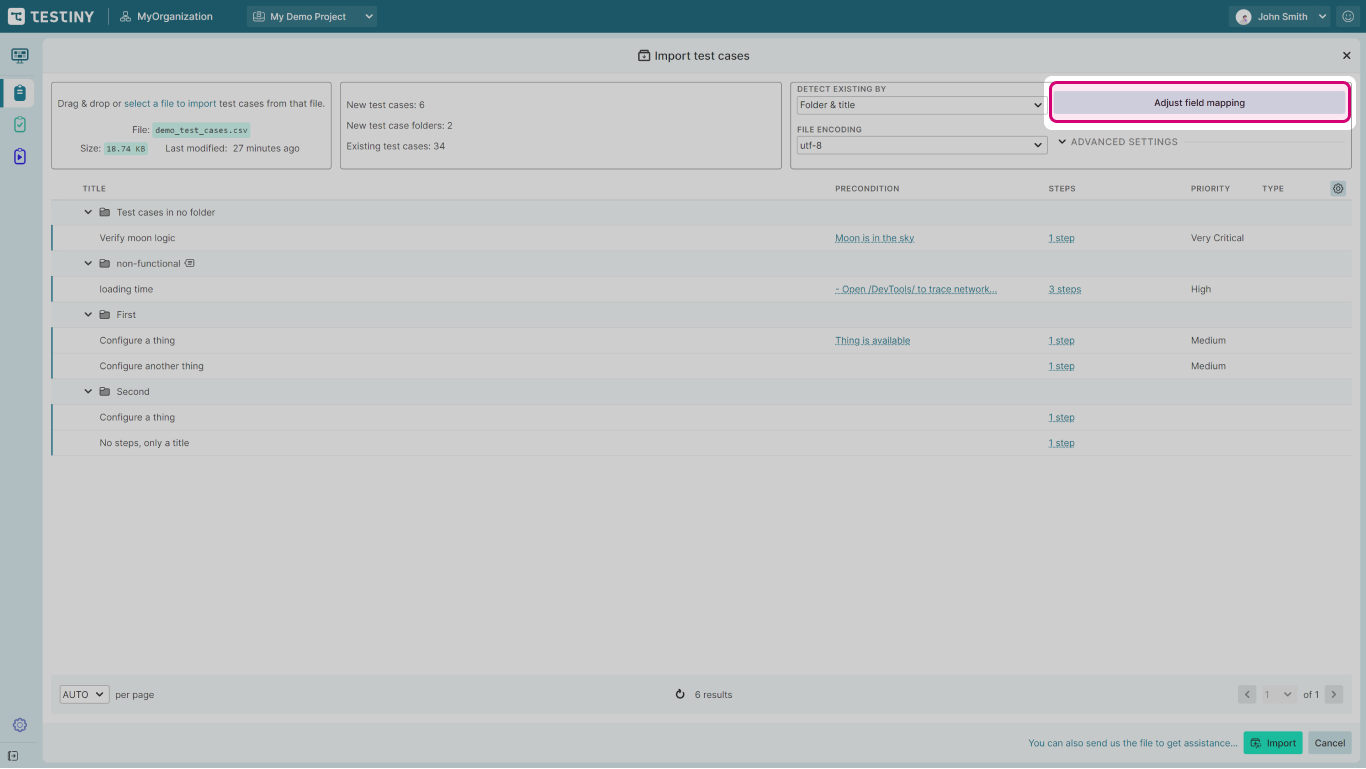
Testiny tries to automatically map the fields of your test cases in the CSV file to the fields in Testiny. If you are not satisfied with the automatically detected field mapping, you can adjust it:
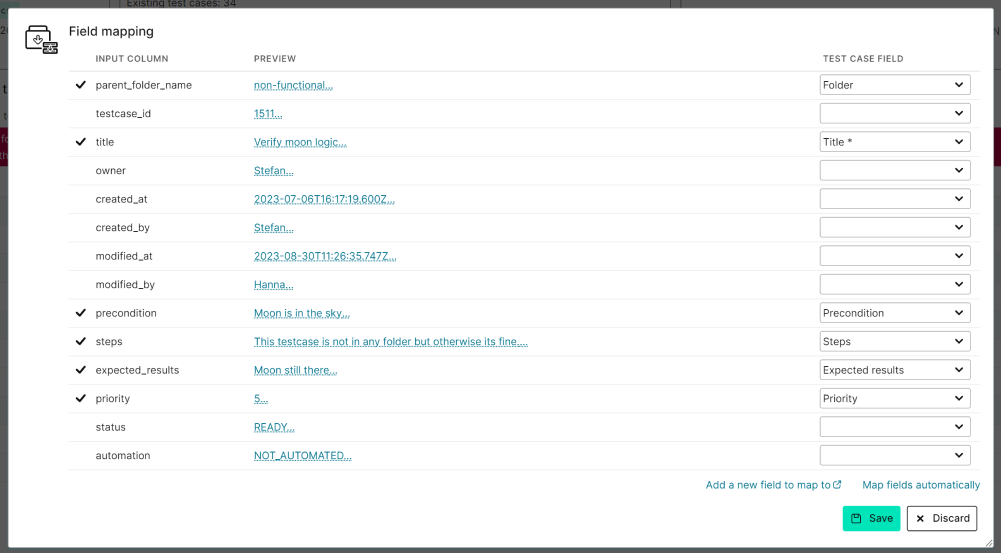
In the field mappings dialog, you can specify which column of your file maps to which test case field in Testiny.
In the screenshot below, there are three columns: the input column from your CSV file, the preview of the content and the test case field in testiny.
If a mapping is set, there is a check mark in front of the row. If no mapping is set, the cell in the "Test Case Field" column is empty.
In the example below, we can see that 6 columns from the imported file are mapped to fields in Testiny. The columns "status" and "automation" (the last two rows in the screenshot) are present in the CSV file, but Testiny could not find a matching field, so they are not mapped to any field and will not be imported. To solve this, either click on the dropdown to select the correct field manually, or create a custom field if the field does not yet exist in Testiny.
Requirements
You can also import Jira references. The Jira work items are automatically linked as requirements to the respective test cases during the import. To import Jira references, follow these steps:
- Select the Jira integration during the import.
- Map the column of your CSV file containing the Jira references to the Testiny field "Requirements".
The following formats of Jira work item keys can be imported:- a comma-separated list:
PG-92,PG-93 - JSON format (same format as Testiny exports linked work items):
[{"key":"IT-1"}, {"key":"IT-2"}]
- a comma-separated list:
- Confirm the mapping. In the preview of the test cases, the recognized Jira references are listed in the column "Requirements".
If no Jira references are shown, make sure that your Jira references are in a supported format and that the selected Jira integration has access to the referenced Jira projects.
Advanced Settings
- Import From — Specifies whether the file is a CSV file or a TestRail XML file.
- Steps Delimiter — Specify how the steps in your CSV file are formatted. All options are explained below, in the step import modes section.
- Enable nested folders — By default, Testiny allows nested folders, i.e. folders can have any number of (nested) subfolders.
- Folder Separator — If the auto-detected folder separator is wrong, you can uncheck this option and specify it manually. The separator is used to recognize the folder hierarchy, i.e. to enable importing nested folders.
- Convert Markdown — This option is checked by default. If your test case steps are written in markdown, Testiny will automatically convert them so that our rich text editor can display them correctly.
Importing folders and subfolders
If no folder column is available in the CSV file or this column is not mapped, all test cases are added to the root folder.
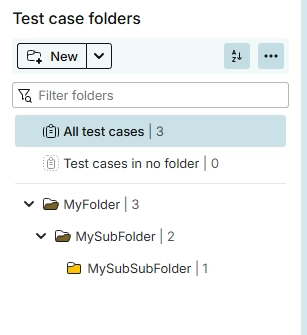
If you would like to import a folder structure, you have to specify the folder in your CSV file in a folder column:
folder                                        title
MyFolder,                                     Test Case 1
MyFolder > MySubFolder,                       Test Case 2
MyFolder > MySubFolder > MySubSubFolder,      Test Case 3
By default, the delimiter > is used to separate folders. This setting can be changed in the importer's advanced settings.
The importer then imports the nested folder structure:
Step import modes
Testiny supports writing tests in a steps-based manner using the Steps Template. It is also possible to import test cases written in steps directly from a .csv file, if the file is formatted for the respective import mode. Testiny already provides various formats, making it possible to easily migrate from many other tools. The importer provides the following step import modes:
All of the following examples would create a four-step test case titled "Login" in folder "Folder_1". We may use indentation to better illustrate the file contents. No indentation is used when downloading the sample files.
Off (off)
The step-based import is switched off; the text template is used and one test case per row is imported.
Rows with same folder & title are merged into steps (rows)
If the test case title and its folder are the same in two or more rows, Testiny treats it as a single test case, creating one step per row. Important: Ensure that the title and the folder columns are exactly the same for each test case.
Download and try the 'rows' sample file.
folder,    title,    precondition,    steps,               expected_result
Folder_1,  Login,     ,               Open Login page,     Login page loads
Folder_1,  Login,     ,               Enter Email,
Folder_1,  Login,     ,               Enter Password,
Folder_1,  Login,     ,               Click 'Login',       Successfully logged in
Empty title/folder rows are merged into steps of previous row (block)
Subsequent rows with empty folder and title columns are merged with the last previous row that contains a title.
Download and try the 'block' sample file.
folder,    title,    precondition,    steps,               expected_result
Folder_1,  Login      ,               Open Login page,     Login page loads
,          ,          ,               Enter Email,
,          ,          ,               Enter Password,
,          ,          ,               Click 'Login',       Successfully logged in
One step per line in 'Steps' column (newlines)
Use newline characters (\r\n) to separate steps in the steps column.
Download and try the 'newlines' sample file.
folder,    title,    precondition,    steps,               expected_result
Folder_1,  Login,     ,               "Open Login page
                                       Enter Email
                                       Enter Password
                                       Click 'Login'",    "Login page loads
Successfully logged in"
Please note: There are no ',' in the new lines; all steps are in one "cell"!
Steps are numbered in 'Steps' column (numbered)
Use '1.', '1)', '(1)', or '1.)' in front of the respective step.
Download and try the 'numbered' sample file.
folder,    title,    precondition,    steps,                                                                           expected_result
Folder_1,  Login,     ,               1.) Open Login page   (2) Enter Email   3) Enter Password   4. Click 'Login',    1. Login page loads (2) 3) 4.) Successfully logged in
Steps are numbered in brackets in 'Steps' column (numbered_bracket)
Use [1] in front of each step to number them.
Download and try the 'numbered_bracket' sample file.
folder,    title,    precondition,    steps,                                                                           expected_result
Folder_1,  Login,     ,               [1] Open Login page [2] Enter Email [3] Enter Password [4] Click 'Login',        [1] Login page loads [2] [3] [4] Successfully logged in
Steps are delimited by asterisks '*' at start of line in 'Steps' column (asterisk)
Use * in front of each step to separate them.
Download and try the 'asterisk' sample file.
folder,      title,     precondition,   steps,                                                                     expected_result
Folder_1,    Login,      ,              * Open Login page   * Enter Email   * Enter Password   * Click 'Login',    * Login page loads   *   *   * Successfully logged in
FAQ
I have test case fields that do not exist in Testiny.
If you have fields in your existing test cases that do not yet exist in Testiny, you first need to create custom fields for your Testiny organization. Once you have created the custom field in Testiny, you can import your tests successfully. If the name of the field in your importer file and the name of the custom field do not match, you might need to adjust the field mapping manually during the import. Please see the description of the adjust field mapping setting on this page.
I get an error that a field "does not allow the following value".
If you receive an error during import that says that a field does not allow the following value you might need to change the configuration of your custom fields in Testiny. You can also let Testiny add the missing values automatically by clicking the Fix automatically button.
In the screenshot below you can see an example of this error. In this case, the custom field Priority in Testiny does not allow the value 5 but some test cases in your test case file have a priority value 5.
To solve this problem, you would either need to change the custom field Priority and add value 5 to it (a click on the Fix automatically does that), or adapt your existing test cases to values that are allowed in your Testiny organization.
![]()
Migrating from TestRail
Testiny supports the migration from TestRail via its API or via TestRail XML files. See the TestRail migration guide for more information.
Migrating from other tools
Testiny supports importing test cases with CSV files with various formats. Export the test cases from your tool to a CSV file and you can easily import the file as described at the top of this article.
Importing my existing test cases does not work. What should I do?
If you encounter any problems while importing your existing test cases or migrating from another tool and this documentation could not help you, please do not hesitate to ask in the forum. Our support team is always available to assist you.Exporting Test Cases
Testiny also allows you to export all or just selected test cases. You can export tests to an Excel or CSV file. You can use these export files e.g. to import Testiny test cases into other tools or to archive them yourself as a local copy. You can also export test cases and all other entities in Testiny with our REST API.
-
Export all test cases
To export all test cases, go to the 'All test cases' folder and click the " Export Excel" or "
 Export CSV" buttons and a file download dialog will appear.
 -
Export selected test cases or folders
To export only selected tests, select the checkboxes of the individual test cases or select an entire folder. Then, click the " Export Excel" or " Export CSV" buttons. The downloaded file will contain only the previously selected tests.