Rich Text Editor
Our rich text editor is a "what you see is what you get" (WYSIWYG) editor and supports advanced formatting such as various text styles, tables, links, code blocks, support for images and screenshots, and more to provide the best possible experience when writing tests or commenting test results.
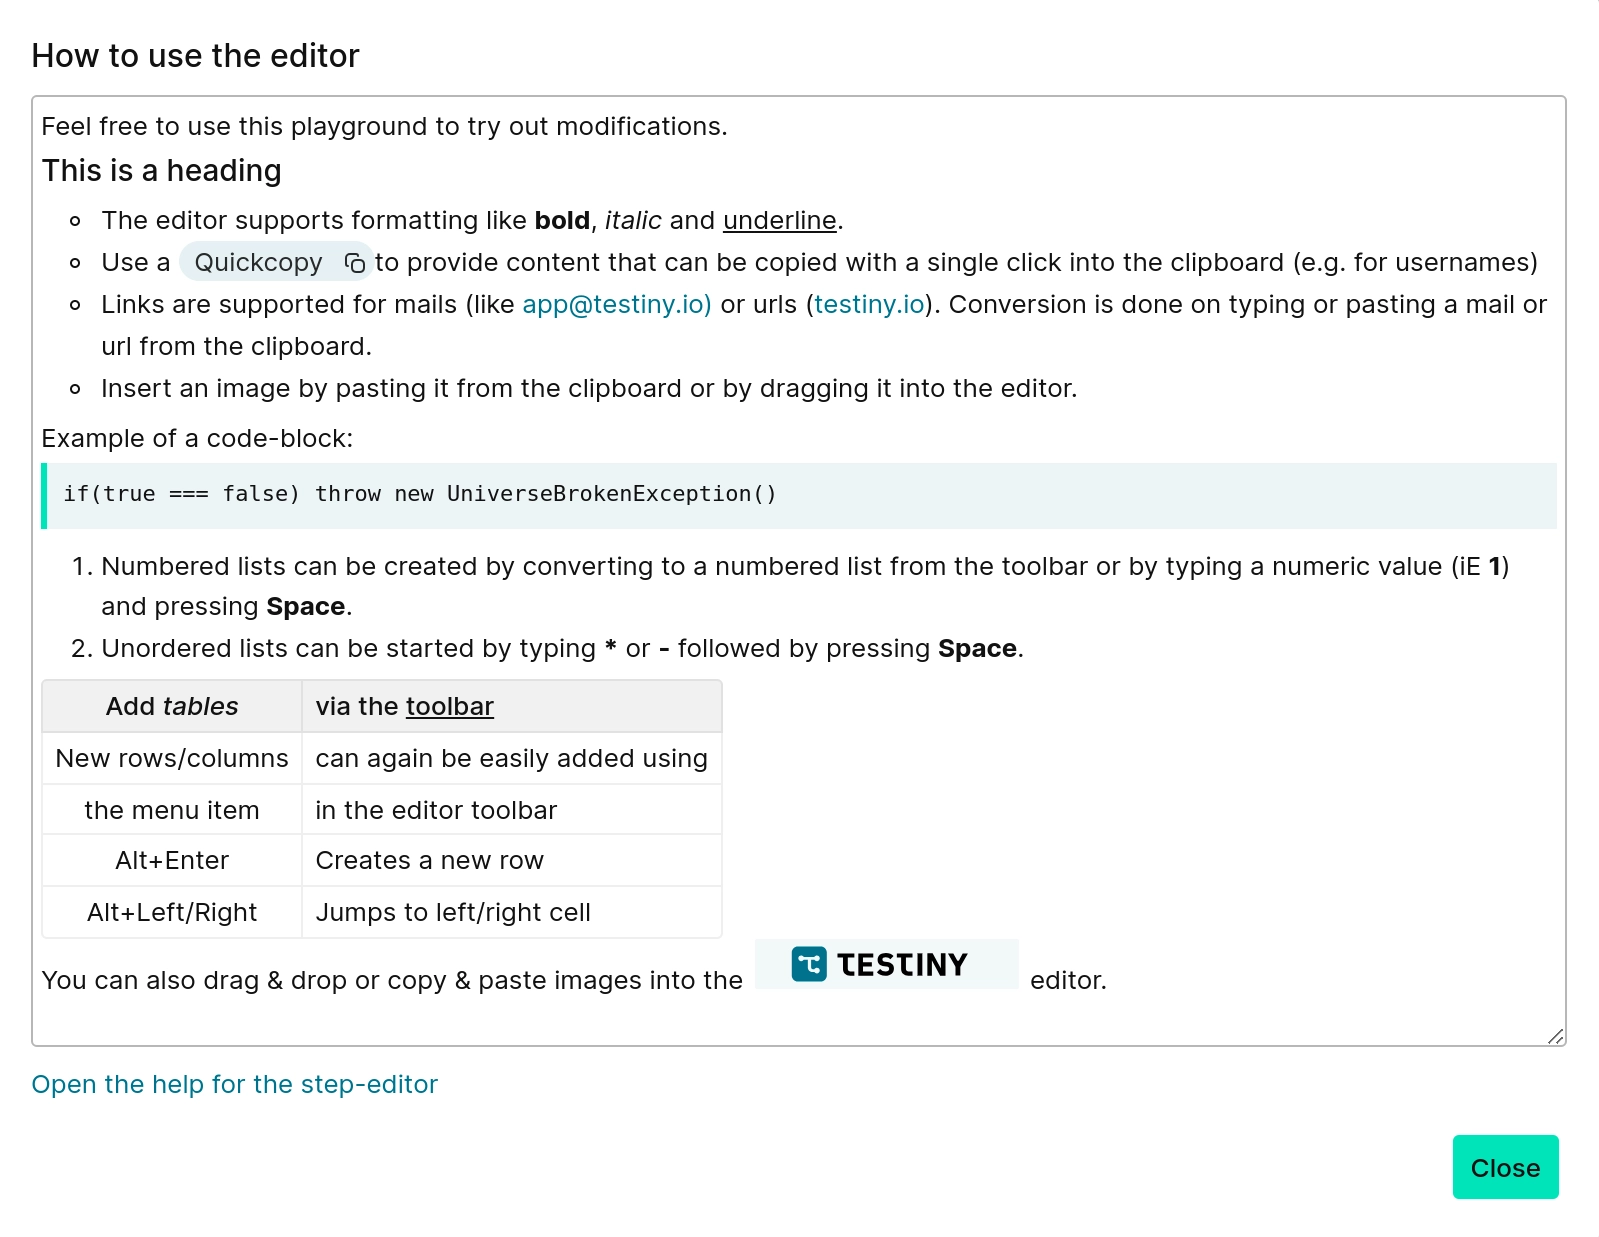
In the screenshot below, you can see the editor playground that you find in the app when clicking on the ![]() icon above rich text fields, e.g. precondition field or steps of test cases. This playground showcases all available editor features and you can try them out yourself.
icon above rich text fields, e.g. precondition field or steps of test cases. This playground showcases all available editor features and you can try them out yourself.
 |
|---|
In the following subsections, we’ll explain all features of the rich text editor in detail.
Text Formatting and Copyable Snippets
The editor supports basic formatting such as bold, italic and underline. Text can also be formatted as headings, paragraphs or code blocks.
The editor in Testiny provides convenient copyable snippets to quickly copy content with a single click to the clipboard. This is especially useful for data that needs to be copied and pasted during testing, such as user names or mails. To make text copyable, format it using the ![]() icon.
icon.
You can also use keyboard shortcuts to format text, see the list at the end of this article.
Numbered and Unordered Lists
Numbered lists can be created by converting to a numbered list using the ![]() icon from the toolbar or by typing a numeric value (for example,
icon from the toolbar or by typing a numeric value (for example, 1.) and pressing Space.
The list indent can be increased by Tab and decreased by Shift+Tab.
Links
Any text can be formatted as a link or you can add a link and define the label inside the dialog that opens when pressing the ![]() icon.
Hovering over the inserted link will display a preview of the URL and clicking on it will open the URL in a new tab.
To remove the link, simply select or place the cursor in the link text and click the
icon.
Hovering over the inserted link will display a preview of the URL and clicking on it will open the URL in a new tab.
To remove the link, simply select or place the cursor in the link text and click the ![]() icon.
icon.
Images and Screenshots
Insert an image by pasting it from the clipboard or by dragging and dropping it into the editor. When taking screenshots with popular tools like Snipping Tool on Windows or Screenshots on macOS, this feature makes it easy to insert screenshots.
You can also use the ![]() icon to open the file dialog and select an image to insert.
icon to open the file dialog and select an image to insert.
Tables
Insert a new table by using the ![]() icon from the toolbar. You can add or remove columns and rows can be easily added using the menu item in the editor toolbar. This menu also allows you to remove the table, align the contents of each column, and remove or add the header row.
The table also supports various keyboard shortcuts to make editing easier, see the complete list of shortcuts at the end of this article.
icon from the toolbar. You can add or remove columns and rows can be easily added using the menu item in the editor toolbar. This menu also allows you to remove the table, align the contents of each column, and remove or add the header row.
The table also supports various keyboard shortcuts to make editing easier, see the complete list of shortcuts at the end of this article.
Steps Template
When creating or editing a test case, you can choose between different templates. The Steps Template creates separate cells for each step of the test case with a field for describing the actions and a field for describing the expected results. The editor within the cells works like the simple rich text editor. Learn more about the Steps Template in this article or see the list of keyboard shortcuts at the end of this article.
Keyboard Shortcuts
| Action | Shortcut |
|---|---|
| Bold text | Ctrl + B |
| Italic text | Ctrl + I |
| Underlines text | Ctrl + U |
| Mark as copyable | Ctrl + E |
| Undo | Ctrl + Z |
| Redo | Ctrl + Y |
| Lists | |
| Increase/decrease indent | (Shift) + Tab |
| Tables | |
| Create a new row | Alt + Enter |
| Jump to left/right cell | Alt + Left/Right (Ctrl + Option + Left/Right for macOS) |
| Steps Template | |
| Add a new step below | Alt + Enter |
| Add a new step below (at the end of a cell) | Press 2x Enter |
| Add a new step below (at the end of all steps) | Press 2x Enter |
| Remove an empty step | Del or Backspace |
| Remove a step | Select the step and press Del |
| Navigate | Alt + Left/Right/Up/Down (Ctrl + Option + Left/Right/Up/Down for macOS) |
| Move to next cell | Tab |
| Move to previous cell | Shift + Tab |