Working with Test Runs
Test runs are the entity type in Testiny for executing manual tests and displaying the test results. A test run consists of test executions: every test case listed in the table is an execution of the test, which has a result and an assignee, who should perform the test. Test runs also sum up all the results and give an overview of the testing status and progress.
In this section, we showcase the user interface, explain how to create test runs, how to execute tests and close runs. Furthermore, we will explore how to create or link defects, the history to track all changes and how to generate reports or export runs.
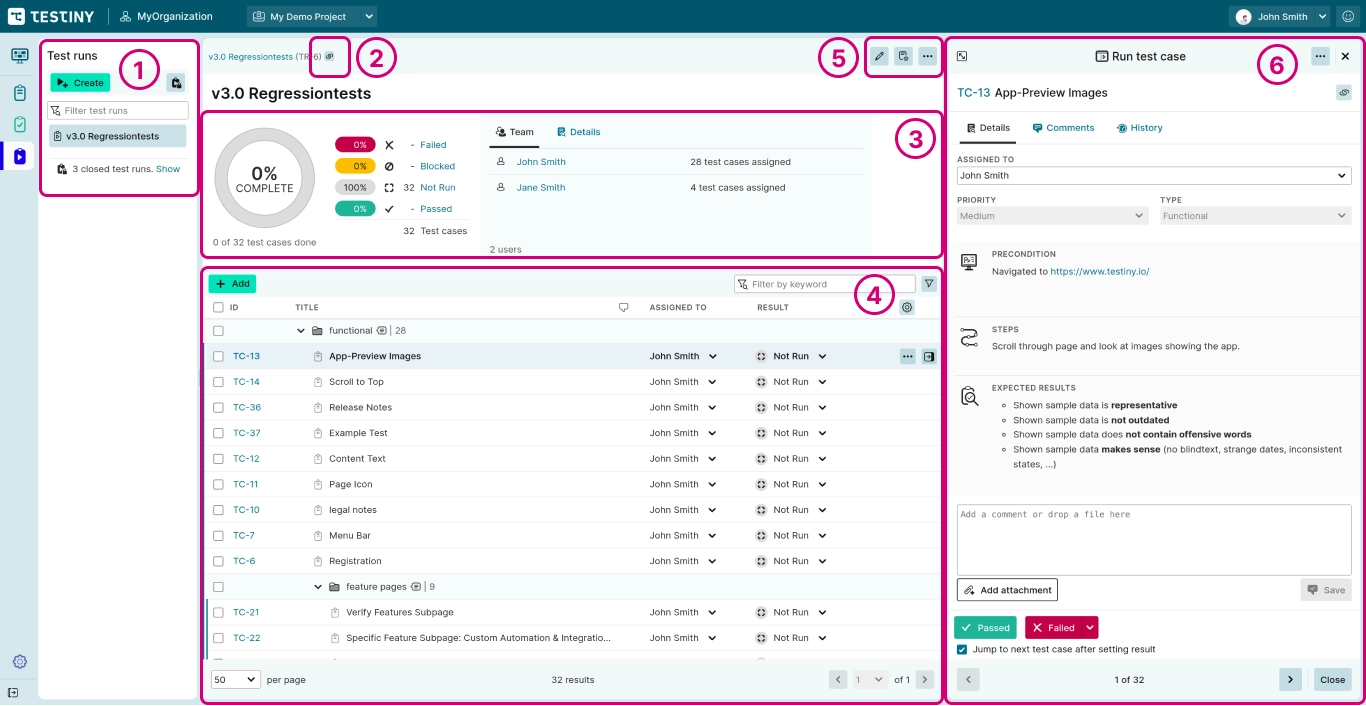
The most important elements in the screenshot above are:
- List of test runs
This lists all open test runs. To show also closed test runs, toggle the button in the upper right corner or click on "Show" below the list. You can also filter this list by a keyword.
You can create a new run by clicking the "Create" button in the upper left corner. - Copy link to test run to clipboard
- Progess overview, Team stats, Details, Defects
In this part, you see the overall progress of the test run and a summary of all test results. On the right you can find who is assigned how many test cases in the "Teams" tab. The Defects tab is only available if you have configured an issue tracker integration. And finally, the "Details" tab shows when the test run was created, by whom and to which test plan the run belongs.
In the result summary and the "Teams" tab, you can quickly set or remove filters. - Test executions table
This table shows all the test cases in the run, the assigned user and the test result. You can configure the visible columns of the table when clicking on the icon and — as in every table in Testiny — set filters.
 - Test run actions
In this area, you find all actions for a test run, e.g. closing a run, editing, generating a report, viewing the test run history, etc. - Runner view
This view opens, when selecting a test case in the test executions table or when clicking the button "Execute test run". In this panel, you can execute the test and set results.
Creating Test Runs
There are several ways to create test runs, depending on your workflow and needs. Create test runs from a test plan, directly from the test cases view or the test runs view. The following sections explain each method in detail.
Group related runs in Milestones to track progress and defects across test runs see the requirements covered by the milestone and the related runs.
From the Test Cases View
A test run can be created directly from the test cases list and will afterward be available in the test runs view. The Executing tests section describes how to create a test run this way.
Directly from the Test Runs View
You can also create and assemble a test run directly from the test runs view.
To do so, follow these steps:
- Click the
Createbutton above the list of test runs in the upper left corner - Enter a title for the test run and confirm by clicking
Create - Click the
Add to test runbutton to add test cases to the run and the "Add test case to test run" panel will open - Select the test cases you’d like to add to the run and confirm with the
AddorAdd & Nextbutton - The selected tests have been added to the test run
- [Optional] To add additional tests to the run, use the 'Add' button above the test executions table
Using Test Plans
A test run can be created using a test plan. The originating test plan is then displayed in the properties area of the run.
The advantage of creating test runs from test plans is that all runs created from the plan have a common ancestor and an execution analysis is available within the test plan.
More information is available in the test plan documentation.
Create a re-run from existing runs
Re-runs allow testers to quickly create a new test run based on the results of an existing one. Rather than manually selecting the test cases again, a follow-up run can be generated that automatically includes only the relevant test cases, such as those that failed or were blocked.
To create a re-run, open an existing test run and open the More... actions menu. Then select Create re-run. Define the test run name, the assignee (this can be the "current assignee", i.e. the same assignee as in this run, "not assigned" or a team member) and which test cases to include.
Click Create to create a new test run containing only the filtered test cases.
The new run has a clean execution state and the test cases are copied without results, comments, or defects, ready for retesting.
If the original run was linked to a test plan, the new run will be linked to the same test plan.
However, linked milestones are not copied, so you would need to add the new run to the respective milestone if required.
Adding or Removing Test Cases
You can add or remove test cases from an open test run at any time. If you’ve closed the test run, changes to the runs are not possible anymore, hence, adding or removing tests is also not possible. You can also add or remove test cases from a run that was created from a test plan.
To add an additional test case, click the "Add" button above the test executions table in the upper left corner. A side panel will open on the right sight, where you can see a list of all tests that are not in the run yet. Select the desired test cases and confirm by clicking on "Add".
To remove a test case from the run, open the menu by clicking the ![]() button of a test case (either in the test executions table or in the runner view) and select
button of a test case (either in the test executions table or in the runner view) and select Remove.
Executing Tests
This section explains how execute tests, set results (per step) and attaching result information. You can also watch a short video, or continue reading for more details:
To execute test cases, select an open test run from the test runs list and select the first (or any other) test case from the test execution table to open the runner, which is shown in the image below.
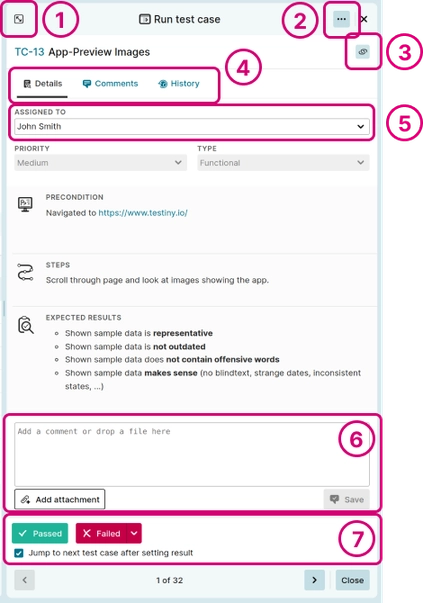
The most important elements of the runner shown above are:
- Maximize/Minimize
Maximize the runner view to focus just on the current test case. - Test case actions
(Edit the test case, remove the test case from the run, ...) - Copy link to test case in test run to clipboard
- Tabs (Details, Comments, Defects, History)
- Assignee
Shows the team member who is assigned to this test case and should execute it. - Comments & Attachments
Write a comment in this text field, or upload or drag & drop a file and attach it to the test execution. - Buttons to set result
Setting Results
To go through and execute all test cases, perform the following steps:
- Execute the actions described in the precondition and steps, and check if the expected results match the actual result.
- Set the test case result by pressing:
→Passed
→Failed
→Blocked(available as a dropdown value on the 'Failed' button)
→Skipped(available as a dropdown value on the 'Failed' button)- You can change the result multiple times. All changes will be tracked and recorded in the history.
- If 'Jump to next test case after setting result' is checked, the runner jumps to the next test case in the list.
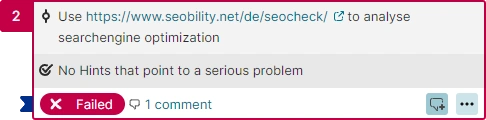
- You can also leave comments, or create or link a defect e.g. when a test failed.
- Move on with the next test case.
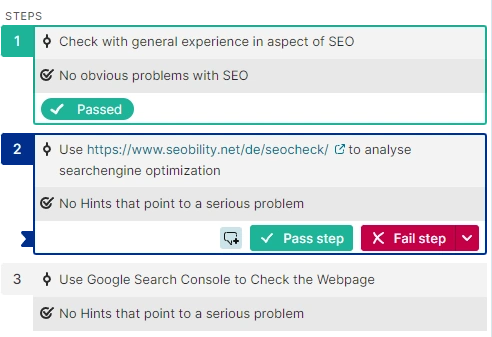
Marking steps with results
Click a test case step to select it as the active step. You can use this feature to maintain a better understanding of your current
progress during test case execution.
Each step can be given an individual result. Marking test steps with results is intended to provide a better documentation of execution details.
To only see test cases assigned to yourself and are not run yet, you can filter the test cases in the run.
Test Executions Table
You can also set results or change the test assignee directly in the table by opening the dropdown and selecting another value. These changes are of course also tracked in the history.
Re-ordering tests in the runner view is not possible. The order needs to be set in the test cases list and the runner derives the order from this list. How to re-order tests is described in the 'Organizing Test Cases' section.
Bulk Edit
You can set the assignee, reset results, set the results of multiple test executions, etc. at once using a bulk edit. To do so, follow these steps.:
- Select the checkboxes of the desired test cases → the 'Bulk edit bar' appears
- Select the desired action (e.g. 'Edit', 'Reset results', 'Remove')
- In case of
Edit, a panel will appear to set a result or an assignee to multiple tests. Confirm your changes withSave.
Comments
Testiny allows you to add comments and to attach files on test case executions as well as on test case steps.
For example, you can leave notes or upload a file if a test case or a step has failed, or if the test needs to be rewritten.
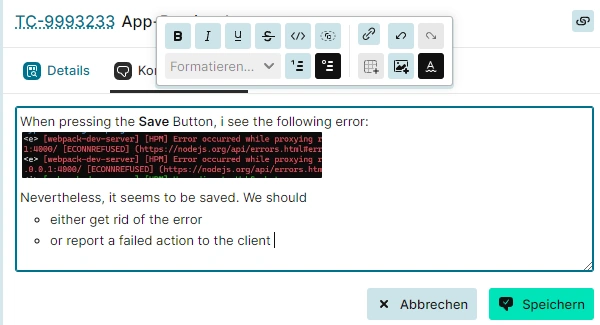
Comments support advanced formatting such as various text styles or inline images/screenshots:
You can submit the comment by pressing the "![]() Save" button.
Save" button.
All comments can be seen in the Comments tab.
You can add, remove, or edit your comments at any time, while the test run is open. Comments on closed test runs are sealed. You can only add new comments, but not edit comments that existed before the run was closed.
Comments on steps
You can add a comment to the active step.
Comments on steps can be viewed by clicking the comment counter in the footer of the step.
In the Comments tab, comments on steps allow direct navigation to the step.
Add Attachments to Test Executions
The comments section also allows uploading all types of artifacts to a test case execution.
Use the "![]() Add attachment" button below the comment field or simply drag and drop the file to the comment field to upload an attachment. The file will be uploaded and will be listed in the
Add attachment" button below the comment field or simply drag and drop the file to the comment field to upload an attachment. The file will be uploaded and will be listed in the Comments tab. Images are displayed inline, and other types of attachments can be viewed in the browser or downloaded.
You can add or remove your attachments at any time while the test run is open. Attachments in closed test runs are sealed, you can only add new attachments.
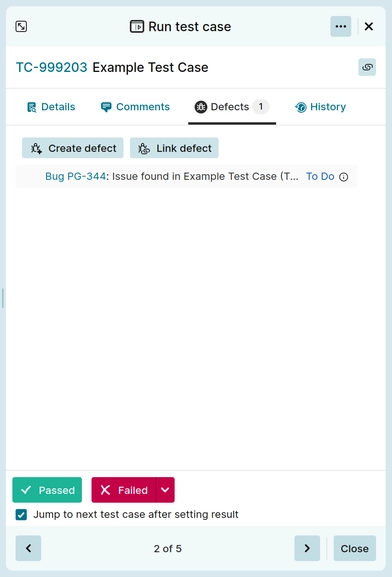
Creating or Linking Defects
If you have an issue tracking integration enabled in Testiny, the "Defects" tab, as shown in the screenshot below, will appear. There you can create a defect (e.g. a bug entry in Jira) directly while executing the test. You can also link existing defects (or another entity type) to the test run or result.
The available functionality, especially creating requirements or defects from Testiny depends on the respective integration. For the exact feature set, please refer to the respective integration documentation.
You can link defects to the following entities:
- Test runs
- Test results
To create a defect, use the "![]() Create defect" button.
A dialog will appear, where you can define and set the fields for the issue in your linked tool. Click
Create defect" button.
A dialog will appear, where you can define and set the fields for the issue in your linked tool. Click Create to confirm.
If pop-ups are allowed, the defect will be opened in a new browser tab; otherwise, a small window with the defect details and a link to the defect will appear.
To link an existing defect, use the "![]() Link defect" button. A small dialog will appear, where you can search for all issues in the linked defect tracking tool and link the issue with the test execution.
Link defect" button. A small dialog will appear, where you can search for all issues in the linked defect tracking tool and link the issue with the test execution.
The dialog for linking or creating requirements can look slightly different for each tool. For more details see the integration documentation for the specific tool.
The linked or newly created defect will immediately appear in the "Defects" tab. Clicking on the 'defect ID' will open the defect in a new tab. If the defect is deleted in the issue-tracking tool, it will still be listed in Testiny, but will be grayed out and has to be removed in Testiny as well. To remove a defect from a test case, open the menu of the respective defect by clicking the ![]() button that appears when hovering over the defect and selecting the option "Unlink defect".
button that appears when hovering over the defect and selecting the option "Unlink defect".
If you want to learn about configuring an integration, please refer to the integration documentation.
Closing Test Runs
To close a test run, click the Close test run button at the top of the test run view.
This button appears when a test result has been set. Otherwise, you can find the action 'Close test run' in the menu ![]() .
.
Closed test runs are sealed against any changes. If a test case is changed, or deleted, the test in the closed run is unaffected and shows the state of the test when the run was closed. You can also reopen a test run to apply any changes or adjust results.
When reopening a test run, all tests are automatically updated to their latest state. Deleted test cases will also be deleted from the run. So reopen test runs with caution!
History
All changes to a test run or test case execution are tracked and logged, so you’ll always know when a change was made and who made it.
Changes are only saved to history when you either e.g. set a result (passed/failed/...) or press Save. If you cancel an edit or discard changes, nothing is stored in the history.
The formatting of the history is identical throughout Testiny. More information is available in the History section.
Test Run History
To access the test run history, use the ![]() button in the test run view in the upper right corner and select 'Show history'.
button in the test run view in the upper right corner and select 'Show history'.
All changes applied to the test run will be shown in the appearing side panel. Changes on test executions (e.g. when a result was set or who set the result) are not shown here but are available in the respective test execution history.
Test Case Execution History
To view the history of a test case execution, click the respective test in the test executions table first to open the runner view and then navigate to the History tab.
All changes applied to the test execution will be shown in this tab, e.g. who set which result and when.
Creating Reports and Exporting Test Runs
Testiny supports the following report and export options — more information is available in the respective sections:
Grouping related runs in Milestones
Use Milestones to group related runs under a common goal, track progress across test runs and manage high-level deliverables, such as release versions or sprint cycles.
If you have an issue tracker set up for your project, you can also view created defects across all runs and the requirements covered by the milestone and the related runs.