Import & Export Test Runs
In this section, we explain how to import and export test runs.
Regarding test automation, please have a look at the Automation section, where we explain how to import automation results.
Importing Test Runs
Importing test runs is currently possible using the Testiny CLI Importer, available as an executable or as a NPM package, or using Testiny’s REST API directly. You can use the importer to import test runs and to close a test run via the CLI.
Download and get started with the CLI tool if you haven’t done so yet.
Please note: If you’d like to submit results from manual testing, the test results need to be available in CSV or JUnit format. If you’ve exported your test run as Excel, please convert it to CSV (use 'Save as' in Excel and select '.csv' as file format).
To import results from a .csv file into Testiny, the command will look similar to the following examples:
- Linux
- Windows
- macOS
./testiny-importer-linux testrun
testiny-importer-win.exe testrun
./testiny-importer-macos testrun
The Testiny importer will subsequently ask for:
- A valid API key
- The project to import the results to
- The file type (choose CSV)
- The filename
- If the CSV file is not in the same folder as the importer binary:
Paste the full file path, e.g.C:\Users\TestinyUser\Desktop\my_testrun_results.csv - If the CSV file is in the same folder as the importer binary:
You can also paste just the filename, e.g.my_testrun_results.csv
- If the CSV file is not in the same folder as the importer binary:
- If custom field values should be included (off/on)
- If you have nested folders in your tests (off/on)
- If you have nested folders, you can specify a folder separator. Default is '>'.
- The test run name. Default is
Import-%source-%date. - Confirm with (y/n)
A new test run will subsequently be created within the specified project in Testiny based on the results in the imported file.
Updating an Existing Run
Updating an existing test run with (new) results, e.g. from 'offline' testing done in Excel is also possible using the --update flag.
- Linux
- Windows
- macOS
./testiny-importer-linux testrun --update
testiny-importer-win.exe testrun --update
./testiny-importer-macos testrun --update
For further information please have a look at the Testiny CLI Importer reference.
Closing a Test Run
To close a test run, add the --close flag to the command when importing or updating a test run.
- Linux
- Windows
- macOS
./testiny-importer-linux testrun --close
testiny-importer-win.exe testrun --close
./testiny-importer-macos testrun --close
For further information please have a look at the Testiny CLI Importer reference.
Exporting Test Runs
In addition to the PDF report, it is also possible to export a test run to an Excel or a CSV file. You can use these exports e.g. for documentation purposes, but you can also export a test run to e.g. Excel, perform the test executions 'offline' using Excel, and then re-import the results and update the original run. You can also export test runs and all other entities in Testiny with our REST API.
Please note: Exporting a test run to a file always includes all custom fields.
To export a test run to either an Excel or CSV file, click on the ![]() button in the top right corner in a test run and select the respective option, as highlighted in the screenshot below.
button in the top right corner in a test run and select the respective option, as highlighted in the screenshot below.
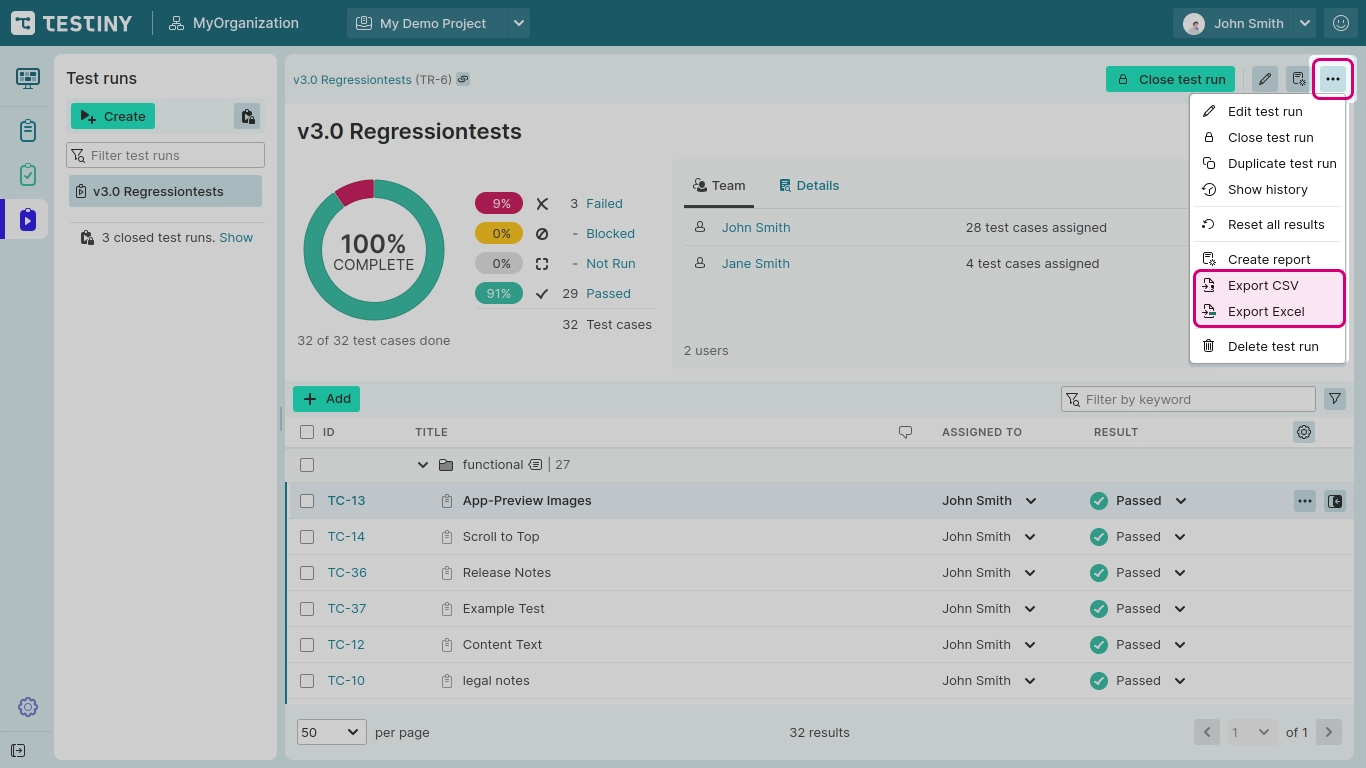
Export to Excel file
Select "![]() Export Excel" from the menu.
All data from the test run is stored in the Excel spreadsheet and you can archive the downloaded file or edit it using e.g. Excel, LibreOffice Calc, or another spreadsheet editor of your choice.
Export Excel" from the menu.
All data from the test run is stored in the Excel spreadsheet and you can archive the downloaded file or edit it using e.g. Excel, LibreOffice Calc, or another spreadsheet editor of your choice.
Please note: The file is stored compatible with Excel 2003 and above. If you’re using an older version, please upgrade Excel or use the CSV export instead.
Export to CSV file
Select "![]() Export CSV" from the menu.
All data from the test run is stored in the CSV file. You can archive the downloaded file or process it (e.g. using an editor of your choice, Excel, LibreOffice Calc, ...). CSV files are also perfect for processing and manipulating via code within your framework or tools.
Export CSV" from the menu.
All data from the test run is stored in the CSV file. You can archive the downloaded file or process it (e.g. using an editor of your choice, Excel, LibreOffice Calc, ...). CSV files are also perfect for processing and manipulating via code within your framework or tools.