Test Case Details
To open the test case details, either click on a test case in the table or use the ![]() button that appears when hovering over a test case in the table. The panel that opens on the right side will look similar to the following screenshot:
button that appears when hovering over a test case in the table. The panel that opens on the right side will look similar to the following screenshot:

The test case details view is separated into the following areas and tabs:
- Test case actions
- Copy link to test case to clipboard
- Tabs (Details, Attachments, Defects, Requirements, Runs, History)
Header & Test Case Actions
The header shows the test case title and its ID. The ID is automatically assigned by Testiny and is incremented with each new test case.
It is not possible to change or set the test case ID manually.
Test Case Actions
- Maximize view
Click the button in the upper left corner.
 - Open the menu via
 :
:
- Duplicate
Creates a copy of the test case. '- Copy' will be appended to the test case title. - Delete Deletes the test case.
- Duplicate
- Copy Link
All test cases in Testiny are directly reachable via a unique URL. Use the 'Copy link to clipboard' button to get this URL.
Deleted test cases in Testiny are moved to an invisible recycle bin. If you’ve deleted a test case by mistake, reach out to us to undelete it. A recycle bin will be available soon.
Details and Custom Fields
The details section shows the test case owner, the test case template, and all configured custom fields.
- Owner
By default the owner is the user who created and is responsible for this test case. If a user is deactivated or removed from the organization, the user will still be the owner of the test case. - Template
Changing the template will change the test case steps area. Currently, Testiny offers two templates: 'Text' and 'Steps'. The 'Text' template contains two rich-text fields for steps and expected results and gives the most freedom. The 'Steps' template provides numbered steps out-of-the-box and provides a great structure for writing test cases. - Custom Fields
Testiny has some preconfigured fields like 'Priority' and 'Type'. However, these custom fields are configurable per project. You can edit existing fields or create new ones.
All required fields are marked with an asterisk (*).
'Save' or 'Create' buttons will only be enabled if all required fields are filled in.
Precondition
The precondition field is a multiline text field and is available in all test case templates. It supports full rich text editing (e.g. lists, code areas, bold/italic fonts, ...). Editing is enabled by double-clicking the precondition or by clicking the "Add" link.
It is intended to be used for environment definitions needed to execute the test case.
Test Case Steps
The test case steps area provides the steps needed to execute the test case. The representation of this area is defined by the selected template. Editing is enabled by double-clicking the text fields or by clicking the "Add" link.
See the Test case templates section for more information.
Attachments
Upload files or images to attach them to your test case. This is useful for additional test data that does not fit into the test case steps. These attachments are also shown during the test run when executing tests.
Defects & Requirements
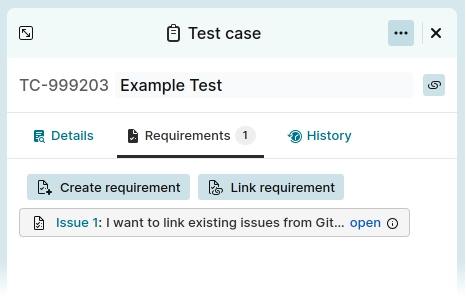
If you’ve configured an issue tracker integration (like Jira cloud, GitHub, etc) the "Requirements" tab, as shown in the screenshot below, will appear. The "Defects" tab only appears if a defect was linked to the test case during a test run.
The available functionality, especially creating requirements or defects from Testiny depends on the respective integration. For the exact feature set, please refer to the respective integration documentation.
Requirements
If you’ve configured an integration for requirements tracking, it’s possible to link existing requirements with a test case in Testiny or directly create a requirement in the other tool. To create or link a requirement, go to the Requirements tab in the test case details view. There you will see two buttons and, if there are already requirements linked to this test case, a list of requirements as shown in the screenshot below.
To create a requirement, use the "![]() Create requirement" button.
A dialog will appear, where you can define and set the fields for the issue in your linked tool. Click
Create requirement" button.
A dialog will appear, where you can define and set the fields for the issue in your linked tool. Click Create to confirm.
If pop-ups are allowed, the requirement will be opened in a new browser tab. Otherwise, a small window with the requirement details and a link to the requirement will appear.
To link an existing requirement, use the "![]() Link requirement" button. A dialog will appear, where you can search for all issues in the linked requirement tracking tool and link the issue with the test case.
Link requirement" button. A dialog will appear, where you can search for all issues in the linked requirement tracking tool and link the issue with the test case.
The dialog for linking or creating requirements can look slightly different for each tool. For more details see the integration documentation for the specific tool.
The linked or newly created requirement will immediately appear in the "Requirements" tab. If the requirement is deleted in the issue-tracking tool, it will still be listed in Testiny, but will be grayed out and has to be removed in Testiny as well. To remove a requirement from a test case, open the menu of the respective requirement by clicking the ![]() button that appears when hovering over the requirement and selecting the option "Unlink requirement".
button that appears when hovering over the requirement and selecting the option "Unlink requirement".
See how to link requirements to test cases, access requirements during test execution and track requirement coverage in Milestones:
Defects
If you’ve configured an integration for defects, you can link test case executions or a test run to a defect in the tool of your choice.
Creating or linking defects has to be done on test executions within test runs. See the test runs section for more details.
The "Defects" tab in the test cases details view only appears if a defect was already linked to the test case. This gives you an overview of all defects that have ever been linked to a test case.
Runs
When the test case has been executed in multiple test runs, the 'Runs' tab provides insights into the results of the latest executions.
History
To access the history view of a test case, go to the 'History' tab in the details view. This tab shows the history of all changes made to the test case. All changes to test cases in Testiny are tracked and logged, so you’ll always know when a change was made and who made it. Changes are only saved to history when you press "Save"; if you cancel an edit or discard changes, nothing is saved in the history.
The formatting of the history is identical throughout Testiny. More information is available in the History section.